Science & Sfumato – Technical Analysis to Aid Art Historians

This post is part of a larger on-line symposium to honor the late Hasan Niyazi, the self-taught art historian behind Three Pipe Problem. Hasan championed art history, critical analysis, valuable online discourse, and all things Raphael! As part of this April 6th celebration (Raphael’s birthday), you can read all of the posts here. He is missed by all those who knew him personally or through his active engagement with readers online.

The Mona Lisa’s mysterious sfumato being quantified. (Image from [1])
I always appreciated that Hasan advocated for scientific research and technical analysis as a complimentary approach to historical research and stylistic connoisseurship. Art is fundamentally material science even if the end result can be ascribed beauty or emotional intensity. Thus it makes sense to use analytical techniques to understand how a piece of art was constructed in order to understand to creative process and the end product.
Given the numerous Three Pipe Problem posts on Leonardo da Vinci and the continuing struggle to attribute two recent works – Salvator Mundi and La Bella Principessa, I thought it would be useful to return to this enigmatic artist. Da Vinci’s experimentation with material and techniques is anecdotally well-known. But really what do we know about his luminous sfumato faces? One recent study confirmed the nearly impossible.
Art History Question

Detail of Mary from Leonardo da Vinci’s “The Virgin of the Rocks”, National Gallery, London (Photo)
Sfumato, which come from the Italian word for smoke, is the effect of creating transitions from light to dark without any discernible lines. An invention of the Renaissance, it is a technique most closely associated with its champion Leonardo da Vinci. While the soft, naturalistic result is breathtaking, true sfumato is very difficult to produce. Egg tempera paints of the Italian Gothic period made it nearly impossible to achieve this effect, whereas oil paints introduced to Italy widely in the 15th century, were more suited for this method. Da Vinci is believed to have used washes of oil-based tints to slowly build and mold the sfumato volumes.
Unfortunately there has been very little that art historians can do to verify that this was the process used by da Vinci. In the last 30 years or so, art conservators have commonly removed small bores, or cross-sections, from a painting which show like tree rings the layers of paint on top of each other. This analysis uses high magnification and the identification of visible pigment crystals to attribute layers. This method would not be appropriate for the type of low pigment washes da Vinci used. More importantly, no one would ever let a bore of pigment be removed from the face of a da Vinci figure!
Here’s where recent analytical science provides an answer: a non-destructive, highly sensitive method for identifying and quantifying pigment and binder (i.e. the oil holding everything together) layers.
The Analytical Method
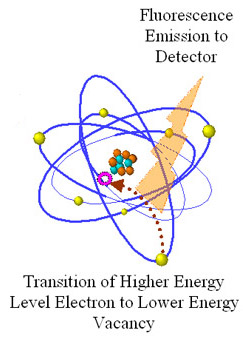
Basic diagram showing the atomic fundamentals of XRF Spectroscopy (adapted from Detora Analytical)
X-Ray Fluorescence Spectroscopy (XRF) is a well-established analytical method which uses the intrinsic and unique atomic properties of many element to identify materials. Think back to the 1950’s atom model of a central nuclei with an electron spinning around it on an elliptical orbit. In XRF, the energy of an x-ray is used to remove an electron in an elliptical orbit near the nuclei. Electrons wants to be as close to the nuclei as possible, so another electron in an outer elliptical “falls” back down to take its place near the core. During this fall, the electron gives off an amount of energy proportional to the drop. The energy released is based on the respective energy levels of the two ellipticals and is so unique that we can identify most element in the periodic table by that signature energy difference.
One of the greatest advantages of XRF is that since it used x-rays, it is not destructive to paintings, ceramics, and a whole range of materials. Advances in x-ray generation and engineering mean that XRF can be applied to a single point in space whether on the surface of or inside materials. Scientists can probe down through paint layers with a fine degree of resolution.
XRF at the Lourve

(left) XRF equipment and (right) experimental set-up for analysis of “Saint Anne, the Virgin and the Child”. Photo from [1]-Supplemental Information
In 2010, a team from the French Art Research and Conservation Center (Centre de Recherche et la Restauration des Musees de France) working at the Louvre were joined by a scientist from the European Synchrotron Radiation Lab (i.e. the x-ray experts) to perform the first XRF analysis of Leonardo da Vinci’s priceless sfumato faces. This was an incredible undertaking as this type of analysis had never been performed before. Their results were published in a prestigious, general interest, international chemistry journal.[1]
The researchers wanted to understand how da Vinci created the sfumato effect of flesh. So they selected a line of several centimeters that moved from light to dark along a figure’s face and tracked how the pigment and layers changed over this 2D line. The Louvre has an impressive 7 paintings by da Vinci which span his entire career which provided information about da Vinci’s general painting style and he adjusted his techniques over his career.
How Thick Are the Paint Layers?

Figure 2 from [1]. Virtual cross-sections of the paint surface obtained from a 25-45mm 2D line across da Vinci faces in the Louvre collection. (L-R, T-B) Bacchus, Saint John the Baptist, Virgin, and Child. With the baseline representing the painting support, the thickness of the priming layer is the Pink square. The thickness of the glaze layers on top of the primer is shown in Red, and the final varnish layer thickness is the Orange squares. The data are shown as cumulative thickness measurements across the painting surface, so these graphs represents the entire painted thickness.
The figure above summarized the study findings. Along the bottom axis is the position along the figure’s face and the vertical axis is the total paint thickness. You can see the thickness of the base white-pink flesh layer by the pink line. The thickness of the darkening glazes is then on top of that following the red line. Then finally the varnish layer is shown in orange. (The authors also admit that the varnish may be a later addition.)
As you would expect for such a subtle effect, the glaze layers are tiny and build up linearly. Glaze layers of 2-5um, or only 0.002 – 0.005mm, in thickness were discovered.
It is particularly startling how thin the paint on Saint John the Baptist is applied overall. For this painting, the combination of primer layer and glazes is never more than 50um thick on the face! For comparison, that is approximately the thickness of a human hair.
What Constitutes the Glaze Layers?

Raw pigments and paint making display at the Rembrandt House, Amsterdam (Photo: Kotomi, flickr)
Prevailing historical knowledge and visual analysis tells us that these sfumato glaze layers were thin. But what does that mean quantitatively?
The authors were able to analyze the pigment content in the glaze layers and found that they were only 8% pigment.[1] The pigment minerals themselves were standard for the time so da Vinci was not playing with the chemistry at least. Walter et al. do point out that it is possible that carbon black was also added to the glaze but that it cannot be detected by XRF. Even so, 8-15% of pigment is not a significant amount. I have no concept of how opaque this concentration would be, but it does not seem like much. You can imagine the need for layer after layer of this dilute paint to achieve a perfectly shaded face.
What Does This Tell Us About da Vinci’s Style Over Time?
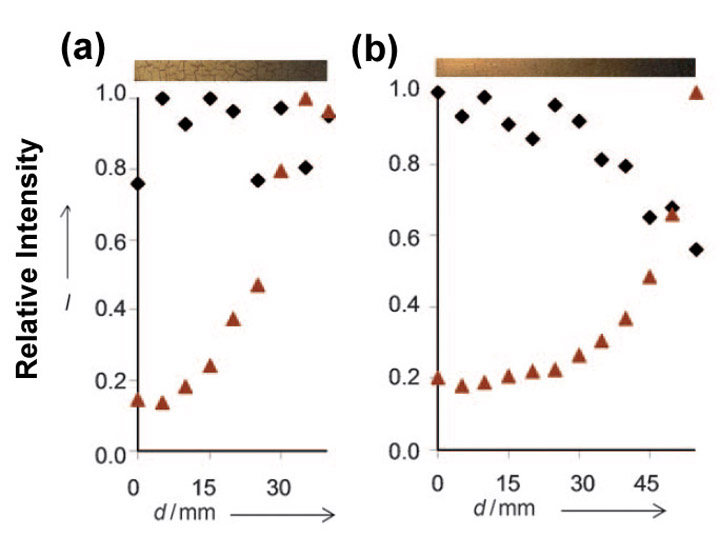
Adapted from Figure 1 in [1]. Relative intensity of (black diamonds) white-pink pigment and (brown triangles) darkening glazes as observed across ~20mm of face in (a) La Belle Ferronniere and (b) Mona Lisa. The surface of the face sampled is shown above each graph.
One of the more interesting findings in this paper is the change in da Vinci’s approach to sfumato over time. The Louvre team found that La Belle Ferronnière (painted around 1490-1495) had a consistent under-painting of white and pink pigments. The thickness of this layer was even across her entire face. The thickness of the darker glaze was increased to give the desired shading.
However, the Mona Lisa, painted sometime between 1503-1517, is constructed slightly differently. The white-pink under-painting layer is thinner in the shaded areas. So not only do the glazes slowly taper to build up the darker areas, the light color underneath slowly tapers away. The result is a proudly sublime sfumato effect.
Conclusions

Eyes of St. Anne from “Virgin and Child with St. Anne” after cleaning (Photo: ArtWatchUK)
Studies like this one performed by the Centre de Recherche et la Restauration des Musees de France are phenomenally valuable and informative. Science can validate prevailing theories about an artist’s style and give us knew insights such as paint thickness and composition that cannot be found exactly in the historical record.
This type of analysis can best be leveraged when performed with art historians. With a keen understanding of prevailing controversy and unknowns, art historians can provide not only the questions to trigger scientific studies but also interpretation. Scientific understanding must eventually be translated to the practice of executing a painting.
Ultimately scientific analysis lends itself to a new kind of connoisseurship as Hasan forsaw. Even perfect imitations of an artist’s style that can convince the greatest connoisseur, can be discredited with more fundamental scientific information about the execution of the piece. For example, it would be difficult to refuse something that looked like a da Vinci but was also painted to the thickness of only a human hair like the other paintings explored in this article. With both scholarly and scientific information, great new research and understanding is possible.


So glad you participated in this link-up and that you wrote about this. Hasan would have enjoyed this since, as you said, he had such an appreciation for scientific analyses and also enjoyed discussing attribution.
And that detail from The Virgin of the Rocks is stunning.
LikeLike
This is such an appropriate post to write in Hasan’s memory! He would have loved this exploration of Renaissance art from such a scientific perspective. I’m so glad that you tackled this topic. Thank you!
I wonder if future analyses will reveal any more about Leonardo’s “sfumato” technique. It’s interesting that his earlier painting “La Belle Ferronnière” has consistent underpainting, as you mentioned, especially in contrast to the Mona Lisa. Perhaps future analyses will help us to determine if this change is a result of Leonardo’s overall style and technique. I wonder if patrons might have expressed an interest in (or perhaps expressly stipulated in a contract?) how much “sfumato” was used, which could account for the differences in underpainting.
LikeLike
Truely a fresh insight into Leonardo’s Sfumato. I have a question – if the pink underlayer is thinner in the shaded areas of the Mona Lisa – what colour was the painting support (wood, I assume) that would be providing an ‘off white’ tinge to some primer layer areas? Was it beige or darker brown?
LikeLike