


In this tutorial, we’ll draw an angelfish—a small freshwater fish with a round body and elongated fins of a complex angular shape. This contrast makes an angelfish a truly creative discovery for an artist!
Angelfish are one of the most commonly kept aquarium fish; they are noteworthy for their beautiful stripy coloring. So we'll also practice creating a pattern on a three-dimensional object (in our case, a fish).
For this angel fish drawing project, we’ll use just a couple of graphite pencils. A fish is a wonderful subject from the drawing standpoint; it's a relatively easy yet fascinating thing to depict.
You may also be interested in these great articles:


What You Will Need to Draw a Tropical Fish
To complete this tropical fish drawing project, you'll need the following equipment:
- an HB graphite pencil
- a 3B graphite pencil
- an eraser
- a sheet of drawing paper


How to Draw a Tropical Fish Step by Step
Step 1
Let's start this tropical fish drawing tutorial. With the HB pencil, I draw the rounded shape of the fish’s body.
A flat, round body lets an angelfish glide through the dense underwater plants. Knowing such nuances always helps you to create a credible drawing, so some quick research is beneficial.


Step 2
I add the shape of the head; it almost overlaps the bigger body shape, leaving just a tiny narrowed area on the left side.


I also draw the round eye with the pupil.


Step 3
I add the rough shape of the tail fin; it is forked with two pointed ends. Then I join the shapes of the body and the tail fin.


Step 4
The front dorsal fin of an angelfish has a complex shape. Let’s construct it in several steps.
I draw the first segment of the fin; its form is similar to a triangle with a curved side.


I add the second segment; it is longer than the previous one and bends towards the tail.


I draw the last segment with an S-shaped contour line in the fish pencil drawing.


Step 5
I add the long, pointed ventral fins to the underside of the fish’s body.


Step 6
I draw the anal fin, adding it to the lower part of the fish’s body.
The process is similar to designing the dorsal fin, but in this case without the smaller segment.


Step 7
I refine the mouth of the fish, drawing stylized "lips".


I also add the gill covers with a set of curved, organic lines in the fish pencil drawing.


Step 8
The realistic beautiful fish drawing is coming along. Next up, I add the small pectoral fin to the side of the fish.
Then I refine the contours of the body, making them smoother and more streamlined.


Step 9
It’s time to add the details to the fins to get a beautiful fish drawing. I start with the dorsal fin, filling its shape with a pattern of paired lines that imitate spikes.
Don’t forget to create a jagged top contour of the fin, joining the spikes with the curved lines.


Step 10
I add the details to the tail fin, working in the same manner. The best option is to start from the sides, gradually moving towards the center of the fin shape.


A similar principle applies to the pectoral fin of this beautiful fish drawing.


Step 11
I add the pattern of lines to the ventral fins and the anal fin.


Step 12
These fish usually have a beautiful stripy pattern; it’s time to mark it in this angel fish drawing.
I add longer and shorter vertical stripes to the head and body of the fish. You can be creative here—vary the length and width of the stripes as you like. An organic type of line works great here.
Please keep in mind that a fish is a three-dimensional object! Your shapes should emphasize the contours; don't draw just straight vertical lines.


Step 13
With the 3B graphite pencil, I darken the stripes and the sides of the fish, making my fish pencil drawing more contrasting and three-dimensional. Note that the stripes begin on the body and continue on the fins.
The stripes are lighter in the upper and central parts of the body; this tonal gradation gives more volume to the drawing.
I also add pencil strokes to the eye, leaving bright highlights.


Step 14
Let's add more details to this realistic beautiful fish drawing. With the HB pencil, I apply a layer of light cross-hatching to the fish to make the drawing harmonious. It’s important to find the balance between contrast and tonal unity.
The lightest places here are the center of the body, the eye around the pupil and the highlight, and the pectoral fin.


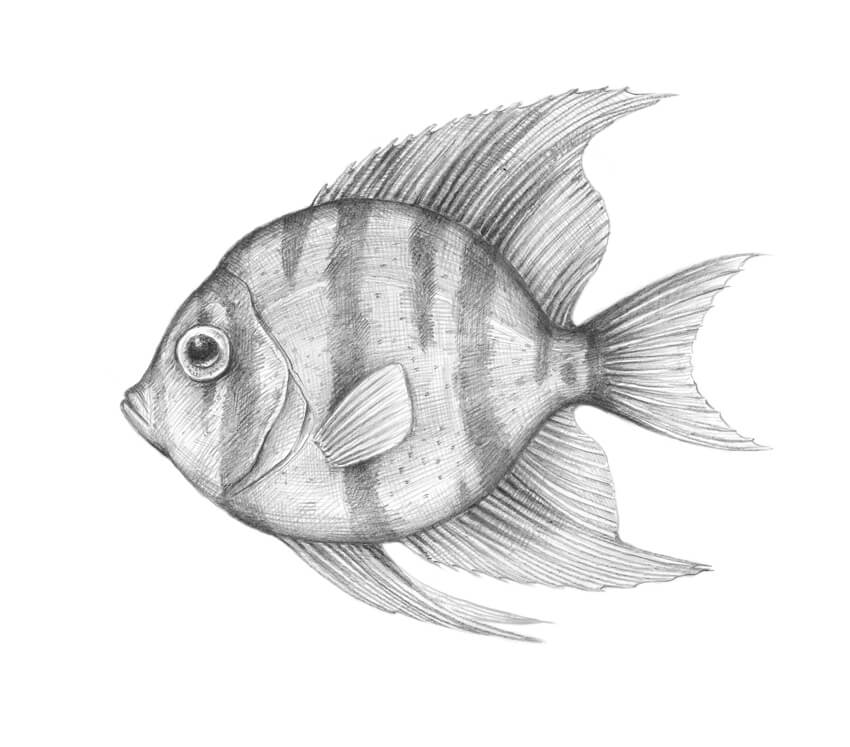
Your Tropical Fish Drawing Is Complete
Congratulations! You know how to draw a tropical fish, and you’ve created a beautiful angel fish drawing; I hope you enjoyed both the process and the result.
I wish you much success in drawing with graphite pencils. Have fun capturing the unique charm of the wonderful world of animals and nature!
Explore More Drawing Tutorials
If you enjoyed this tutorial on how to draw a tropical fish step by step, check out these other awesome resources!

 How to Draw a Pot Leaf


 How to Draw a Dalmatian Dog


 How to Draw a Skull

 How to Draw Animals: Cats and Their Anatomy

 How to Draw Animals: Dogs and Wolves, and Their Anatomy

 How to Draw Wood

 How to Draw a Sheep

 100 Easy Drawing Tutorials for Beginners and Beyond!

 How to Draw a Fish

 How to Draw a Pig

 How to Draw a Dolphin Step by Step


