


Hello, Tony Rivera here. In this tutorial I'll be sharing some of my techniques for creating tattered cloth using Maxon Cinema 4D. We will learn how to create this effect by making a flag simulation using the power of C4D's Spline and Boole tools. This technique was used on one of my recent collaborations/artworks for https://evokeone.com.
Every few weeks, we revisit some of our reader's favorite posts from throughout the history of the site. This tutorial was first published in February of 2011.
Note* Yes, there already is a torn cloth tutorial for 3DSMax, but the techniques are much different between programs. The methods described below were created with Cinema4D users in mind. So let's get started!
Step 1
Start out by changing the camera view to Top.


Step 2
Now let's create a plane, which will be used as the cloth.


Step 3
At the bottom right of the C4D interface, change the object properties to match those seen here. This will give us a flag-like shape to work with.


Step 4
Now on to the fun stuff. Select the free-hand spline tool.


Step 5
Here is the part we get creative. What you want to do in essence, is basically draw the torn edges of the cloth, as seen below. The outside doesn't matter so much, as we are going to be cutting this shape away from the plane. Make sure that when you've created your spline, that it is a closed spline.


Step 6
Once you've made your spline in the shape of torn cloth, next we want an Extrude Nurbs. This will give shape to our spline.


Step 7
Now drag the spline inside of the Extrude Nurbs in the Object list in the top right of the interface, and change the object properties of the Extrude Nurbs to those seen below. (This will expand the shape the right way so that we may cut the plane properly.)


Step 8
Now, in the top right of the interface, select the Extrude Nurbs, then go to the top area and hover over Tools to get a drop-down menu, then select Object. Once you've selected Object, go to the coordinates and change the Y axis to -5 and click Apply, this helps position our shape so that we may cut it away from the plane, to give the shape of ripped cloth.


Step 9
Time to select a Boole.


Step 10
Now, drag the Extrude Nurbs into the Boole, and then drag the Plane in. You will see that now we have a 'torn' looking side of the rectangle.


Step 11
Make use of the free-hand spline tool again, use your imagination, and make more shapes along the rectangle where you want holes and rips to be. Just be sure and don't overlap your splines, as this can cause things to get tricky and make the Extrude Nurbs not work properly.


Step 12
Now in the object menu, select all your splines, then right click on one of them. Then select Connect+Delete, this will merge all your splines into one, and get rid of the unnecessary splines.


Step 13
Repeat steps 6-9 for this new set of shapes / splines.


Step 14
Now let's drag our new Extrude Nurbs object into Boole.1, and then drag 'Boole' into 'Boole.1. You'll now notice more holes and rips cut into the rectangle. (You may repeat this process as many times as you'd like to increase the amount of detail.)


Step 15
Time to create the cloth material. On the bottom left, create a new material by clicking File, then New Material.


Step 16
Right click the material and select Edit so we can adjust the properties of our cloth material. Select the Color field, and then where the triangle next to Texture is, click it and then select Load Image. Browse your directory for CG.jpg, select it and then click Open. You will now have the image loaded as a texture in the color channel.


Step 17
Enable the Diffusion channel, click the arrow in the texture field to get the drop-down menu, and add Noise, also tone the Mix Strength down to 35%.


Step 18
Click the Noise to edit the properties of the Noise. (This will help give a more cloth-like texture.) Now click the noise drop-down menu in the new screen, and select 'FBM' type noise, and then change the Global Scale to 300% to increase the spread of the noise.


Step 19
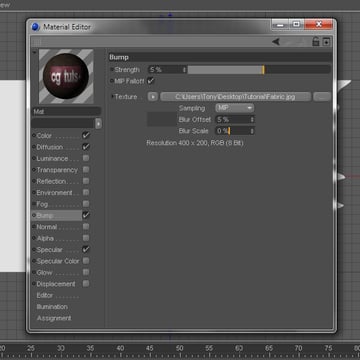
Now enable the Bump Channel. In the Texture field, let's load our 'Fabric' texture, and then to reduce the roughness and make it more like fabric, lower the Strength to 5%, and change the Blur Offset to 5%


Step 20
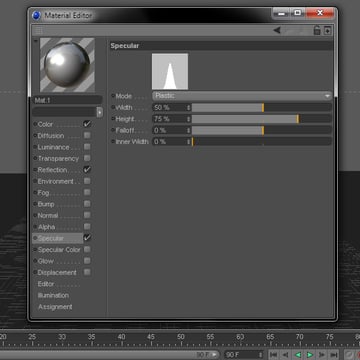
Last but not least for this material, let's select the Specular channel. We want a more realistic sheen to our material, we don't want it to look like plastic. Raise the Width to 85%, and lower the height to 7% to get a smoother specular.


Step 21
Let's apply our material. Select the Boole from the object list, then right click the material and select Apply'.


Step 22
At the top of the viewing pane, click Cameras, and change the view to Perspective.


Step 23
Now select the Boole and press 'C' to make the object editable, this will have an effect on every object inside the boole. Rightclick the top-most boole. Boole.1 again, and then select Select Children, and then select Connect+Delete to get rid of unnecessary objects.


Step 24
Your object list should now look like this.


Step 25
Select the flag in the object menu, then go to Tools > Object. Now in the bottom area, change the Y position to 250, and the P field to 90 degrees .


Step 26
Create a Floor .


Step 27
Next let's create a flag pole. Create a Cylinder , change its Radius to 6m , Height to 400m , and change the coordinates of the object to X -200, Y 175, Z 0 .


Step 28
Now let's create a material for the flag pole. Make a new material, and double click it to go into edit mode. First let's enable the Reflection channel. Inside the Reflection settings, change the Texture to Fresnel. Leave everything else as default in the Reflection channel. Now lets change the specular, raise the height to 75%, and now we have a shiny metallic material to apply to our flag pole.


Step 29
Select the flagpole we just created, then copy and paste it. Change the new copy's properties to Radius 8m, Height 10m, and change the coordinates of the object to X -200m, Y 135m, Z 0m.


Step 30
Copy+Paste the newly re-sized cylinder, and change its Y axis coordinate to 360m.


