

This guide is out of date. I’ve written an updated guide on setting up PCem’s successor, 86 box here:
Setting Up 86box and Windows 98
If you have an older computer or just prefer PCem, then carry on with this guide:
————————————————————————
PCem is an impressively versatile emulator, capable of emulating a wide range of IBM compatible PCs. From XT 8088 based machines up to Late Pentium I MMX era machines, making it a viable alternative to DOSbox and virtualization.
The latest version at the time of writing is PCem V12. Heading up the list of improvements are speed optimizations and Vodoo 2 support.
Games from the late 90s era of Windows computing are notoriously difficult to get working on a modern install of Windows. These latest improvements make PCem an attractive option to play around with.
This tutorial will focus on setting up PCem to run Windows games from this era. You should also be able to run older Windows software and even many DOS games well as a bonus. If you need to see any of the images in more detail, right click on them and click view image. The files needed should be easily searchable by the names I give.

Things you will need:
- A fast CPU. At least if you want to run the more demanding 3DFX titles. Something around the 4Ghz mark. Emulation of a single thread CPU is impossible to run on multiple threads. As a result, a slower clocked octo core CPU will be no help to you here. I’m using an i7 3820 running at 4.2Ghz and I’m able to get performance similar to a Pentium 1 200Mhz. This gets me a good frame rate in games like Quake 2, Need for Speed III and even pretty playable frame rates in Quake 3. A host CPU of around half the speed will likely be able to keep up with games made for a Pentium 1 90Mhz.
- PCem. Get it here:
http://pcem-emulator.co.uk/downloads.html - Compatible BIOS files:
https://mega.nz/#!p99klbTb!A5-E97bh290pALB7vayX7t8ibVLgWKfmFf2GoU8oj04 - Windows 95 OSR2.5 CD image:
You can use an actual CD or a .iso disc image.
https://winworldpc.com/product/windows-95/osr-3
From what I understand this version of Win 95 is the one to get. Better compatibility with things apparently. It does cause a slight complication during the setup but it’s not a big deal. - Windows 95 boot floppy disk image:
You’ll need floppy disk image windows95b.img or this boot.img here:
https://mega.nz/#!888XlQ4A!pRdORIFx3W4zw8KAemkOUZVTm3Gu4X0gPzgzn-1mLDY
We’ll need this to setup our virtual hard drive. Make sure it’s a .img file. - Win9x Voodoo 2 drivers:
http://www.falconfly.de/voodoo2.htm
Get the latest reference driver from 2000. Just note that you will need to install DirectX 7 for many games to work properly, even if the games themselves don’t require Dx7.
You’re also going to need to install some additional software:
- A tool to extract compressed archives. I recommend 7zip:
http://www.7-zip.org/download.html - Daemon Tools lite or similar CD image mounting software:
https://www.daemon-tools.cc/products/dtlite
Windows comes built in with it’s own image mounting software but it’s limited in compatibility. - ImgBurn:
http://download.imgburn.com/SetupImgBurn_2.5.8.0.exe
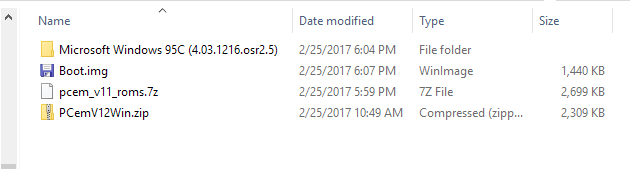
Once you’ve got all that you should have a collection of files that looks something like this:

Initial Emulator Setup
To get things started we’ll need to extract the PCem archive. Plonk it where ever is convenient to you. I’m going to keep everything in the one folder.
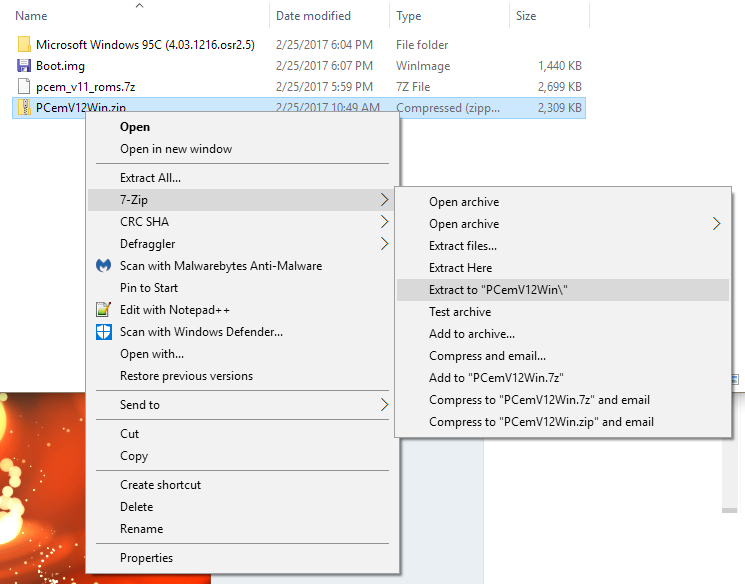
Extract the pcem_v11_roms.7z archive somewhere else convenient too.
Open up your PCem folder and in a new window, open up the folder you extracted the pcem_v11_roms archive to.
In the PCem folder there is a folder called roms. We’ll need to copy the contents of the pcem_v11_roms folder into this folder.
Select all files inside pcem_v11_roms and drag them into your PCem\Roms folder. Overwrite files if it asks.
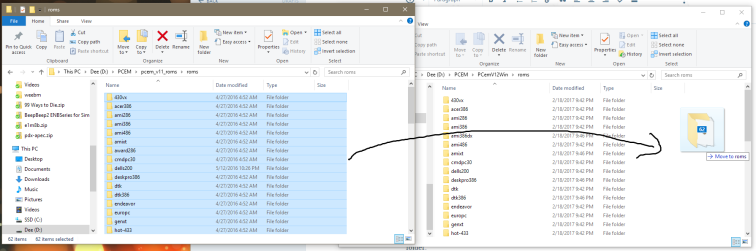
Now all those funny named folders have ROMs inside them. Most importantly you should have a file named 55xwuq0e.bin contained within the 430vx folder. This is the mother board BIOS ROM that we will be using.
Back out to the root of your PCem folder. Fire up PCem.exe
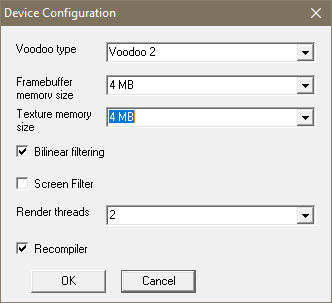
It might start up as some sort of Sinclair computer. Just ignore that. If your mouse cursor has become trapped within the emulator press Ctrl + End to get it back. Open up the settings menu and click configure. Change the options in the window that pops up to look like this:
(Update 27/12/17:
PCem is now on version 15. The configuration menus are a little different now, but all the settings I show are still relevant. The menus just look a bit different so you might need to click around a bit to find the settings I talk about.)
The Award 430VX PCI motherboard is now listed as “[Socket 7] Shuttle HOT-557”
I’m not sure why but this is what you will now have to set as your machine in the current version of PCem instead.
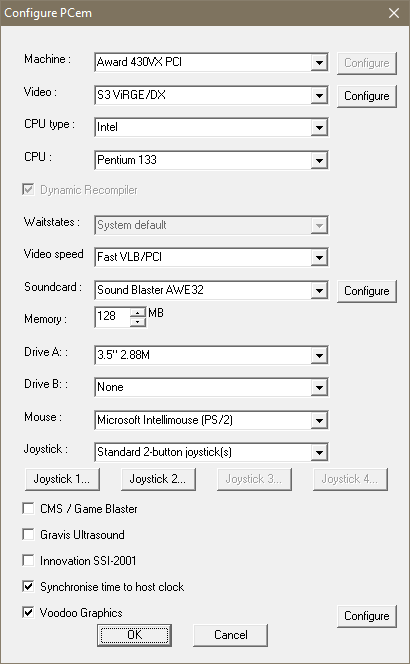
Don’t be concerned about the CPU speed too much, we can bump that up at any time and using a slower Pentium runs better during the initial setup of Windows.
Click the configure button next to Voodoo Graphics and change the settings to these:
It will complain about having to reset, just hit okay in both instances. The emulator will restart and you should be presented with a nostalgic POST screen – at least to some of you:


Setting Up the Virtual Hard Drive
Open up the Disc menu and find Configure hard disks…
Make sure under C: that Hard drive is selected and then click the New button.
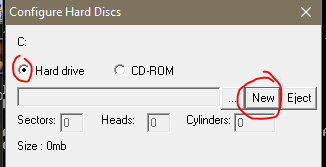
In the window that pops up, click the unhelpfully labelled “…” button.
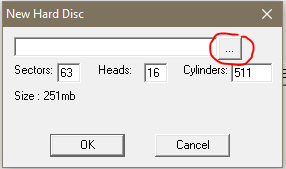
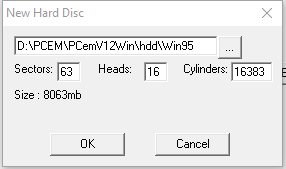
This will let you select a location for your virtual hard drive. The file is going to take up roughly 8GB of disk space. I recommend making a folder labelled “hdd” in your PCem folder and placing it in there. It will ask you to choose a name. Call it something like “Win95”
Next you’re going to want to change the value in the Cylinders field. The maximum is 16383 so lets go with that. Leave Sectors and Heads at their default values of 63 and 16 respectively.
Once you hit OK, PCem is going to lock up. Don’t panic, it’s creating the virtual hard drive file. It’ll take a minute or two before popping up a window reminding you to partition and format your drive. We will get to that soon. Hit OK and PCem will complain about needing to reset again. Hit OK.
You should now be back at the POST display we saw earlier. Click on the display and hit the DEL key to enter the BIOS setup screen. Select STANDARD CMOS SETUP.
Use the down arrow key on your keyboard and select Primary Slave. Primary Master should be set to Auto. To speed up boot times a little we can set the three other drives to None. Press PgDn twice to change this and repeat for Secondary Master and Secondary Slave.
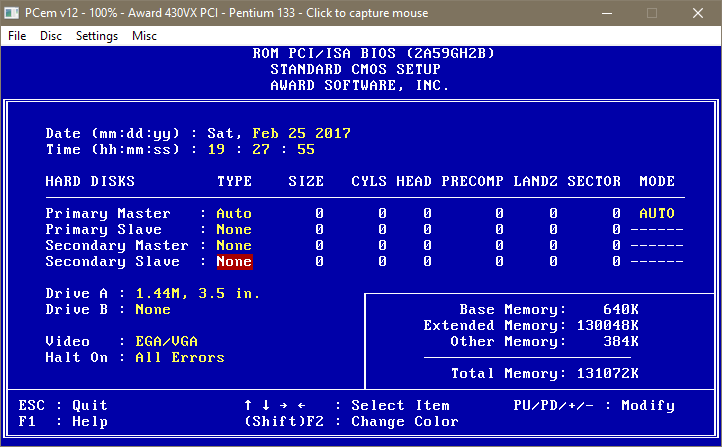
Hit ESC to back out to the main menu and then press F10 then Y and then Enter on your keyboard to save the settings. The emulated system will now reboot, go through the POST screen again and then complain about NOT HAVING ANY BOOT DISK. Time to fix that I suppose.
Press Ctrl + End to release your mouse from the emulator and open up the Disc drop down menu. Select “Change Drive A:” Navigate to the boot.img I had you download, select it and press open.
Now open up the File drop down menu and select Hard Reset.
The emulator will now restart and boot from the floppy disk image we just virtually inserted into it’s virtual floppy disk drive virtually.
You’ll be presented with this screen:
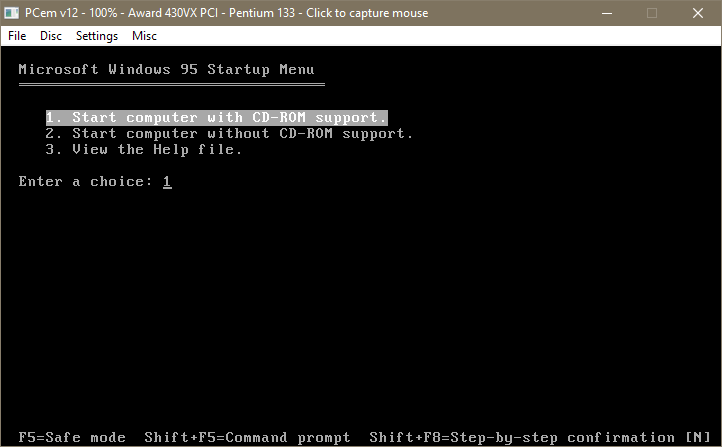
Hit 1 and enter to continue with CD-ROM support. Give it a few moments and you should have something like this on your screen:
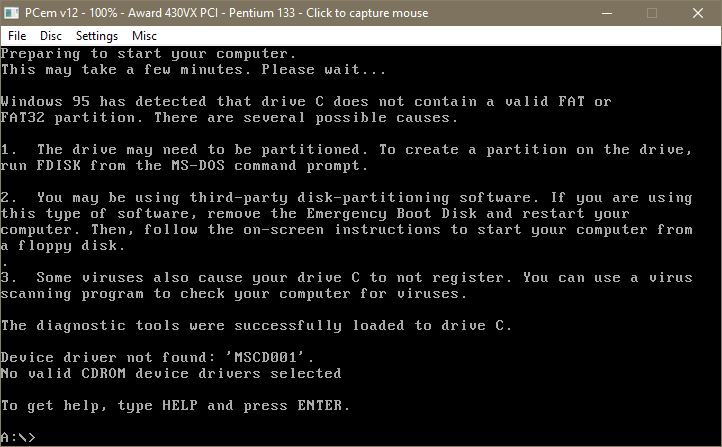
Type in “fdisk” at the prompt and press Y to say yes to large disk support.
Now press 1 and enter to Create DOS partition or Logical DOS drive. Then 1 again at the next screen to Create Primary DOS Partition
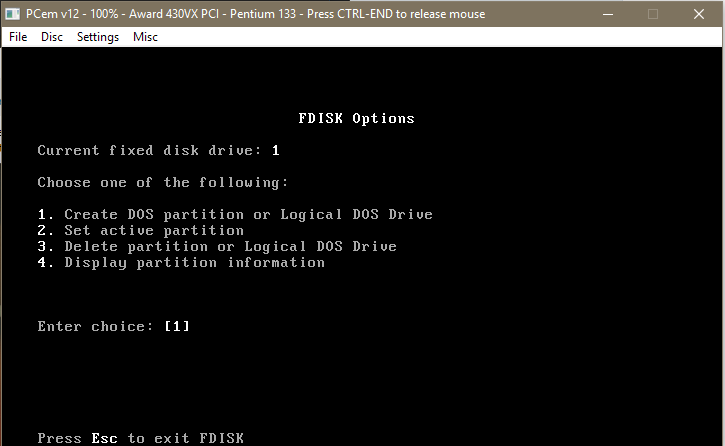
After a brief moment it will ask you if you want to make the maximum space available plus make the partition the active partition. Press Y for yes and then enter.
Fdisk will then inform us that we MUST restart the system. Let’s not upset it. Press Ctrl + End and select the File menu and Hard Reset once again. Say yes to CD-ROM support once again when you’re asked.
Once the system is back to the A:\> prompt type in “format c:” and press enter. It will warn you about erasing all data on c: but since we haven’t put anything on there yet I don’t think we need to worry about that. Press y and then enter.
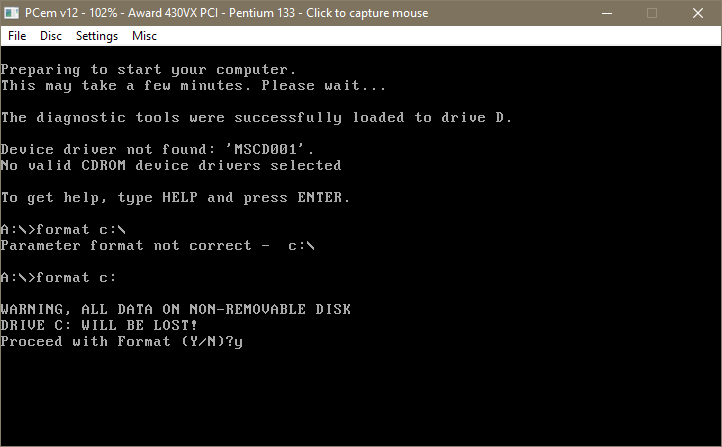
Formatting will take a few minutes. Once it’s finished it will ask you to give it a label. You can hit Enter for no label or call it whatever you like.
That’s the Virtual Hard drive setup and ready to have Windows installed on it.
 Installing Windows
First we are going to need to mount the disc image of the Windows 95 installation CD. There are a couple of ways to go about this.
You can either use Daemon Tools to mount the image, once mounted in Daemon Tools you can then open the settings menu in PCem, navigate to CD-ROM and then select the virtual drive you have the Windows CD mounted to. You may need to close and re-open PCem in order for it to see the newly mounted image.
If you don’t want to use Daemon tools, you can mount it directly within PCem by going to Settings–>CD-ROM–>ISO… Navigate to the Windows 95 OSR 2.5 I had you download at the beginning, select it and click Open.
Whichever method you decide to use you will need to restart PCem. It will again boot from our boot disk floopy image. Again select CD-ROM support.
Once you’re at the A:\> prompt, check that the CD is mounted correctly by typing e: and press Enter. You should now be at an E:\> prompt. Type dir and hit enter. You should see these files and folders listed:
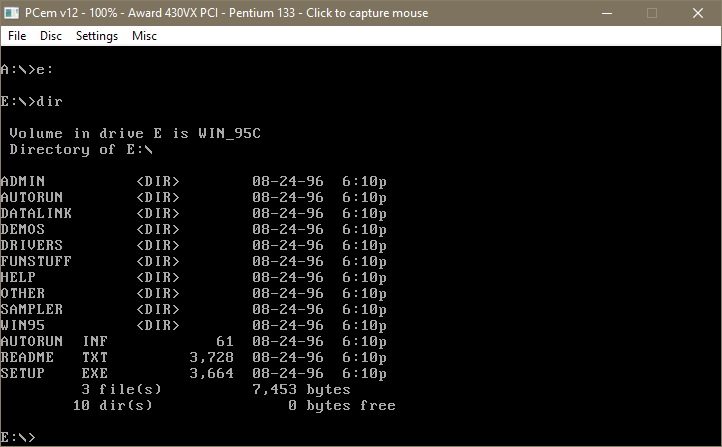
There is a bug with the version of Windows that we are installing that won’t let it read from the WIN95 folder on the CD during the install, so we’ll need to copy it over onto the c:\ drive manually.
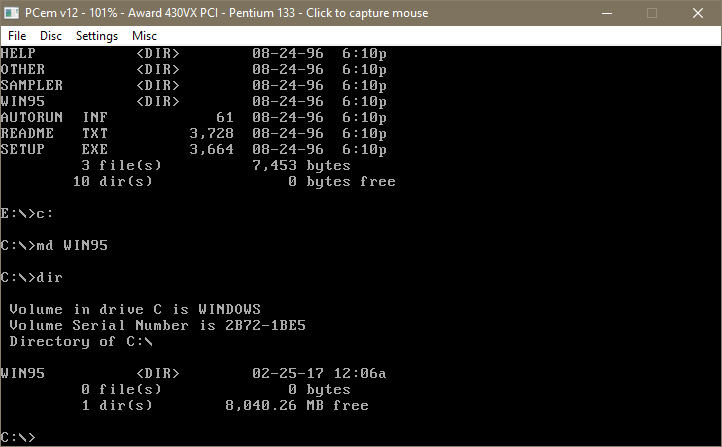
First let’s make a directory on the c: drive to copy the folder into.
Type c: and press Enter.
Type md WIN95 and press Enter. (md is the make directory command. you can check that it’s made the folder by typing dir and pressing Enter. It should look like this:
Now we can copy the files from the CD onto c:\ . Type:
copy e:\WIN95 c:\WIN95
Press enter and you should see it copying the files. You can navigate into the folder and check that all the files are there by typing:
cd win95
Then:
dir/p
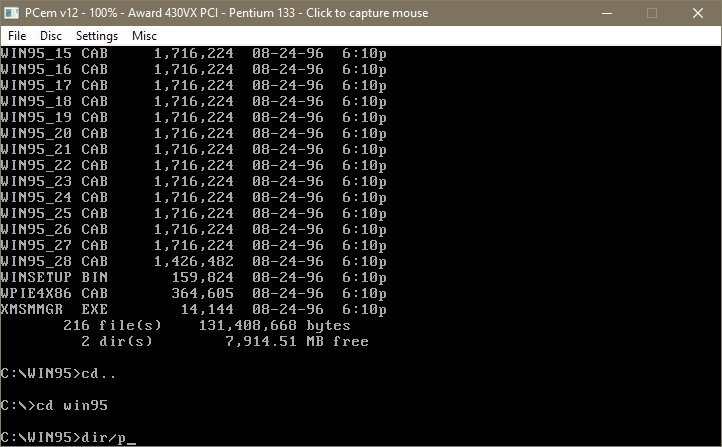
Once you hit enter it will display the list of files contained in the directory. Keep pressing any key until you are returned to the prompt. Once you’ve confirmed the WIN95 folder from the CD is on your c: drive we can go back to the e: and start the Windows setup. Type e: and press Enter.
At the E:\> prompt type setup and press enter. Press enter again and the installer will run through it’s checks to make sure everything is ready to go. Once it’s done, press x on your keyboard to Exit and jump into the Windows setup proper.
 Windows Setup GUI
Alright, you can start using your mouse again. Press Continue to get things started. Press Yes to accept the license agreement and Next two times to get to the type of install you want. Select Typical and hit next. (You can select custom and choose to install additional components like games and mouse pointers but these can also be installed later once Windows setup has completed.)
Once you hit next it will ask you for a COA key. You can search around for one or search around for one.
At the next screen, enter your name and make up a dumb company name if you want and hit next.
It will then ask what type of devices it searches for just check both boxes and hit next.
I forgot to take pictures during this part so here’s a screenshot of a progress bar:
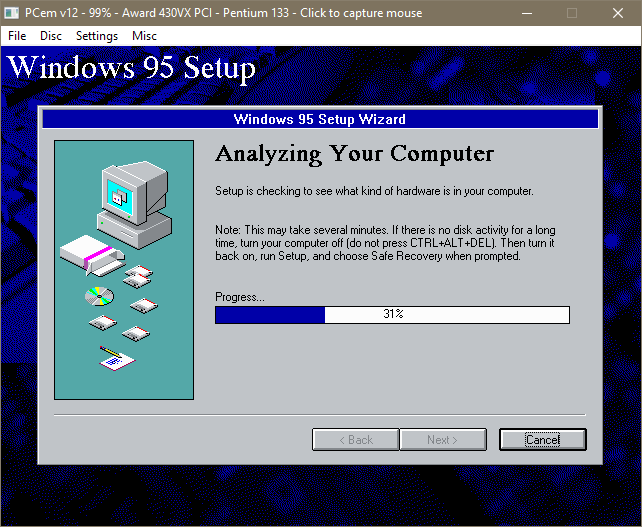
This will take a minute or so. Once that’s done if you selected typical install it will ask you if you want to install the most common components or if you want to choose. Just select common and move on. You’ll then be asked if you want to make a start up disk. Say no and click next and then next again to start it copying files.
It will take a few more minutes to do it’s thing. Once that’s done it will ask you to restart the system. Before doing that make sure to eject the floppy disk image by pressing Ctrl + End and then going to the Disc menu and selecting Eject drive A:
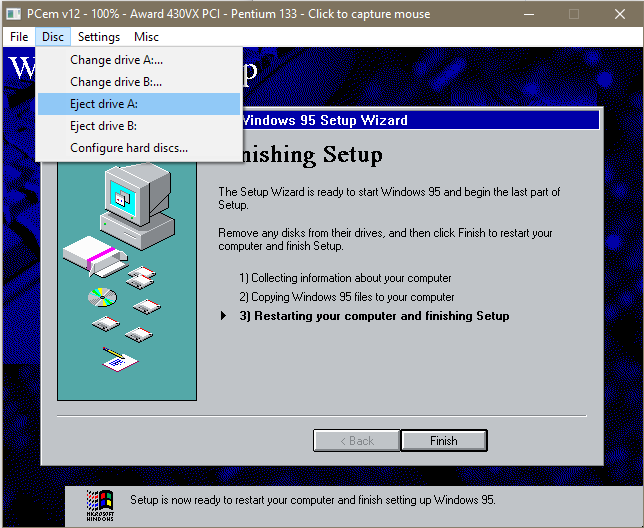
Hit finish and the system will reboot and continue into Windows.
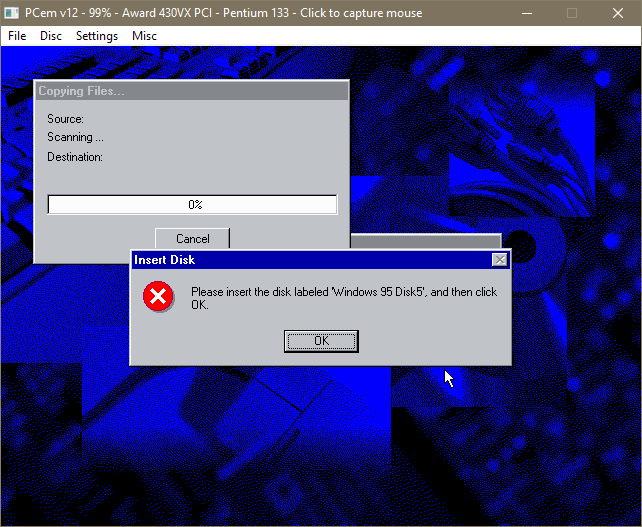
Here’s why we had to faff about, moving files in DOS:
Hit OK. In the next window that pops up click on Browse…
The Win95 folder on c: we created should be right there.
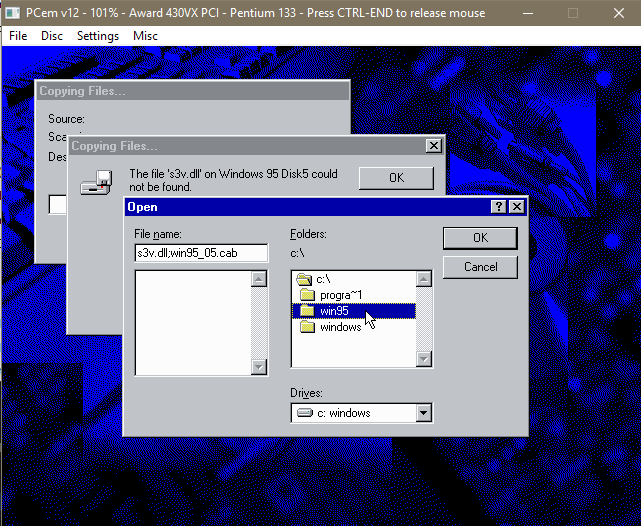
Double click on it.
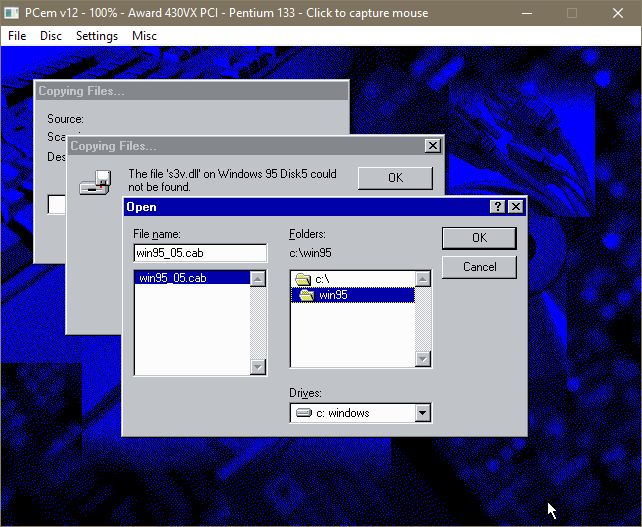
Windows should see the .cab file it’s looking for and display it in the left panel there. Click OK, then OK again.
Windows will now go through it’s unpacking process. Tell it what time zone you are in when it asks. If it asks you to setup a printer or something else you don’t care about just click on cancel. Once all that is done Windows will reboot again.
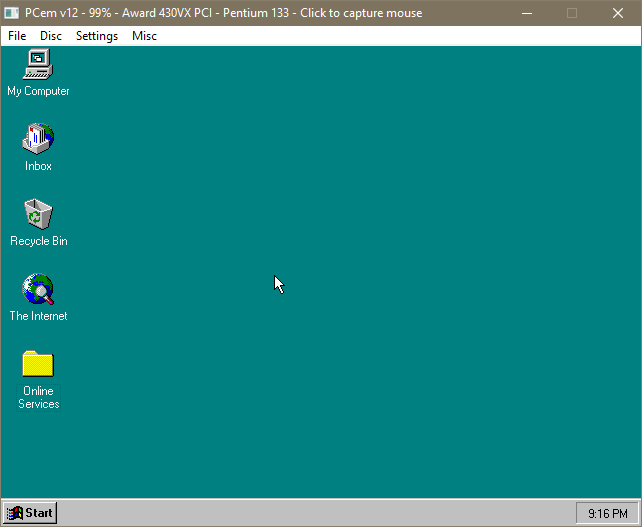
The emulator should now boot into the default Windows 95 256 colour desktop, in all it’s turquoise glory. You should find that the base graphics card has installed itself so feel free to up the resolution and colour depth in screen properties. (If you find that you are stuck on a low resolution and low colour mode it means Windows hasn’t automatically installed the S3 drivers, I talk about fixing that at the end of next section.)
You should have also noticed a startup sound indicating sound drivers are also installed.
If for some reason you don’t get any sound, you can try running the add new hardware wizard in the control panel. If it asks for your Windows 95 CD just point it to the WIN95 folder on the c: drive that we created.
Grab this Soundblaster software suite CD image if you want more advanced features and other related stuff:
http://www.vogonsdrivers.com/getfile.php?fileid=13
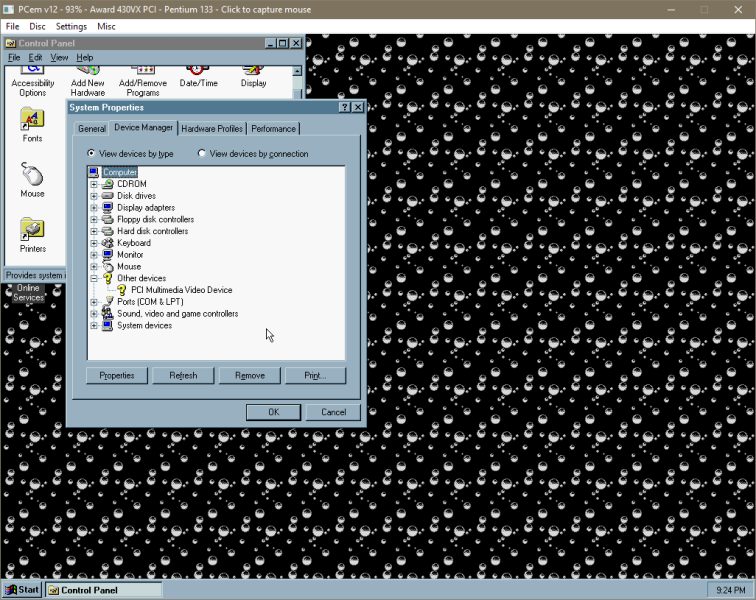
Okay, moving on. Head on over to the device manager, you will find PCI multimedia Video Device without drivers. That’s our emulated Voodoo 2. To install it we’re going to need a way to get files from the host system into the emulator. This is where Imgburn comes in.
 Importing Files Into PCem and Installing 3DFX Drivers
Extract the Voodoo 2 drivers you downloaded and open up imgburn.
Select Create Image File from Files/Folders.
Hit the Show Disc Layout Editor, find your voodoo 2 driver folder and drag it into the lower panel.
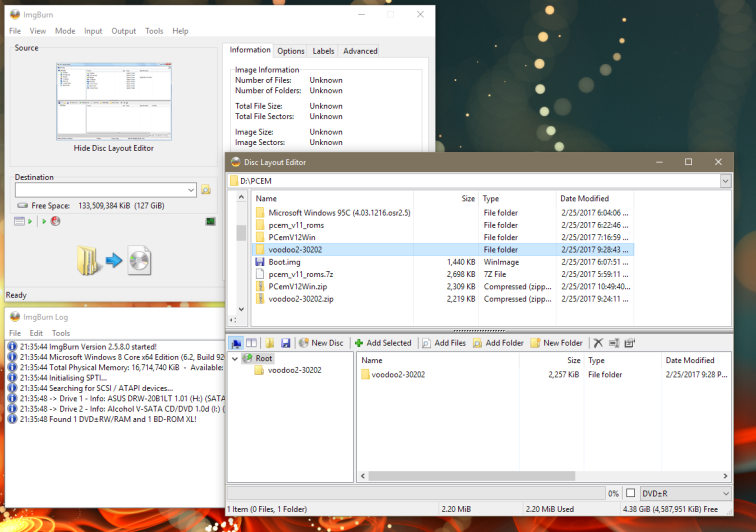
Close that window. And find the sneaky little toggle button I’ve highlighted below that tells Imgburn to write the image to a disc image and not your optical disc drive (if you have one).
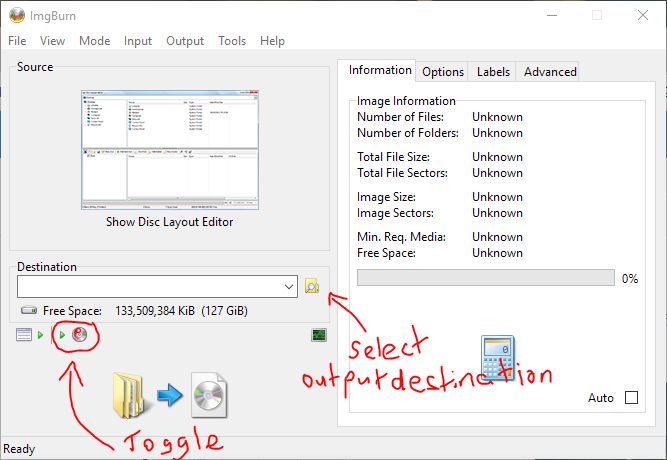
Click the little folder to tell Imgburn where to save the image we’re creating to. Then click the big button in the bottom left to create the image. Hit Yes to select the default image name and we’re done with Imgburn.
Mount the image you just created with Daemon tools or with PCem as described earlier and a CD containing our files will appear within Windows 95.

Run the Voodoo 2 executable and extract the driver files somewhere handy. c:\voodoo2 is good.
Open up the control panel, navigate to System, open up the device manager tab and find PCI Multimedia Video Device. Double click on it, click on the driver tab and click on Update Driver…
Choose Yes to search for the driver and click next. Give it a moment and it will say it was unable to locate a driver but there will now be a button labelled Other Locations that you can click on. Click Browse, find your voodoo2 folder on c: and click OK and then OK again.
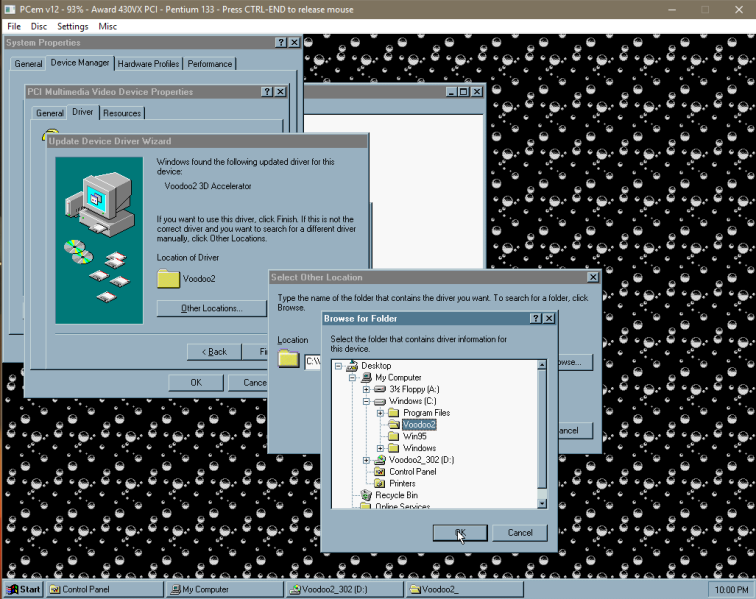
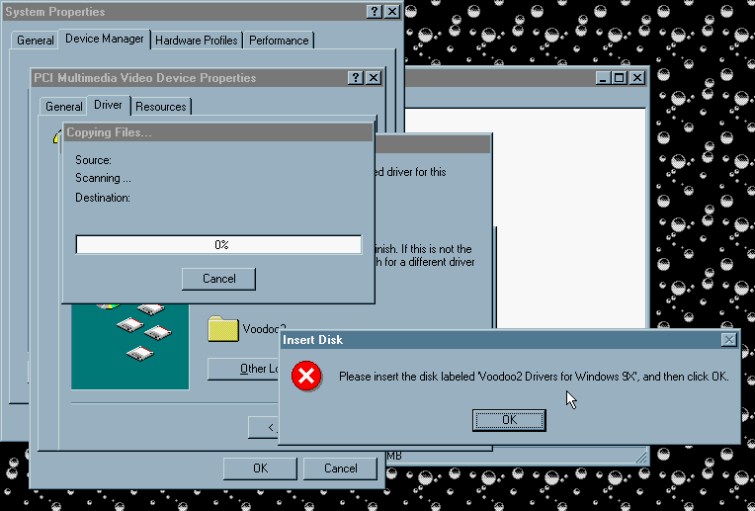
Click Finish and Windows will throw up an error message telling you to insert the disk labelled Voodoo 2.
 Windows 95! \o/
Hit OK. Again, click browse on the window that pops up and yet again navigate to your voodoo 2 folder on c:\ until a .dll file appears in the left panel.
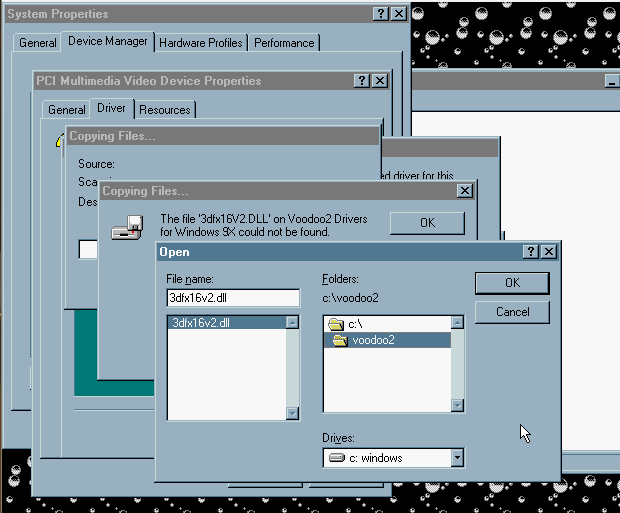
Click OK. Then OK once again. This bullshit is fairly standard procedure when installing drivers in Win9x. Their are many things I remember fondly about Windows 95 but installing new hardware is not one of them.
It will install the driver, prompt you to restart the system. Once rebooted, you should now have the Voodoo 2 drivers installed.
—
If the S3 graphics drivers haven’t installed themselves it should be simple enough to fix.
I’ve uploaded a CD image file which contains the S3 drivers (and vodoo 2 drivers as a bonus) that you will need here:
https://mega.nz/#!d4MhCYCD!kOkZFQaV8Jzpkp9CG2s5RGI1VXRXUEwTvjyh1qlC_Bc
Mount it with Daemon tools just like we did above and right click on the Windows 95 desktop and select properties then click on the settings tab. Click on the Advanced Settings button.
Click on the monitor tab and make sure it says Plug and Play monitor. If it doesn’t, click the change button and change it to that.
Once that is done you can click back onto the adapter tab and click the Change… button there. Click the have disk button and point it towards the S3 folder in the CD drive. With a little luck, after a reboot Windows should now be using the S3 Virge as it’s default display adapter and you will be able to use higher resolutions with more colours.
—
And that’s pretty much it. You’re ready to install some games.
If you think I’ve said something dumb and need to correct something, be sure to let me know in the comments. Please let me know if any of the links are dead too. I hope you have a good time using PCem and that this has been of some use.
 Things to Note
A quirk of PCem to be aware of is that if a program isn’t using much CPU the emulator can slow right down. Sim City 2000 for example will run very slowly when you aren’t moving around the map and in game menus, you might notice sound stuttering. The best fix for this is to lower the CPU down to a slower chip. Like a Pentium 90Mhz. The general rule of thumb is to use the lowest speed CPU that will allow you to run the game smoothly. For 2d games use something like a Pentium 90 and for 3d use a Pentium 200Mhz MMX. You will probably need to experiment with it a bit. You can change the CPU while the emulator is running. It’s best to do it while on the Windows desktop because some games can freeze up if you swap around CPUs while they are running.
If your CPU has hyper-threading (or an AMD equivalent) it’s worth turning it off in your bios if you need some extra performance. Overclocking your CPU will also make a big difference. Raw clock speed is what counts most with emulation like this.
Full screen can be found in the settings menu under video. Direct 3d tends to look best and be sure to set Full screen stretch mode to 4:3 if you don’t want it to look ugly and stretched. Press Alt + Ctrl + PgDn to exit full screen.
 Testing Out Some Games
I’ll throw up a few screenshots of games here and describe the sort of performance I get with each.
The Need for Speed: Special Edition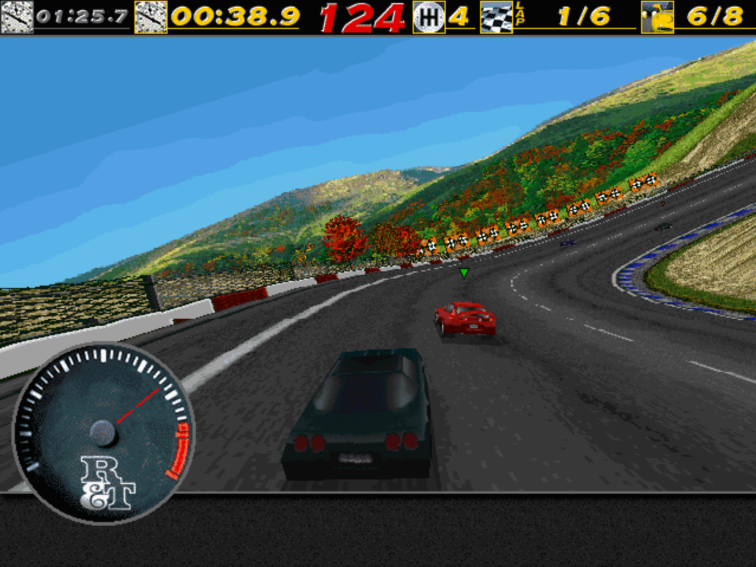
With the CPU set to 166Mhz audio is quite choppy in the game menus. In game it runs perfectly with high settings and no audio issues.
Need for Speed III: Hot Pursuit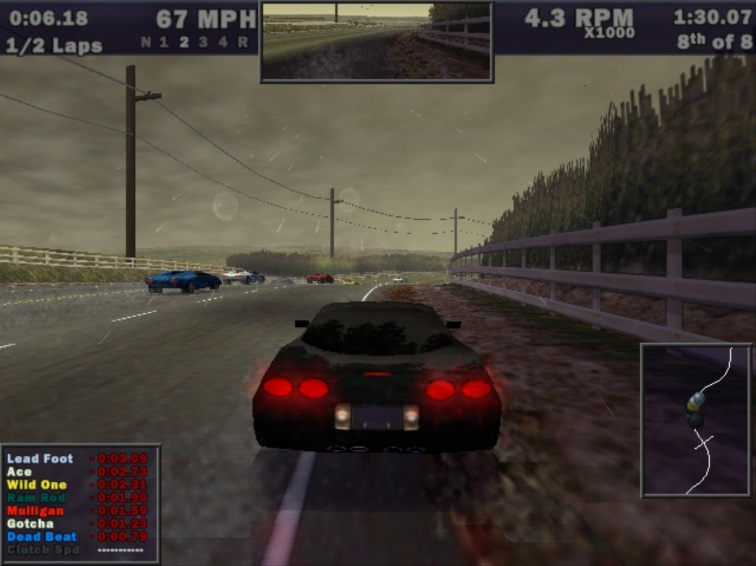
You may need to install the DirectX 5 redistributable that comes on the game’s CD before this game will work properly. Be sure to set the video device to Voodoo 2 using the games video setup program. Running with a 200Mhz CPU the game runs smoothly. The menus are a little bit choppy but in game performance is good with all the graphical bells and whistles turned up.
Quake II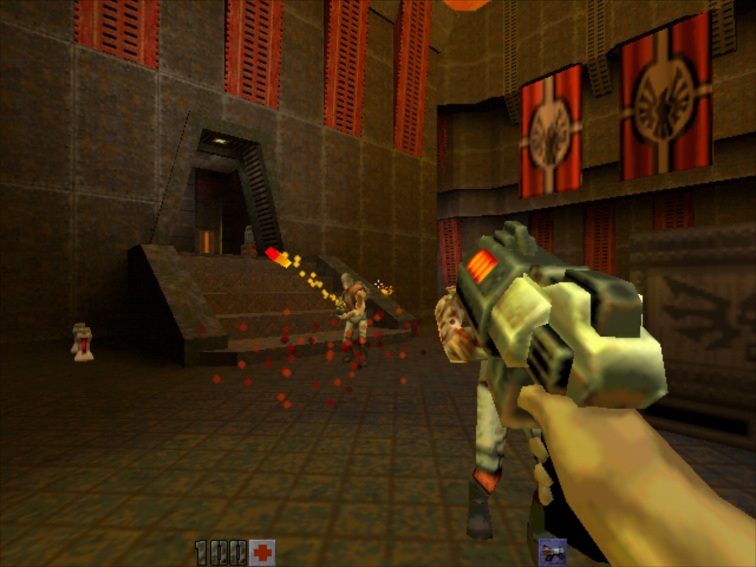
I was running this from a physical CD and was experiencing poor performance and choppy sound. Ripping the disc with ImgBurn to my hard drive and mounting the image solved it. I believe this was due to CD audio played during the game. The game runs great in Glide mode. Very smooth.
Interstate 76
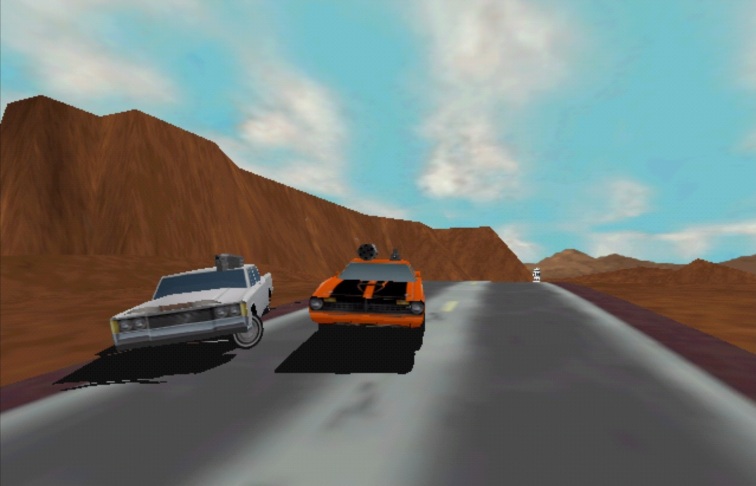
Here we have -at least for me- the best reason to setup PCem. Interstate 76 will not run correctly on a modern computer. Today’s CPUs completely break the physics and AI rendering the game unplayable. Even the gog.com version suffers from this problem. You can make the game playable by limiting the game to below 30FPS to fix the physics issues but flamethrowers will still be broken.
A shame as you aren’t going to find a better game in the car combat sub-genre. I love this game.
At first performance in PCem was disappointing. Running the game at anything higher than 320×240 resolution resulted in a very choppy frame rate. However installing the official “gold patch” allows the game to run in Direct3d or Glide mode instead of the original release’s software renderer. Running in either of these new modes results in a very smooth frame rate and the game becomes perfectly playable. The 3dFX glide mode looks the best. Great stuff.
If you start seeing texture corruption, quickly hit escape to enter the menu and then jump back in and you should be good for the rest of the mission. If you experience a crash soon afterwards, create a .bat file with these two lines:
SET SST_TMUMEM_SIZE=2
i76.exe -glide
And use the newly created .bat file to run the game. You can also limit 3DFX games to 2MB of memory in the 3DFX control panel (the one that is found by right clicking on the desktop and selecting properties.)
As a result of cobbling together a vehicle combat game using the Mech Warrior 2 engine, I76 was never a particularly bug free game. Be sure to check out the games Pcgamingwiki page for more info:
https://pcgamingwiki.com/wiki/Interstate_%2776
i76 gold patch download:
https://mega.nz/#!BwsXxKZb!ySGRNZnCR8AcIkhMO0iaH8tFIilsb2loWgdDrEXxpOc
Sub Culture
With the CPU set to a Pentium 166Mhz and running the 3DFX version, in game frame rates are 30+. Runs great, very playable. FMVs play perfectly. Menus have choppy music. Running a slower clocked Pentium fixes this but will result in poorer frame rates in game. The Direct3D version of the game seems to run pretty much the same.
I haven’t played much of this game but it seems to have a bit of a cult following. It’s like Elite but miniature and in the ocean. There isn’t much support for this game and as it uses a 16-bit installer program, installing it on a 64-bit install of Windows isn’t much of an option. Another good use for PCem.

Best Guide I’ve ever seen on the Net! Thank you for this and keep up the good work!
LikeLiked by 1 person
What a great work ! Thank you from France
LikeLiked by 1 person
I would recommend copying the whole contents of the CD to the hard drive before running setup, as that seems to be the best way to get a smooth install. Instead of doing “copy e:\WIN95 c:\WIN95”, do “xcopy /E E:\*.* C:\WIN95\.”, and then run setup from that folder.
LikeLiked by 1 person
Hi there,
I followed your tutorial closely. I installed win 95 as shown, but I have a problem. In my display options I only have 16 colors or monochrome and when I try to change the adapter or display, it says “your display is not configured properly”. I tried everythig I could think of. How do I fix this?
Thanks in advance for your help.
LikeLike
It sounds like your display drivers aren’t installed correctly. If you selected S3 Virge DX in PCem’s setup menu you could try installing the DX driver located here:
http://www.vogonsdrivers.com/index.php?catid=26
LikeLike
Those are dll and weird files. No installs or exes in there.
LikeLike
Same here. I guess we both aren’t smoking pot then. 🙂 Good to know it’s not just me. Seems like PC Em is another dead end. Virtual Box with Sci Tech we have full 256 colors in it but on PCEM it just keep saying the video display driver is not loaded correctly unless you go back to 16 bit VGA.
PCEM FAIL! Looks like back to the drawing board. (Virtual Box). Funny how Viritual Box is still a monopoly for windows emulation.
LikeLike
Make sure that you install the S3 ViRGE DX display drivers: http://www.vogonsdrivers.com/getfile.php?fileid=589 this should fix the 16bit color problem for you.
LikeLiked by 1 person
Thanks for the reply. I changed it to s3trio 64 in PCem’s options, installed the drivers on win95 cd. Now I can change the color pallet but the resolution is locked at 640×480. Maybe I’m missing something?
LikeLike
Not sure. It could be that card only supports 640×480 or the drivers aren’t installed correctly.
Edit:
I just tested and the card does support higher resolutions so I’m guessing there’s something wrong with how your drivers are installed.
You could try uninstalling the drivers (remove device in device manager) restarting and running the add new hardware wizard in control panel and see if that helps.
LikeLike
How did you install the drivers? I got a bunch of dll files no install of anything when getting the zip file. What are you smoking?
LikeLike
Go to System,Device Manager, find whatever your installing, double click it, click Driver, click Update Driver and then it’ll ask for wherever your drivers are, find them and double click them then as long as your drivers are in the same area it’ll install all of them but if they are not in the same area you’ll have to do them manually.
LikeLike
Thanks for making this guide. I’ve had no luck getting Windows 95 games to run before finding this.
LikeLike
How did you get past the 16 bit graphics issue?
LikeLike
Just update your graphics drivers. I have Trucolor 32 bits and 1024*768 Fullscreen
LikeLike
i did everything to the T, but when i go to update the voodoo driver, it wont detect the drivers in the folder even though i can see them plain as day
LikeLike
I has the same problem. Make sure you selected ‘voodoo 2’ in the configuration for PCem under Voodoo Graphics.
I also had an issue with the default video drivers not being installed causing low resolution only / 16bit etc, which I fixed by updating the drivers for the device under ‘display adapters’ with this one http://www.s3graphics.com/en/drivers/legacy_software_archive.aspx#id_375drv (the w9534202 specifically)
LikeLike
And once you have the zip where do you extract it and how do you get PCEMU to read it?
LikeLike
when i try to start
setup i have no mouse pointer
LikeLike
Do you mean MS-DOS or the Setup GUI (A GUI, or Graphical User Interface, is what you work with everyday on a PC.)?
LikeLike
Hi, thanks for this, I am following your procedure, but when I get here:
“you should be presented with a nostalgic POST screen – at least to some of you:”
I only see PCem’s window completely black, no POST screen for me, so I am unable to proceed… any ideas?
Thanks again
LikeLike
I solved this, it was due to unpacking the roms with Winrar, which caused errors while unzipping some of them… I unpacked using 7zip, and it works… thank you!
LikeLike
Sounds like you haven’t set up your motherboard rom or video card rom correctly.

Make sure your settings look like this:
If you still can’t get it to work properly you might not have copied the bios files into your pcem directory correctly, try starting from the very beginning to make sure you haven’t missed a step.
LikeLike
mine doesn’t have the video you have.
LikeLike
thanks again!
LikeLike
Thanks for the tutorial!
LikeLike
Thanks for the comment!
LikeLike
Thanks a lot.
Very useful!
LikeLiked by 1 person
I’m glad it was useful.
LikeLike
mine doesn’t have Voodoo options.
LikeLike
How come it says missing operating system after doing the first reset when saying (Y) to allot maximum disk space?
LikeLike
This website has stopped working. Give a link to the Windows 95 OSR2.5 image. Please, sorry for my English
LikeLike
Hopefully that site comes back online.
I haven’t tested it but you could try the image I found here:
https://mega.nz/#!oAVyTYYY!9AMiw5P8FkDrCqOy70Pa9Rvl0XHVVOx5eKlfr-B4Jjg
I found it on this page:
http://vhd-vault.weebly.com/iso.html
LikeLike
I have installed windows 98 with your tutorial,two questions. How i can put the games in the emulator? when i shut down the fake pc and i reopen the emu the system say fail boot system ecc. how i can return to windows 98?
LikeLike
Hi, I got a problem in virtual hard disc setting. When I follow your instruction, it said I need to select a Hard Disc Image. I don’t know which one to select so I select boot.img. Then I cannot boot it through A disc anymore.
Did I do something wrong? Thanks
LikeLike
to get all colors change your adapter as it comes with VGA by default and change it to S3
LikeLike
Never mind. It just gives me errors. Stuck in 16 bit Standard VGA please help!
LikeLike
Better late than never.
I’ve added to the “Importing Files Into PCem and Installing 3DFX Drivers” section with a method of installing the S3 drivers if they don’t automatically install for you. This will let you use more than 16-bit colour.
LikeLike
Your methods are buggy. Why can’t PCEmu or any of these (emulators) emulate beyond 16 bit colors? Is it REALLY that hard?
LikeLike
If you think it is too hard, just install Windows 98SE. It is more easier and supports true color and higher resolution.
LikeLike
Hey, I’ve got a question. I’m stuck on the part where I have to copy the components from e:\WIN95 to c:\WIN95, but in my case I have components on d: and typing dir gives me this: https://imgur.com/a/25uPE instead of what you posted. I don’t know what I did wrong. I pretty much did what you said, but at the beginning when I was setting up the virtual drive, I copied boot.img into the created hdd folder and used it as the virtual drive while using the original boot.img (in my downloads folder) as drive A.
LikeLike
The CD-ROM is always in the E:, the D: is the diagnosis tools. Reformat the drive and copy from there. Be sure to turn on CD-ROM if it is off.
Or, get the floppy version (although it is more of a pain in the butt)
LikeLike
Thanks for the advice. I managed to get Windows 95 installed and working as well as make some improvements outside of this tutorial, but now my issue is that the audio sounds choppy. Also, a game that I installed has a MIDI soundtrack that doesn’t work.
LikeLike
ACMDogfight1997, I can’t reply to your last comment for some reason so hopefully you see this.
Choppy sound is usually caused by emulating a CPU that is too fast for your computer to handle. Try changing it to a slower CPU in PCems settings and see if that helps.
As for midi, first try going into C:\Windows\Media and playing one of the midi files in that folder to make sure the problem isn’t just with the particular game you are playing. Also in PCem’s settings is a configure button for the sound card where you can tell it where to send the midi signal, make sure it’s set to Microsoft GS wavetable. If it already is you could try installing Virtual Midi Synth on your host system and then setting pcem to output midi to that. You might also need to check the multimedia settings in the Windows 95 control panel to make sure midi is setup correctly in there.
There’s a lot of variables here so hopefully some of that will help you out.
LikeLike
Well the choppy sound issue was taken care of. I had it set to MMX 300 settings so that a game I could play would run smoother. As for the midi issue, C:\Windows\Media had only the Windows startup .wav file and nothing else. I tried running a midi song from an iso and I got this message: https://imgur.com/a/wJdDC
LikeLike
Regarding resolution and colour: after I had finished the installation as described above, I only had 16 Color and 640×480. I then changed in the PCem settings under Video to “Diamond Stealth 3D 2000 (S3 Virge)”. After rebooting, Win95 automatically installed a new display adapter (S3 Virge PCI). I now have up to True Color (24 bit) and 1600×1200. Success! 🙂
LikeLiked by 1 person
Worked thank you!
LikeLike
I have no sound… tried installing everything on the sound blaster cd from the link but nothing…
LikeLike
Brilliant stuff.
Can you tell me how to install Direct X 7 and where I can get it?
LikeLike
Couldn’t you just share a fresh install on a virtual drive with us so we could skip the cumbersome setup phase?
All I wanna do is play Rebellions AvP and I can’t get it running VMware. So I looked into pcem and it just seems so complicated and time consuming 😦
Very nice guide though!
LikeLike
Welcome to the camp!
LikeLike
Hi. I must ask after looking for several hours.
Does anybody know, how to configure the sound outside the windows?. Some games ask for Ms Dos and when windows 95 its not open, there are no sound. Its kind of frustrating. Any suggets? Thank You.
LikeLike
Brillant
LikeLike
You should do one for Windows 98!
LikeLike
It’s essentially the same process except it’s even easier to install 98.
You can just ignore the part about copying the win95 directory onto the c:\ drive.
LikeLike
Thank you very much for this!
Now, I have a question. I tried to play Motorhead (1997 racing game) and it’s impossible to run on Windows 10 but works without any problem on emulated Windows 95. But playing with CD makes it choppy, so I ripped it and played this way. The thing is: music only works with CD! Is there any way to get the music in the game just from the cd image?
LikeLike
I think it could be either one of two things.
You might have ripped the CD incorrectly. Try ripping it with imgburn in bin/cue format to make sure the CD audio got ripped correctly.
You might also try reinstalling the game. Some games point to a certain CD drive when you install them for CD audio and it might be looking for your physical drive instead of the ripped image you are now using.
LikeLike
Thanks! Yeah, I definitely did something wrong earlier. Now it works fine with bin/cue file.
LikeLike
Is there anything that can be done for old game that have really bad stuttering? I’ve been trying to replay some of the old educational jumpstart games and the two barbie detective games but they don’t seem to get along very well with the settings. I’ve tried lowering the processor speed but the stuttering is still really even using the pentium 75 setting. Is there anything that can be done to make them run better, or are they just doomed to stutter forever?
LikeLike
If it stutters even at 75Mhz then probably not.
However, if they don’t need much 3d acceleration you might have better luck trying to run them in a virtual machine, probably running Windows XP. I’d recommend Virtual Box.
LikeLike
No S3 Virge shows up when I download it.
LikeLike
When I type format c: it says bad command or file name.
LikeLike
After Fdisk I had to put both the boot image AND CD image for it to get to the choices again and I get the blue Format screen not like what you said for putting 98 in. Now I can proceed formatting.
LikeLike
Very nice I’m a old guy who found a box of games in the attic and I hope this works because w10 and vbox or vmware doesn’t!
LikeLiked by 2 people
As long as you have a good CPU you should be able to play the vast majority of Win 95/98 games.
Let me know how you get on.
LikeLike
Thank you for your concise, easy-to-follow instructions. I got it right the first time, and have no built a number of Win95 installs (mostly with 350MB or so hard drives) for use with my favorite games from that period. PCem is now up to v.14, and the interface is different, but underneath it all the information is the same: just grouped differently.
I do have one question: you outline methods for getting items into the emulated PC, but is it possible to get items out back to the host computer? Some Win95 games run perfectly well even in Win10 – Broken Sword 1 comes to mind, but the old 16 bit installers won’t work in the 64k environment. PCem is a nice answer here.
LikeLike
Yes, you can actually create an image to transfer files with, with windows disk management. It’s a bit of a protracted process but not too bad:
On your host install of windows, type Disk management into the start menu, it’s comes up as “create and manage hard disk partitions” in Windows 10.
Open the action menu and hit “Create VHD”, fill in the size you want the vhd to be (1000MB will probably be fine for this purpose).
Hit OK and Windows will create the image file. Once this is done, you will need to find the image you’ve created in the lower half of the disk management window, right click on it and de-mount it so that we can make changes to it. You don’t want to format it with your host version of windows, we’ll let PCem do that.
Now, change the extension of the .vhd file you’ve just made to .img
You can then mount it as a second hard drive in PCem. Load into Windows 95 and open up device manager. Under hard disks you will see a second hard drive listed. Right click on it and open it’s properties. In here you can choose to make the drive removable. Select a drive letter and windows will ask you to reboot.
Once it’s rebooted you should see the drive appear as a removable drive that you can copy files into. Once you’ve put what you need onto the drive, you can then shut down PCem and rename the image back to .vhd
You can now go back into Disk Management on your host OS and mount it by clicking on “Attach VHD” in the action menu, it will appear as a drive and you can now pull the files off of it.
LikeLike
This worked perfectly; thank you so much!
One thing of note: I noticed that Win95 would allow me a total of three disks only; normally a floppy disk, the primary hard disk (C:\) and one other – normally the CD-ROM drive. I could substitute a secondary hard drive per your instructions, which in essence was a virtual removeable hard disk drive. But if I did that, it didn’t allow me the CD-ROM. Not that this was earth shattering, just an interesting point.
Again, thank you for your time and effort and crystal clear instructions.
Regards,
Smectymnuus
LikeLiked by 1 person
Happy to help. 🙂
LikeLike
Im sorry to ask, but could you please update the guide to work with PCem v14, as i cannot seem to find any working guides for that versions (the latest version)
LikeLike
I might at some point but I’ll probably wait to see if it changes even more in the next update or not.
You should still be able to use this guide, the interface and menus are a bit different but all the settings and the basic process is all the same. Just have a click about in the menus and you’ll still be able to find all the settings I talk about.
LikeLike
I got as far as formatting and ready to put in the ISO but the E prompt doesn’t work. It won’t read any ISO’s.
LikeLike
You are awesome. Thank you so much for this guide; it was hugely helpful.
LikeLiked by 1 person
Help! I am stuck on this step: At the E:\> prompt type setup and press enter. Press enter again and the installer will run through it’s checks to make sure everything is ready to go. Once it’s done, press x on your keyboard to Exit and jump into the Windows setup proper.
After I press the X button I get an error that says: An error occured while trying to initialize the VGA video adapter.
I am not sure what to do at this point.
LikeLike
I can only guess you haven’t set up the emulated machine properly. Check that you have the video card set to S3 virge/DX
LikeLike
I’m getting to the “Other Devices” part. and that’s where i’m stuck. I see “PCI Multimedia Video Device”, I open properties, click “Update Driver”… but that is where it fucks up. I select the unzipped Voodoo2 folder in my C:\ but it says “The selected location does not contain an updated driver for your device” and clicking finish just takes me back to the properties
LikeLike
I FIXED IT! I’m a moron…. i never noticed the “Config” icon next to the Voodoo Option under the video tab… Heh…
LikeLike
I finally got an E drive. What I did was instead of making a blank harddrive I just used your boot image in the place of the hard drive and THEN I got the damned E drive.
LikeLike
However it then says it needs a bunch of memory on my C Drive. I have given up and just going with Virtual Box. I know why PC Emu hasn’t really caught on it’s too hit and miss. Mostly miss.
LikeLike
Anyone who claims to have gotten PCEmu is as truthful as the American politician who gives free treats to people who don’t necessarily deserve it at tax payers expense. (Meaning the cost is hidden to the public). Makes me realize why there is no such thing as a free lunch.
LikeLike
I get Windows requires 7340032 kb of space even though I set my HD to 512mb
LikeLike
Turns out I was using a bad ISO like a bad politician treat from Win World. I was using the Microsoft Win 95 and 95 Plus one which I assumed had both in it but I am not thinking it’s just the extras only but the title is dubious.
I had to find from a video an appropriate one and it then recognized my hard drive and I set it to 2,000MB.
LikeLike
How come PCEM has no sound even though I set it to SB16? No Chimes.wav happens.
LikeLike