

This guide is out of date. I’ve written an updated guide on setting up PCem’s successor, 86 box here:
Setting Up 86box and Windows 98
If you have an older computer or just prefer PCem, then carry on with this guide:
————————————————————————
PCem is an impressively versatile emulator, capable of emulating a wide range of IBM compatible PCs. From XT 8088 based machines up to Late Pentium I MMX era machines, making it a viable alternative to DOSbox and virtualization.
The latest version at the time of writing is PCem V12. Heading up the list of improvements are speed optimizations and Vodoo 2 support.
Games from the late 90s era of Windows computing are notoriously difficult to get working on a modern install of Windows. These latest improvements make PCem an attractive option to play around with.
This tutorial will focus on setting up PCem to run Windows games from this era. You should also be able to run older Windows software and even many DOS games well as a bonus. If you need to see any of the images in more detail, right click on them and click view image. The files needed should be easily searchable by the names I give.

Things you will need:
- A fast CPU. At least if you want to run the more demanding 3DFX titles. Something around the 4Ghz mark. Emulation of a single thread CPU is impossible to run on multiple threads. As a result, a slower clocked octo core CPU will be no help to you here. I’m using an i7 3820 running at 4.2Ghz and I’m able to get performance similar to a Pentium 1 200Mhz. This gets me a good frame rate in games like Quake 2, Need for Speed III and even pretty playable frame rates in Quake 3. A host CPU of around half the speed will likely be able to keep up with games made for a Pentium 1 90Mhz.
- PCem. Get it here:
http://pcem-emulator.co.uk/downloads.html - Compatible BIOS files:
https://mega.nz/#!p99klbTb!A5-E97bh290pALB7vayX7t8ibVLgWKfmFf2GoU8oj04 - Windows 95 OSR2.5 CD image:
You can use an actual CD or a .iso disc image.
https://winworldpc.com/product/windows-95/osr-3
From what I understand this version of Win 95 is the one to get. Better compatibility with things apparently. It does cause a slight complication during the setup but it’s not a big deal. - Windows 95 boot floppy disk image:
You’ll need floppy disk image windows95b.img or this boot.img here:
https://mega.nz/#!888XlQ4A!pRdORIFx3W4zw8KAemkOUZVTm3Gu4X0gPzgzn-1mLDY
We’ll need this to setup our virtual hard drive. Make sure it’s a .img file. - Win9x Voodoo 2 drivers:
http://www.falconfly.de/voodoo2.htm
Get the latest reference driver from 2000. Just note that you will need to install DirectX 7 for many games to work properly, even if the games themselves don’t require Dx7.
You’re also going to need to install some additional software:
- A tool to extract compressed archives. I recommend 7zip:
http://www.7-zip.org/download.html - Daemon Tools lite or similar CD image mounting software:
https://www.daemon-tools.cc/products/dtlite
Windows comes built in with it’s own image mounting software but it’s limited in compatibility. - ImgBurn:
http://download.imgburn.com/SetupImgBurn_2.5.8.0.exe
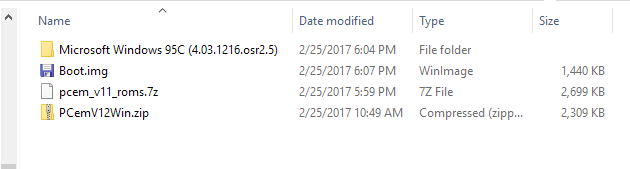
Once you’ve got all that you should have a collection of files that looks something like this:

Initial Emulator Setup
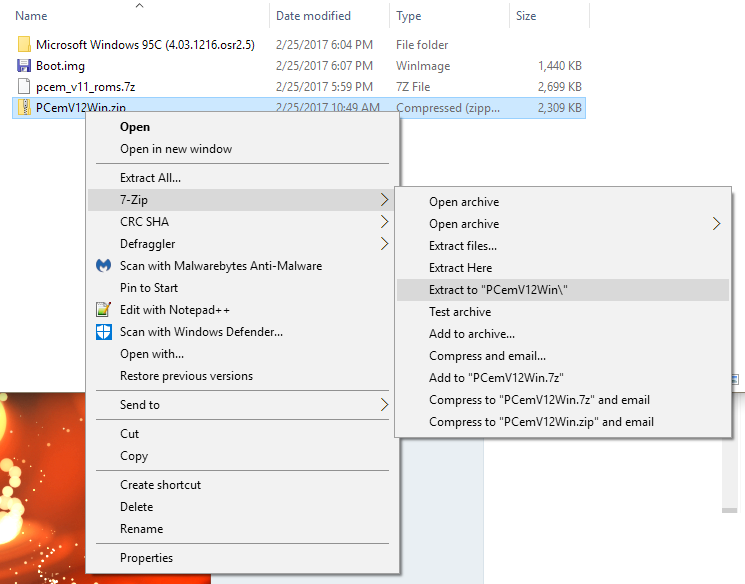
To get things started we’ll need to extract the PCem archive. Plonk it where ever is convenient to you. I’m going to keep everything in the one folder.
Extract the pcem_v11_roms.7z archive somewhere else convenient too.
Open up your PCem folder and in a new window, open up the folder you extracted the pcem_v11_roms archive to.
In the PCem folder there is a folder called roms. We’ll need to copy the contents of the pcem_v11_roms folder into this folder.
Select all files inside pcem_v11_roms and drag them into your PCem\Roms folder. Overwrite files if it asks.

Now all those funny named folders have ROMs inside them. Most importantly you should have a file named 55xwuq0e.bin contained within the 430vx folder. This is the mother board BIOS ROM that we will be using.
Back out to the root of your PCem folder. Fire up PCem.exe
It might start up as some sort of Sinclair computer. Just ignore that. If your mouse cursor has become trapped within the emulator press Ctrl + End to get it back. Open up the settings menu and click configure. Change the options in the window that pops up to look like this:
(Update 27/12/17:
PCem is now on version 15. The configuration menus are a little different now, but all the settings I show are still relevant. The menus just look a bit different so you might need to click around a bit to find the settings I talk about.)
The Award 430VX PCI motherboard is now listed as “[Socket 7] Shuttle HOT-557”
I’m not sure why but this is what you will now have to set as your machine in the current version of PCem instead.

Don’t be concerned about the CPU speed too much, we can bump that up at any time and using a slower Pentium runs better during the initial setup of Windows.
Click the configure button next to Voodoo Graphics and change the settings to these:

It will complain about having to reset, just hit okay in both instances. The emulator will restart and you should be presented with a nostalgic POST screen – at least to some of you:


Setting Up the Virtual Hard Drive
Open up the Disc menu and find Configure hard disks…
Make sure under C: that Hard drive is selected and then click the New button.

In the window that pops up, click the unhelpfully labelled “…” button.

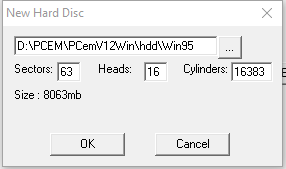
This will let you select a location for your virtual hard drive. The file is going to take up roughly 8GB of disk space. I recommend making a folder labelled “hdd” in your PCem folder and placing it in there. It will ask you to choose a name. Call it something like “Win95”
Next you’re going to want to change the value in the Cylinders field. The maximum is 16383 so lets go with that. Leave Sectors and Heads at their default values of 63 and 16 respectively.
Once you hit OK, PCem is going to lock up. Don’t panic, it’s creating the virtual hard drive file. It’ll take a minute or two before popping up a window reminding you to partition and format your drive. We will get to that soon. Hit OK and PCem will complain about needing to reset again. Hit OK.
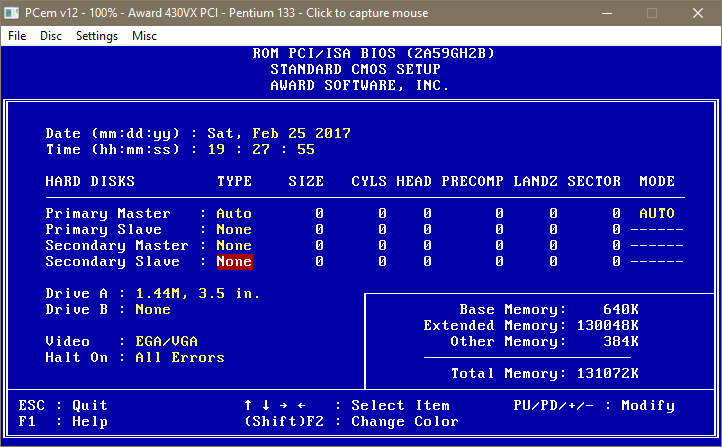
You should now be back at the POST display we saw earlier. Click on the display and hit the DEL key to enter the BIOS setup screen. Select STANDARD CMOS SETUP.
Use the down arrow key on your keyboard and select Primary Slave. Primary Master should be set to Auto. To speed up boot times a little we can set the three other drives to None. Press PgDn twice to change this and repeat for Secondary Master and Secondary Slave.
Hit ESC to back out to the main menu and then press F10 then Y and then Enter on your keyboard to save the settings. The emulated system will now reboot, go through the POST screen again and then complain about NOT HAVING ANY BOOT DISK. Time to fix that I suppose.
Press Ctrl + End to release your mouse from the emulator and open up the Disc drop down menu. Select “Change Drive A:” Navigate to the boot.img I had you download, select it and press open.
Now open up the File drop down menu and select Hard Reset.
The emulator will now restart and boot from the floppy disk image we just virtually inserted into it’s virtual floppy disk drive virtually.
You’ll be presented with this screen:

Hit 1 and enter to continue with CD-ROM support. Give it a few moments and you should have something like this on your screen:

Type in “fdisk” at the prompt and press Y to say yes to large disk support.
Now press 1 and enter to Create DOS partition or Logical DOS drive. Then 1 again at the next screen to Create Primary DOS Partition

After a brief moment it will ask you if you want to make the maximum space available plus make the partition the active partition. Press Y for yes and then enter.
Fdisk will then inform us that we MUST restart the system. Let’s not upset it. Press Ctrl + End and select the File menu and Hard Reset once again. Say yes to CD-ROM support once again when you’re asked.
Once the system is back to the A:\> prompt type in “format c:” and press enter. It will warn you about erasing all data on c: but since we haven’t put anything on there yet I don’t think we need to worry about that. Press y and then enter.
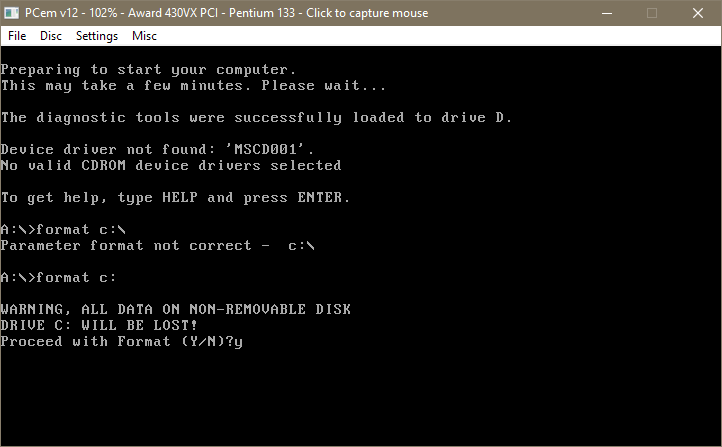
Formatting will take a few minutes. Once it’s finished it will ask you to give it a label. You can hit Enter for no label or call it whatever you like.
That’s the Virtual Hard drive setup and ready to have Windows installed on it.
 Installing Windows
First we are going to need to mount the disc image of the Windows 95 installation CD. There are a couple of ways to go about this.
You can either use Daemon Tools to mount the image, once mounted in Daemon Tools you can then open the settings menu in PCem, navigate to CD-ROM and then select the virtual drive you have the Windows CD mounted to. You may need to close and re-open PCem in order for it to see the newly mounted image.
If you don’t want to use Daemon tools, you can mount it directly within PCem by going to Settings–>CD-ROM–>ISO… Navigate to the Windows 95 OSR 2.5 I had you download at the beginning, select it and click Open.
Whichever method you decide to use you will need to restart PCem. It will again boot from our boot disk floopy image. Again select CD-ROM support.
Once you’re at the A:\> prompt, check that the CD is mounted correctly by typing e: and press Enter. You should now be at an E:\> prompt. Type dir and hit enter. You should see these files and folders listed:

There is a bug with the version of Windows that we are installing that won’t let it read from the WIN95 folder on the CD during the install, so we’ll need to copy it over onto the c:\ drive manually.
First let’s make a directory on the c: drive to copy the folder into.
Type c: and press Enter.
Type md WIN95 and press Enter. (md is the make directory command. you can check that it’s made the folder by typing dir and pressing Enter. It should look like this:

Now we can copy the files from the CD onto c:\ . Type:
copy e:\WIN95 c:\WIN95
Press enter and you should see it copying the files. You can navigate into the folder and check that all the files are there by typing:
cd win95
Then:
dir/p
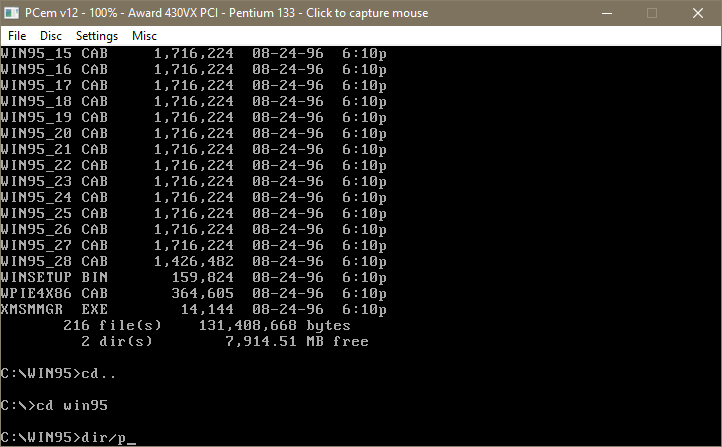
Once you hit enter it will display the list of files contained in the directory. Keep pressing any key until you are returned to the prompt. Once you’ve confirmed the WIN95 folder from the CD is on your c: drive we can go back to the e: and start the Windows setup. Type e: and press Enter.
At the E:\> prompt type setup and press enter. Press enter again and the installer will run through it’s checks to make sure everything is ready to go. Once it’s done, press x on your keyboard to Exit and jump into the Windows setup proper.
 Windows Setup GUI
Alright, you can start using your mouse again. Press Continue to get things started. Press Yes to accept the license agreement and Next two times to get to the type of install you want. Select Typical and hit next. (You can select custom and choose to install additional components like games and mouse pointers but these can also be installed later once Windows setup has completed.)
Once you hit next it will ask you for a COA key. You can search around for one or search around for one.
At the next screen, enter your name and make up a dumb company name if you want and hit next.
It will then ask what type of devices it searches for just check both boxes and hit next.
I forgot to take pictures during this part so here’s a screenshot of a progress bar:

This will take a minute or so. Once that’s done if you selected typical install it will ask you if you want to install the most common components or if you want to choose. Just select common and move on. You’ll then be asked if you want to make a start up disk. Say no and click next and then next again to start it copying files.
It will take a few more minutes to do it’s thing. Once that’s done it will ask you to restart the system. Before doing that make sure to eject the floppy disk image by pressing Ctrl + End and then going to the Disc menu and selecting Eject drive A:

Hit finish and the system will reboot and continue into Windows.
Here’s why we had to faff about, moving files in DOS:

Hit OK. In the next window that pops up click on Browse…
The Win95 folder on c: we created should be right there.

Double click on it.

Windows should see the .cab file it’s looking for and display it in the left panel there. Click OK, then OK again.
Windows will now go through it’s unpacking process. Tell it what time zone you are in when it asks. If it asks you to setup a printer or something else you don’t care about just click on cancel. Once all that is done Windows will reboot again.

The emulator should now boot into the default Windows 95 256 colour desktop, in all it’s turquoise glory. You should find that the base graphics card has installed itself so feel free to up the resolution and colour depth in screen properties. (If you find that you are stuck on a low resolution and low colour mode it means Windows hasn’t automatically installed the S3 drivers, I talk about fixing that at the end of next section.)
You should have also noticed a startup sound indicating sound drivers are also installed.
If for some reason you don’t get any sound, you can try running the add new hardware wizard in the control panel. If it asks for your Windows 95 CD just point it to the WIN95 folder on the c: drive that we created.
Grab this Soundblaster software suite CD image if you want more advanced features and other related stuff:
http://www.vogonsdrivers.com/getfile.php?fileid=13
Okay, moving on. Head on over to the device manager, you will find PCI multimedia Video Device without drivers. That’s our emulated Voodoo 2. To install it we’re going to need a way to get files from the host system into the emulator. This is where Imgburn comes in.

 Importing Files Into PCem and Installing 3DFX Drivers
Extract the Voodoo 2 drivers you downloaded and open up imgburn.
Select Create Image File from Files/Folders.
Hit the Show Disc Layout Editor, find your voodoo 2 driver folder and drag it into the lower panel.

Close that window. And find the sneaky little toggle button I’ve highlighted below that tells Imgburn to write the image to a disc image and not your optical disc drive (if you have one).

Click the little folder to tell Imgburn where to save the image we’re creating to. Then click the big button in the bottom left to create the image. Hit Yes to select the default image name and we’re done with Imgburn.
Mount the image you just created with Daemon tools or with PCem as described earlier and a CD containing our files will appear within Windows 95.

Run the Voodoo 2 executable and extract the driver files somewhere handy. c:\voodoo2 is good.
Open up the control panel, navigate to System, open up the device manager tab and find PCI Multimedia Video Device. Double click on it, click on the driver tab and click on Update Driver…
Choose Yes to search for the driver and click next. Give it a moment and it will say it was unable to locate a driver but there will now be a button labelled Other Locations that you can click on. Click Browse, find your voodoo2 folder on c: and click OK and then OK again.

Click Finish and Windows will throw up an error message telling you to insert the disk labelled Voodoo 2.
 Windows 95! \o/
Hit OK. Again, click browse on the window that pops up and yet again navigate to your voodoo 2 folder on c:\ until a .dll file appears in the left panel.

Click OK. Then OK once again. This bullshit is fairly standard procedure when installing drivers in Win9x. Their are many things I remember fondly about Windows 95 but installing new hardware is not one of them.
It will install the driver, prompt you to restart the system. Once rebooted, you should now have the Voodoo 2 drivers installed.
—
If the S3 graphics drivers haven’t installed themselves it should be simple enough to fix.
I’ve uploaded a CD image file which contains the S3 drivers (and vodoo 2 drivers as a bonus) that you will need here:
https://mega.nz/#!d4MhCYCD!kOkZFQaV8Jzpkp9CG2s5RGI1VXRXUEwTvjyh1qlC_Bc
Mount it with Daemon tools just like we did above and right click on the Windows 95 desktop and select properties then click on the settings tab. Click on the Advanced Settings button.
Click on the monitor tab and make sure it says Plug and Play monitor. If it doesn’t, click the change button and change it to that.
Once that is done you can click back onto the adapter tab and click the Change… button there. Click the have disk button and point it towards the S3 folder in the CD drive. With a little luck, after a reboot Windows should now be using the S3 Virge as it’s default display adapter and you will be able to use higher resolutions with more colours.
—
And that’s pretty much it. You’re ready to install some games.
If you think I’ve said something dumb and need to correct something, be sure to let me know in the comments. Please let me know if any of the links are dead too. I hope you have a good time using PCem and that this has been of some use.
 Things to Note
A quirk of PCem to be aware of is that if a program isn’t using much CPU the emulator can slow right down. Sim City 2000 for example will run very slowly when you aren’t moving around the map and in game menus, you might notice sound stuttering. The best fix for this is to lower the CPU down to a slower chip. Like a Pentium 90Mhz. The general rule of thumb is to use the lowest speed CPU that will allow you to run the game smoothly. For 2d games use something like a Pentium 90 and for 3d use a Pentium 200Mhz MMX. You will probably need to experiment with it a bit. You can change the CPU while the emulator is running. It’s best to do it while on the Windows desktop because some games can freeze up if you swap around CPUs while they are running.
If your CPU has hyper-threading (or an AMD equivalent) it’s worth turning it off in your bios if you need some extra performance. Overclocking your CPU will also make a big difference. Raw clock speed is what counts most with emulation like this.
Full screen can be found in the settings menu under video. Direct 3d tends to look best and be sure to set Full screen stretch mode to 4:3 if you don’t want it to look ugly and stretched. Press Alt + Ctrl + PgDn to exit full screen.
 Testing Out Some Games
I’ll throw up a few screenshots of games here and describe the sort of performance I get with each.
The Need for Speed: Special Edition
With the CPU set to 166Mhz audio is quite choppy in the game menus. In game it runs perfectly with high settings and no audio issues.
Need for Speed III: Hot Pursuit
You may need to install the DirectX 5 redistributable that comes on the game’s CD before this game will work properly. Be sure to set the video device to Voodoo 2 using the games video setup program. Running with a 200Mhz CPU the game runs smoothly. The menus are a little bit choppy but in game performance is good with all the graphical bells and whistles turned up.
Quake II
I was running this from a physical CD and was experiencing poor performance and choppy sound. Ripping the disc with ImgBurn to my hard drive and mounting the image solved it. I believe this was due to CD audio played during the game. The game runs great in Glide mode. Very smooth.
Interstate 76

Here we have -at least for me- the best reason to setup PCem. Interstate 76 will not run correctly on a modern computer. Today’s CPUs completely break the physics and AI rendering the game unplayable. Even the gog.com version suffers from this problem. You can make the game playable by limiting the game to below 30FPS to fix the physics issues but flamethrowers will still be broken.
A shame as you aren’t going to find a better game in the car combat sub-genre. I love this game.
At first performance in PCem was disappointing. Running the game at anything higher than 320×240 resolution resulted in a very choppy frame rate. However installing the official “gold patch” allows the game to run in Direct3d or Glide mode instead of the original release’s software renderer. Running in either of these new modes results in a very smooth frame rate and the game becomes perfectly playable. The 3dFX glide mode looks the best. Great stuff.
If you start seeing texture corruption, quickly hit escape to enter the menu and then jump back in and you should be good for the rest of the mission. If you experience a crash soon afterwards, create a .bat file with these two lines:
SET SST_TMUMEM_SIZE=2
i76.exe -glide
And use the newly created .bat file to run the game. You can also limit 3DFX games to 2MB of memory in the 3DFX control panel (the one that is found by right clicking on the desktop and selecting properties.)
As a result of cobbling together a vehicle combat game using the Mech Warrior 2 engine, I76 was never a particularly bug free game. Be sure to check out the games Pcgamingwiki page for more info:
https://pcgamingwiki.com/wiki/Interstate_%2776
i76 gold patch download:
https://mega.nz/#!BwsXxKZb!ySGRNZnCR8AcIkhMO0iaH8tFIilsb2loWgdDrEXxpOc
Sub Culture

With the CPU set to a Pentium 166Mhz and running the 3DFX version, in game frame rates are 30+. Runs great, very playable. FMVs play perfectly. Menus have choppy music. Running a slower clocked Pentium fixes this but will result in poorer frame rates in game. The Direct3D version of the game seems to run pretty much the same.
I haven’t played much of this game but it seems to have a bit of a cult following. It’s like Elite but miniature and in the ocean. There isn’t much support for this game and as it uses a 16-bit installer program, installing it on a 64-bit install of Windows isn’t much of an option. Another good use for PCem.

It appears there is only one sound file. Microsoft sound (pretty) but I wonder if it happens to be I did the OEM version.
LikeLike
Just curious if you could recommend an alternative to ImgBurn, installed it on my computer and it is infected with Malware. Ended up with ransomware and had to completely scrub my hard drive, lost a bunch of stuff. Everything else seems to be fine ( I have been exceptionally careful this go round), and it’s just ImgBurn that seems to be an issue. Also, the games I am interested in are old Carmen Sandiego games that I found on MyAbandonware, do you ‘install’ them using the same method as the voodoo2 drivers?
Thanks for the help.
LikeLike
I am very partial to PowerISO. I’ve used it for a ton of old games and gotten them working in Windows 10 even (AvP2, Elite Force 1+2, Soldier of Fortune 2,etc)
LikeLike
I just hit this, too. ImgBurn installed a bunch of awful things on my machine.
This tutuorial is otherwise great.
LikeLike
Wow. Sorry that turned into to such a noisy post.
LikeLike
I’ve never had a problem with it, I wonder if you guys are downloading it from one of the third party mirrors and they have injected the installer with garbage.
I’ve changed the download link to go directly to the official mirror which I have installed on my system with no issue just to make sure.
LikeLiked by 1 person
who uses imgburn? I use burnaware
LikeLike
Sorry Anna but the web is nothing but shills and bots now. 😦 Vote better in 2024 for your nation. Don’t let your politicians sell out to China!
LikeLike
The reply seems to go to random places instead of the user above.
LikeLike
HEY I cant thank you enough for this. It is by far the best tutorial on getting this done. I cant seem to get the graphics drivers in no matter what I do. They’re mounted and recognized and unzipped into my Windows 95 which is all set up, but every time I go to properties and Advanced Display Properties, I try to say “Have Disk” and it ready it alright but I get the error message “The specified location does not contain information about your hardware”. I have tried everything and can’t get past this. Any help would be appreciated so thoroughly Ive been through so many emulators trying to get Win95 workable for games and this absolutely runs the OS best. I have definitely directed it to the right spot and it sees the file in the left window. I’m really stumped. Thanks again!
LikeLiked by 1 person
PCI Multimedia Video Device is nowhere to be found in my device manager.
LikeLike
same still trying to figure this out
LikeLike
EDIT: Got it to work, I cant thank you enough for what you did here. This is so great :*)
LikeLiked by 1 person
You mean the comments work?
LikeLike
How sir, I have no PCI area either…
LikeLike
David Petnick “EDIT: Got it to work, I cant thank you enough for what you did here. This is so great :*)”
Why?? Why would you not tell us WHAT YOU DID TO GET IT TO WORK????
LikeLike
You really need to take your guide down. It does nobody any good to have non working stuff. I managed to get Windows 95 working for a week. Dad has a saved copy of a full Sci Tech we thought could get it to go to 32 bit color as it did on our old 98 Virtual Box but all it did was fuck up PCEmu to where sound no longer works so I deleted it hoping to reinstall windows but windows cannot find the ISo even though it’s in there.
So therefore everything in this guide is thrown out the window on your head.
I CAN get Windows 2000 to work and it’s the only one since it goes directly from the ISO no stupid work arounds or weird things. I am just sticking to that and advise all readers who have PCEMU trouble to do so tool You won’t regret it. You just won’t get the full desktop themes.
But at least you can rest assured you won’t get mind raped by non working tutorials. Things have changed since last year and I personally blame the Mandela Effect. Berenst(e)ain Bears?
LikeLike
I don’t give two flying fucks if you think I’m cheating by skipping the 9X bull.
LikeLike
Never mind. Even tha tdoesn’t work. I am going to have to reinstall PCEMU. The whole thing got fuked with Sci Tech somehow.
LikeLike
I can’t help but wonder if your laughing all the way to the bank with people who have so much trouble with PCEMu.
I can’t help but wonder if your doing any Russian Conclusion stuff and getting involved with the right wing banker setup.
LikeLike
I do admit I get my ISO’s from Win World. The one 95 I had was gotten from somewhere else. I think Win World has corrupt files. I wonder if they are the ones laughing to the bank or you and them are together.
LikeLike
One thing I figured out as I was tired was this guide doesn’t explain is to NOT have the boot disk and ISO in at the same time. That didn’t allow me to do F disk and Format C it would launch straight to Windows after Fdisk and fail.
LikeLike
Kyle, are you stupid or something?
LikeLiked by 1 person
What you do is fdisk first then once that is done THEN put the ISO in to do the formatting.
LikeLike
However the disketts from All BOot disks are corrupt still. Only yours works.
LikeLike
The other way I got better boot disks is Win World but they hide it. You have to hunt by format and only the FE has a boot disk but does all your steps automatically. The moment the boodisk.img goes in it does the Fdisk and format C then you do the “Please Insert Disk B.etc” messages as you install. Saves a LOT of headaches.
LikeLiked by 1 person
Kyle: switch to decaf.
LikeLike
How about help instead of being insulting. The internet has turned into a hate box because of assholes like you.
LikeLike
I wanted to add something to this since I noticed people were having issues with the initial install like I ran into. The Boot disk you provide isn’t the same version you used in your guide. At least it appears it isn’t . It boots into some Autoinstaller mode and tries to format the drive (it will fail if you choose yes). And there’s no CDROM support. I was unable to get PCem to recognize the win95ISO.
So I went on WinWorld and got a Bootdisc version close to it. It’s the OSR2 Dell OEM version I am using. The only difference is it gives you more CDROM options. Just choose the first option from the list, upon boot. Everything else works as the guide describes. I didn’t have to copy any Win95 CD folders or anything. I just loaded the ISO through PCem and it worked.
As of this writing, I am using version v14 of PCem March 1st, 2019.
LikeLiked by 1 person
I did that and got the OS to install but no sound whatsoever. A whole bunch of file not found messages when searching for plug n play but the OS’s do install. You just can’t do anything with them.
LikeLike
I think PCEMU has turned into some big virus. Russian Anonymous or whatever they are called has likely gotten ahold which is why there is nothing but crap compared to 3 or so years ago. I had too crappy of a PC to run it then but I did get sound to come out of PCEMU after installing WIn 95 but it was just too laggy. I only got sound once last year then after trying to put Sci Tech Display Doctor in it just crashed the whole machine and I could never get sound out of PCEmu since. Even going back to previous versions of PCEMU still produces no sound.
LikeLike
I ran through everything, re downloading all the files from here to make sure everything still worked as I have written and I encountered no issues.
I’m not sure why you had that problem but I’m glad you got it sorted.
LikeLike
I love this. Great post, but I’m stuck. I got Win95 installed and got to the boot screen (the clouds and the loading bar at the bottom, but after about 10 seconds, PCem crashes and the entire program shuts down. No warnings or errors or anything. Tried safe mode and step by step verification. No luck. Any advise?
LikeLike
No, I’m afraid I’ve never encountered that behavior so I don’t know.
One possibility is if you have overclocked your CPU or RAM it might not be perfectly stable and you could try reducing any overclocks you’ve done on your host PC.
If you aren’t running an overclocked system then I really don’t know, sorry.
LikeLike
Then don’t post misleading guides instead of being insulting. Is that too hard?
LikeLike
I finally did what Brussells did and got those cab files.
LikeLike
Are you personally okay in the head? Like fucking hell your brain is full of shit. Your probably American.
LikeLike
And you sir, are probably a filthy eastern fudge packer.
LikeLike
Brussells knows a lot more then your tutorials obviously.
LikeLike
Damn I keep forgetting to put my new email in. Brussells obviously figured out the ISO’s have been compromised. I managed to do it without copying using only his ISO as it was the only one that worked for Win 95 but no sound came out of it. So I guess it was due to not copying the CAB files.
LikeLiked by 1 person
I decided to give you the benefit of the doubt and I have ran through the tutorial following my own instructions and only using the files I have provided here.
I experienced none of the difficulties you have detailed and all disk images work as I describe.
Please don’t let that stop you from posting about all the problems you have while simultaneously blaming all of them on everything and everyone but yourself. It’s quite entertaining.
LikeLike
I have sound! Brussels your a genius! I would love to give you money if it were allowed!
LikeLike
Kyle I know what your issue is. It’s you!
LikeLiked by 1 person
The problem I have is I have to do instruction 2 when setting up drivers as they are not installed by default anymore and forgot that.
“You should have also noticed a startup sound indicating sound drivers are also installed.
If for some reason you don’t get any sound, you can try running the add new hardware wizard in the control panel. If it asks for your Windows 95 CD just point it to the WIN95 folder on the c: drive that we created.
Grab this Soundblaster software suite CD image if you want more advanced features and other related stuff:
Couldn’t figure out how I got sound to work for a long time until it came to me you have to do it manually. Not sure if it was always that way in the real thing but I recall basic drivers always being there. I had to add new hardware to get sound and will have to do the same with video to get out of 16 bit pixel glory both require restart.
LikeLike
Once that happens Win 9X looks and plays a LOT better.
LikeLike
MS latest upates have killed ANy support for PCemu making it and any new copies not work at all. PCEMU is officially (unofficially) no longer supported. Another person on VMware said his started acting up too and he assumed his VM ware did an update to f’k it up. I told him my PCEMU also started acting weird and I had it working perfectly with Titanic Adventure ouf of Time playing with no stutter.
I was too busy for a few days then came back after the update and wham! It wouldn’t boot and any new copies have no PCI sound. The audio tab remains blank.
Anybody who still says PCEMU works needs to get their glasses checked and redo it with a v15 to fix the bugs or get shot for treason. Virtual machines are a lie and anyone who says otherwise is part of the criminal cartal and needs to be shot by a fire squad.
LikeLike
MS Virtual PC never was supported for 10.
LikeLike
Incredible quest there. What happened after? Thanks!|
LikeLike
The milk truck just arrive and I cloth off
LikeLike
Thanks for putting together this tutorial! They changed the name of the motherboard to Socket 7 HOT 557 but it uses the same bios file that you mentioned in the tutorial. Also I had to change the Primary Slave IDE Device to CDROM in the Machine configuration. Really enjoying this!
LikeLike
Thanks for the update. I’m glad you found it useful. 🙂
LikeLike
Hi there. Great article. But I have a problem on booting. After choosing the win95.img and hard resetting, im still unable to boot. PCem shows “Disk boot failure, enter system disk and press enter” every single time. Help me ;( Thanks
LikeLike
I managed to boot and format. But it doesnt recognize the ISO file; i tried mounting directly CD-ROM>Load image>ISO file but it failed and i even tried with daemon toolkit but no luck. What should i do? ISO files i tried are: WIndows 95c OSR 2.5 and Windows 95b OSR 2.
LikeLike
Start from the beginning.
You’ve done something wrong but I really don’t have a way of telling what that might be, sorry.
LikeLike
Okay i’ll try. thankyou
LikeLike
I’m not sure if this is still being monitored, but I’m having some issues. I’m using the provided files, and windows 95 isn’t recognizing the new drivers?
any help would be appreciated.
LikeLike
Have you tried installing them via the device manager?
LikeLike
Yes. I followed your instructions to a T. After i browse and select the folder, the window says no drivers found in the specified folder.
LikeLike
Hey! Quick question that’s entirely off topic.
Do you know how to make your site mobile friendly? My web site looks weird when browsing from my iphone4.
I’m trying to find a theme or plugin that might be able to fix this problem.
If you have any suggestions, please share. With thanks!
LikeLike
I’m probably doing something stupid, but I’ve made it all the way to the point where I’m trying to get the Voodoo drivers installed. Even though the drivers (all 22 files) are all located in the folder I’m selecting, it still says that it can’t locate the drivers. Is there something I”m missing?
T=
LikeLike
Nevermind. Figured it out. In the initial configuration steps, I had the graphics set for Voodoo and not Voodoo 2.
LikeLike
Easy to follow instructions. Works great. Like the author said, turn your games into image files. When played off CD, they stutter/lag etc. I just loaded them from ISO files and they play perfectly.
LikeLike
I got up to WINDOWS SETUP GUI, but my mouse isn’t visible in that screen, and the keyboard commands don;t work either. Any ideas how to correct?
LikeLike
Thank you for making this guide and taking the time!
LikeLike
I have a problem installing Windows, when I try enter in the drive that has the ISO file of Windows 98 it says “Invalid drive specification”. I used PowerISO to mount the drive to G:. What do I do? Thank you in advance.
LikeLike
Hi, oli. Do you think I’ll be able to emulate pentium 200 at 100%, if i “upgrade” to fx-6350 ? It has avx1 and is somewhere around 3.9-4.1 ghz frequency. Tx!
LikeLike
forget it, you need a 3300X to run 233mhz
LikeLike
{
LikeLike
I followed this tutorial to the T and everything worked perfectly. I’m trying to play a game called HEDZ. I downloaded the ISO from here (https://www.myabandonware.com/game/h-e-d-z-head-extreme-destruction-zone-dh0) and once I installed the game, which went smoothly by the way, the computer freezes when I click “New Game.” Not my computer, or the emulator, but the Windows 95 computer. I’m stuck and have no idea how to troubleshoot the problem. Someone PLEASE help me!!
Discord: Dookie Shoes#2724
LikeLike
Do other games work correctly? Have you installed the required direct-x version? Is the voodoo 2 setup with the correct drivers?
If the answer is yes to all those, the first thing I would try is applying any patches the game received.
https://www.patches-scrolls.com/dl.php?file=hedz_w95.zip
Try installing that and see if it makes any difference.
LikeLike
Quick question: it is telling me an error occurred while trying to initialize the vga adapter.
As far as I know, I downloaded all the roms needed and installed everything properly. I could just go to the BIOS and tell the computer to keep running through the installation despite the error but that could complicate things.
Does it sound more reasonable to just set everything up first, then worry about the VGA drivers later? As long as everything else works properly, I am a happy camper
Sincerely
Joe
LikeLike
EDIT: Never mind.
I forgot to change the emulator setting to vga xp
LikeLike
how did you do that?
LikeLike
Very good info. Lucky me I came across your site by chance (stumbleupon). I’ve saved it for later!|
LikeLike
Is use of newer PCem v16 not recommended or do you know if the hard drive config option is elsewhere? The Disk menu in this version does not appear to have anything resembling “Configure hard disks”
It’s got options for drive A and B, “Dissable BPB checking”, “Create blank disk image”, and Zip drive options.
LikeLike
It’s just a bit different now.
LikeLike
I’m having some issues getting games to run since they need to run in 256 but windows is stuck in 16bit for the color palette? I can’t get any of my games to run because of this but I’m not really sure what I’ve done wrong (if anything) or if it’s something wrong with the files.
LikeLike
Right click on the desktop and open properties, then click the settings tab. You should be able to switch the color palette to 256 bit.
If you can’t, you’ll need to check the video drivers for the S3 Virge are installed correctly (also check you have correctly set the display card to S3 Virge/DX in PCem’s settings for your emulated machine.
LikeLike
I tried but it won’t let me install the sirge drivers. I installed the ones for voodoo since it let me but the ones for sirge it seems like it can’t use them for some reason and I’m not sure why…
LikeLike
NVM I was dumb, I just had to repeat the steps used for voodoo but with the display adapter since it was stuck using a generic adapter for some reason.
LikeLike
Excellent guide! I can run my old Win 95 games now!
LikeLike
How do you get to the C Carmen drive in DOS mode to run both the Where in the World is Carmen Sandiego game and source CD for the extras? It doesn’t work from within Windows and wants you to restart in MS DOS mode but it’s stuck on C/Windows.
LikeLike
I got to the format c: part and it won’t let me do anything, it just says Format not supported on drive C: Format terminated
LikeLike
edit: i missed a step
LikeLike
I just want to point out that for some reason the CD drive is labeled R on the PCEM but I was able to get Win 95 and 98 and 2000 all working. XP also even worked but no sound.
LikeLike