Sale Ends Today! Get annual membership for only $59! You save: $176 ($235).

 Ryan
Ryan
Have you ever found yourself captivated by the timeless beauty of a rose and wondered, “How can I draw that?”
Whether you’re wielding a stylus on your iPad with Procreate or embracing the classic charm of pen and paper, this guide is your golden ticket.
If you’re keen on honing your digital illustration skills, our article on the Best Digital Illustration Courses might be just what you’re looking for. And for those specifically interested in mastering Procreate, don’t miss our roundup of the Best Procreate Courses.
Dive into three delightful tutorials, from the demure allure of a half-bloomed rose to the grandeur of a full blossom, and even a beginner-friendly version to kickstart your journey.
We know the rollercoaster of emotions—curiosity, excitement, and, yes, the occasional frustration.
But remember every petal, every curve, is a step closer to your masterpiece. So, let’s embark on this artistic adventure together and watch as your rose springs to life.
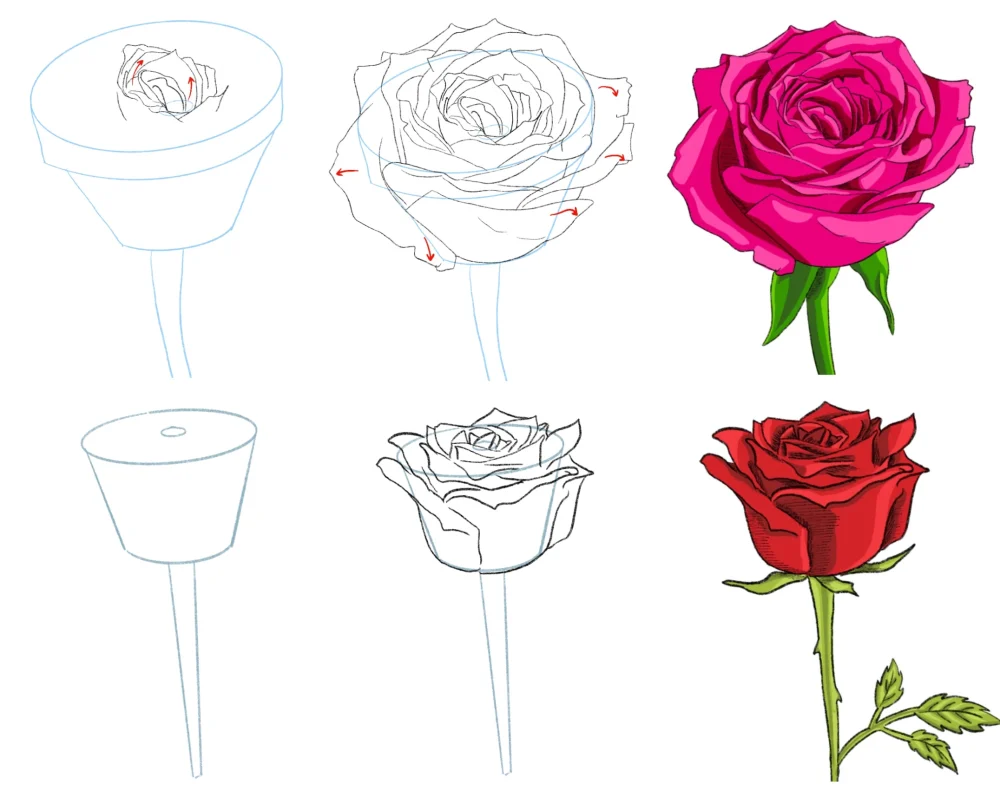
Let begin the journey by learning how to draw a half-bloom rose.
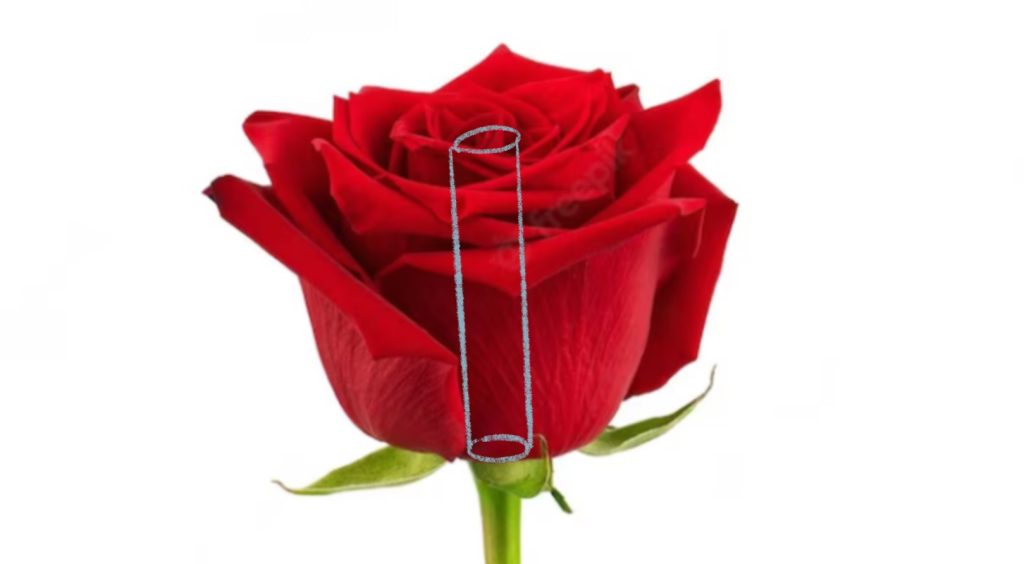
The reference image acts as a visual map, guiding you through the rose’s intricate details and overall shape.

Choose a reference that clearly displays the rose’s structure, from its center to its outer petals.
Remember, this image is your guide, not your master. It’s there to inspire and inform your drawing, not to restrict your learning process.
The next step is close observation. This is more than a casual glance; it’s about studying the details.

Focus on the overall shape of the rose and also the details like how petals curl and vary in shape & size. This observation aids in understanding the rose’s structure and guides your sketching.
A thorough examination is foundational to every great drawing. With your observations, you’re ready to begin sketching the rose’s basic shape.
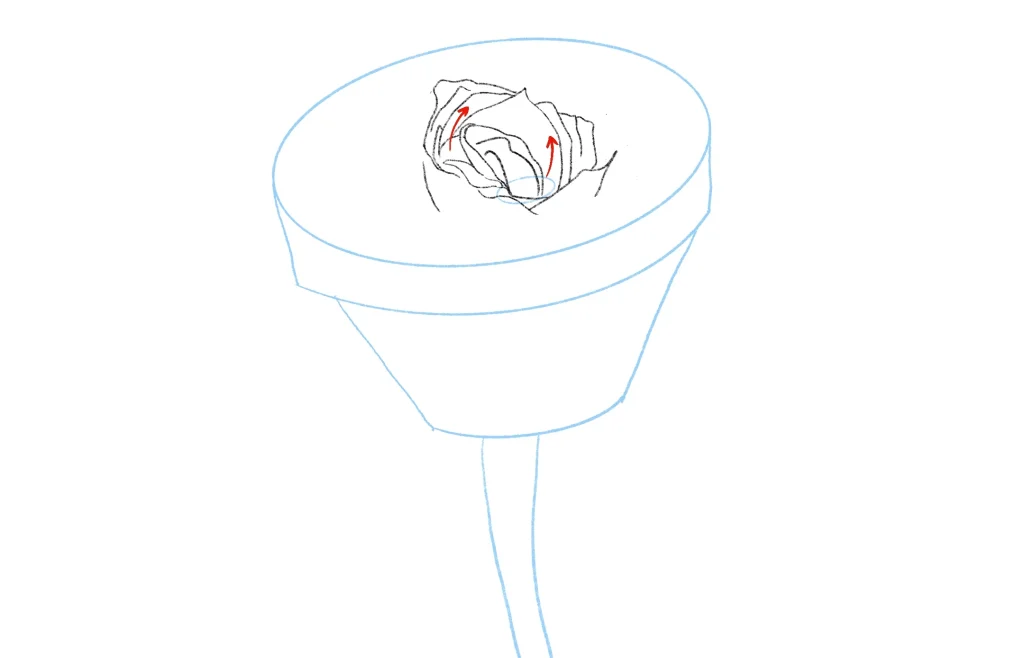
Start by sketching an elliptical shape, like the top of a cup. This represents the opening of your half-bloomed rose. Below this, draw a slightly tapered cylinder to form the body and the base of the rose.
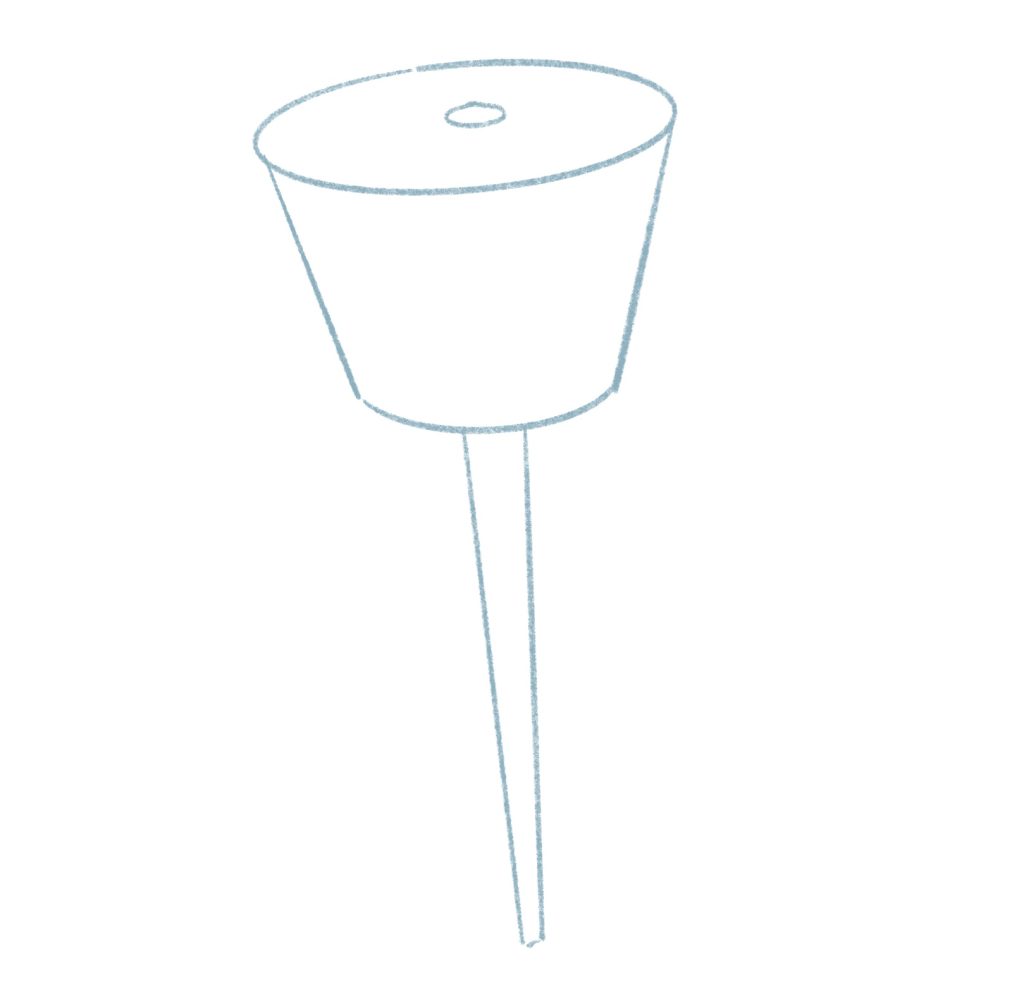
This basic structure will guide the placement of the petals in the next steps. At this stage, precision isn’t the goal; you’re simply laying the groundwork for your drawing.
Start by drawing two petals at the center.

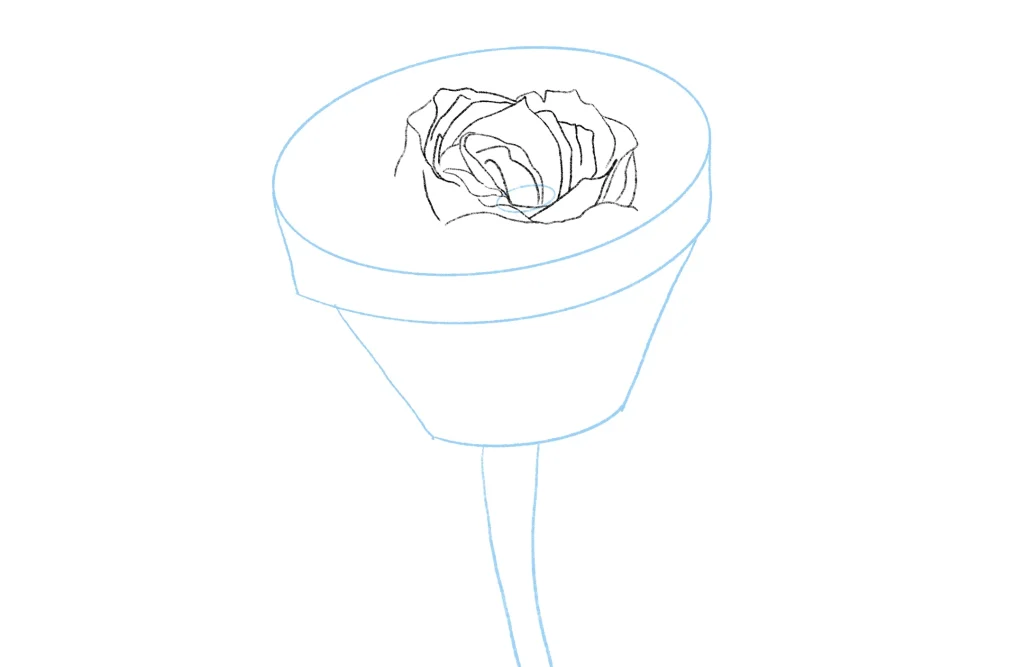
Surround the center petals with more petals

Keep adding petals. Observe how the rose is taking shape.
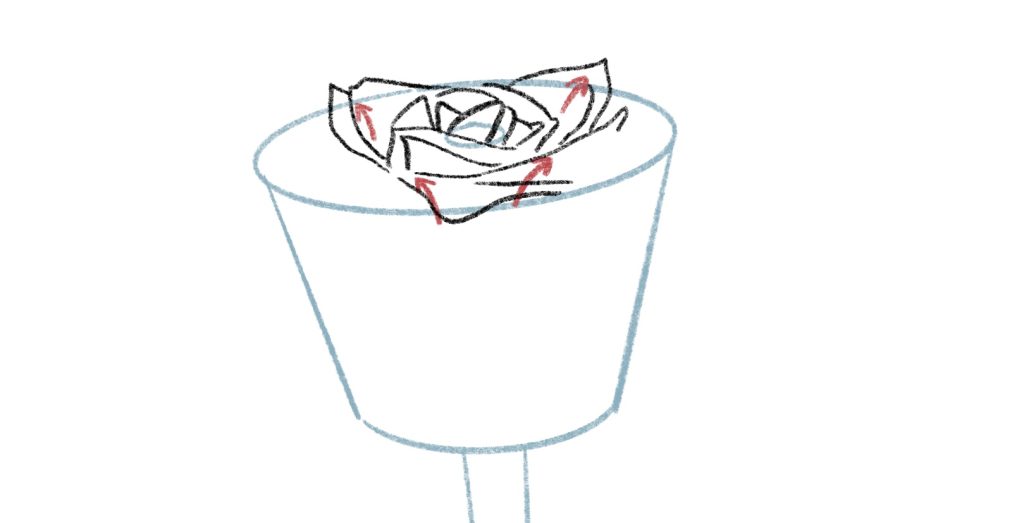
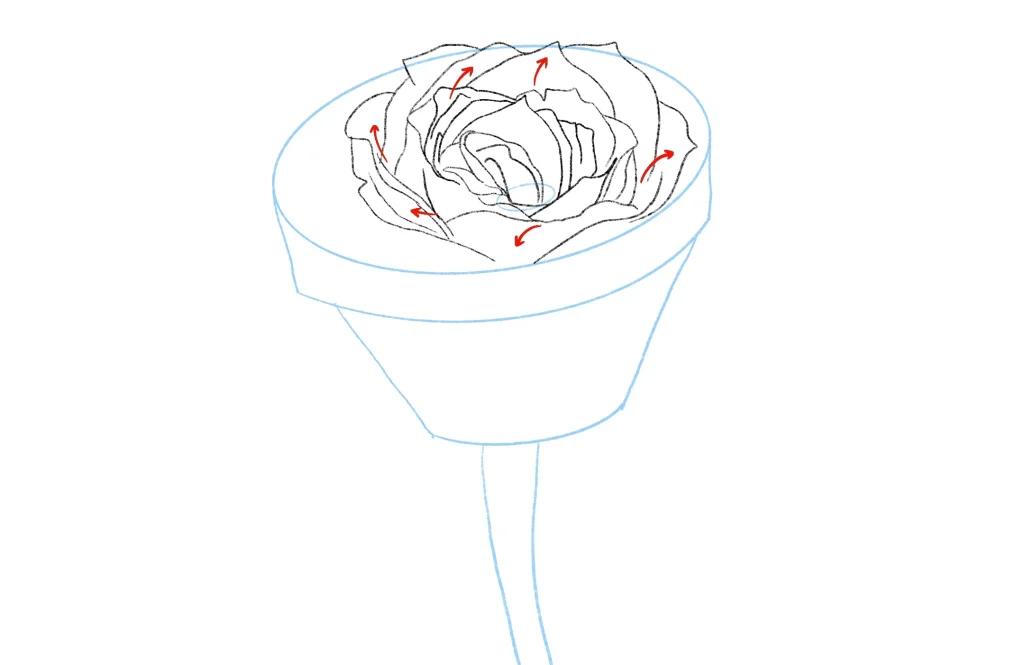
With the center of your rose established, it’s time to add the larger outer petals.
These petals should start where your inner petals end, curving outwards to show the rose is half-bloomed. Make sure to connect the larger petals at the base of your initial shape.
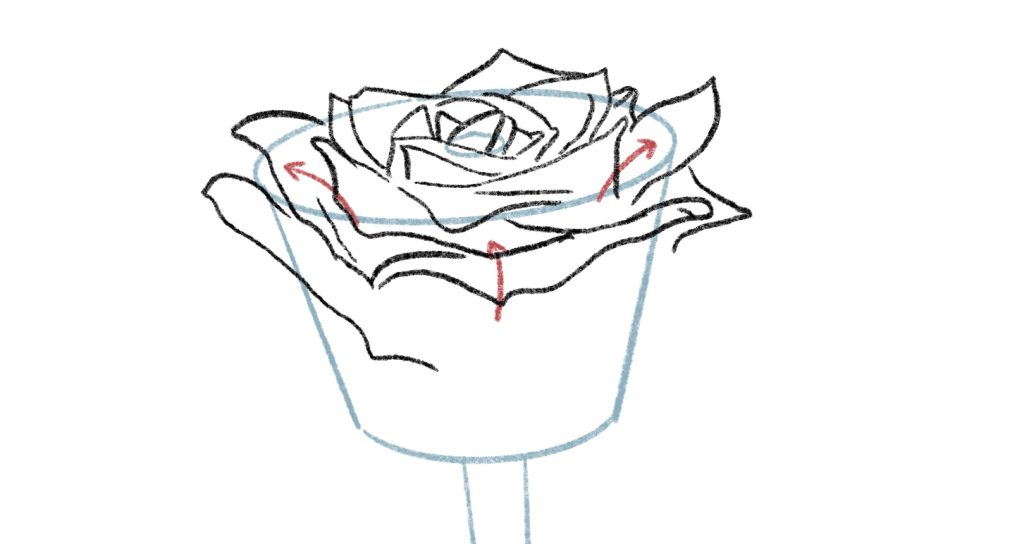
To make your drawing more realistic, include a few imperfect lines. These small irregularities mimic the natural imperfections of a real rose.
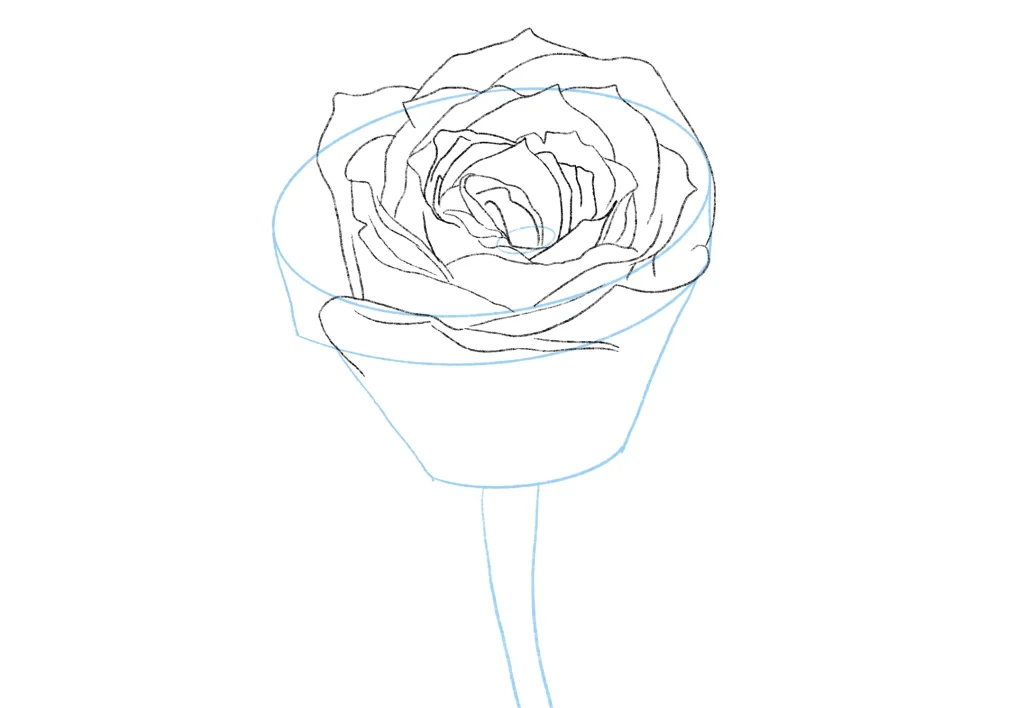
This step is crucial as it combines all the elements of your sketch, transforming it into a realistic looking flower.

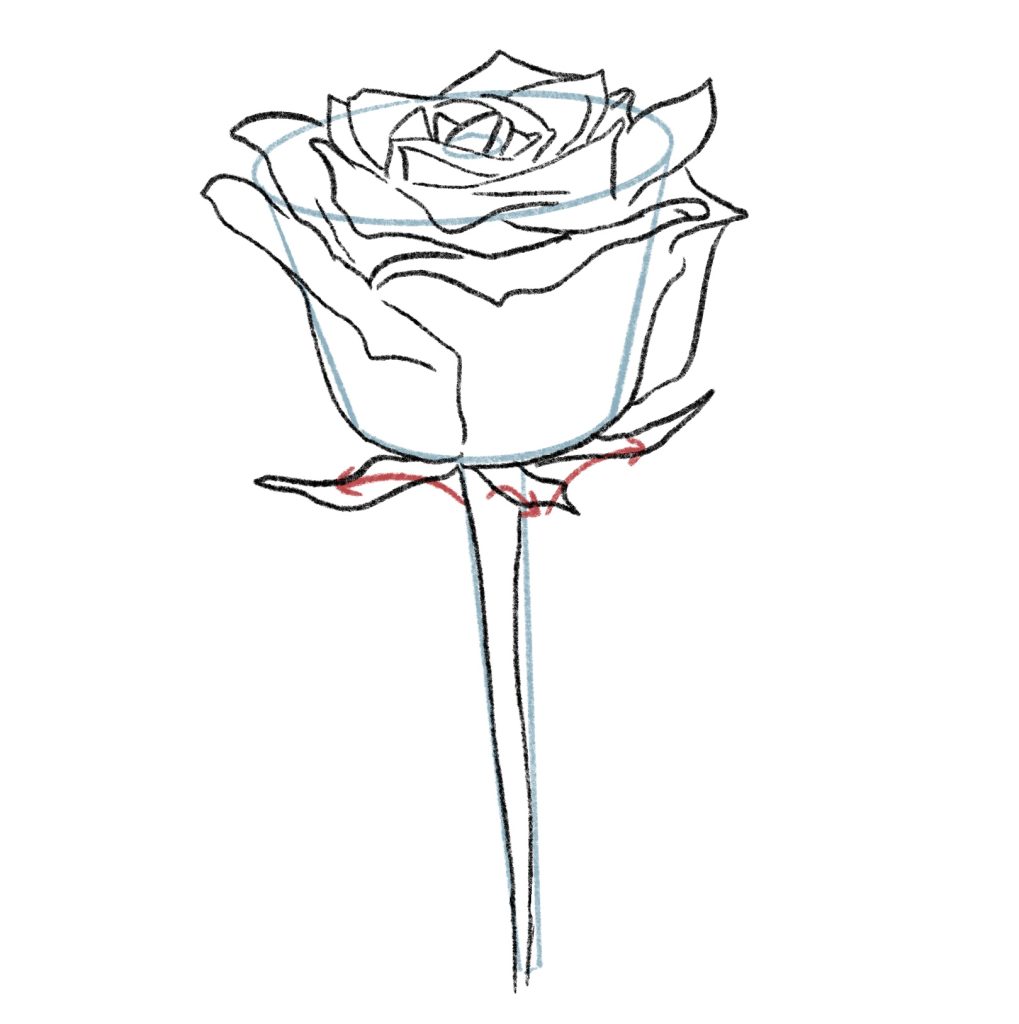
With the petals of your rose in place, it’s time to focus on the base.
Draw the sepals, the green, leaf-like structures that sit at the base of the rose. They look a bit like thin petals fanning out beneath the flower.
While these details may seem minor, they’re vital for a realistic portrayal. Incorporating the sepals provides a finished and grounded appearance to your rose drawing.
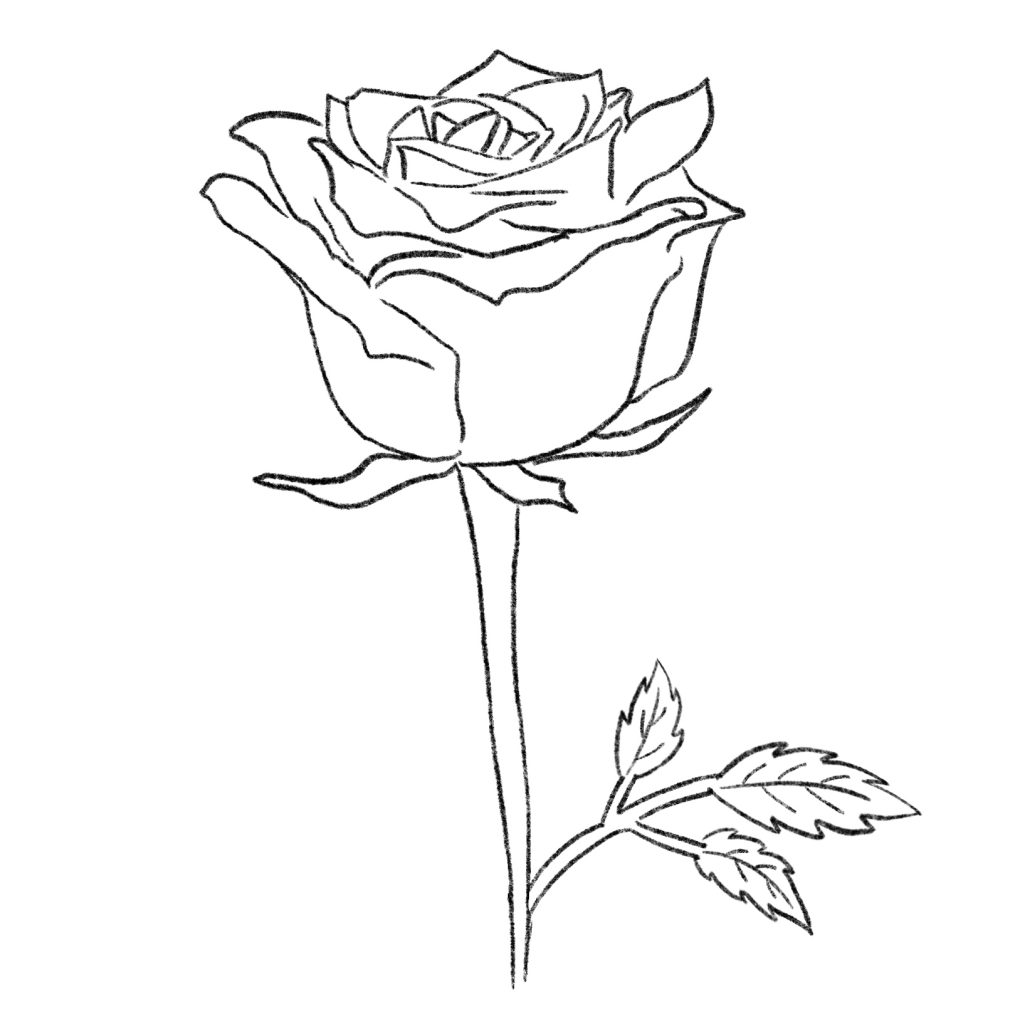
Let’s ground our rose further by adding a stem, leaves, and thorns.
Draw a long, slender stem extending from the rosehip.
Remember that the leaves are not smooth; they have a serrated edge, so include these details for a realistic touch. Finally, add a few thorns along the stem.

Shading is a crucial step in making your rose drawing come to life. It adds depth & dimension and transforms a flat sketch into a realistic representation.
Start by identifying the highlights and shadows on your reference image. Then, apply light shading to the shadows.
Check out our course, “Mastering Lighting and Shading,” to learn about lighting principles in an easy-to-understand manner.
It’s time to add color, highlights, and shadows.
Apply a base color first, then use darker shades for shadows and lighter ones for highlights, considering your light source.


If you’re using Procreate, you can create a new layer, set the color to white, change the layer style to Overlay, and paint on the bright areas.
Highlights and shadows will give your rose a three-dimensional, lifelike appearance.
Now let’s draw a full bloom rose.

Start by selecting a clear reference image of a rose in full bloom. Pay attention to the petal patterns and how they radiate from the center.
After understanding the shapes and structure of the rose, as we did with the half-bloom rose, it’s time to lay the foundation for our full-bloom rose.
Begin by sketching a cup-like structure with a wide and elliptical top. While it should be close to a circle, it shouldn’t be perfectly round.
Now draw a couple of petals.
This shape serves as the base for the unfolding petals of our rose.
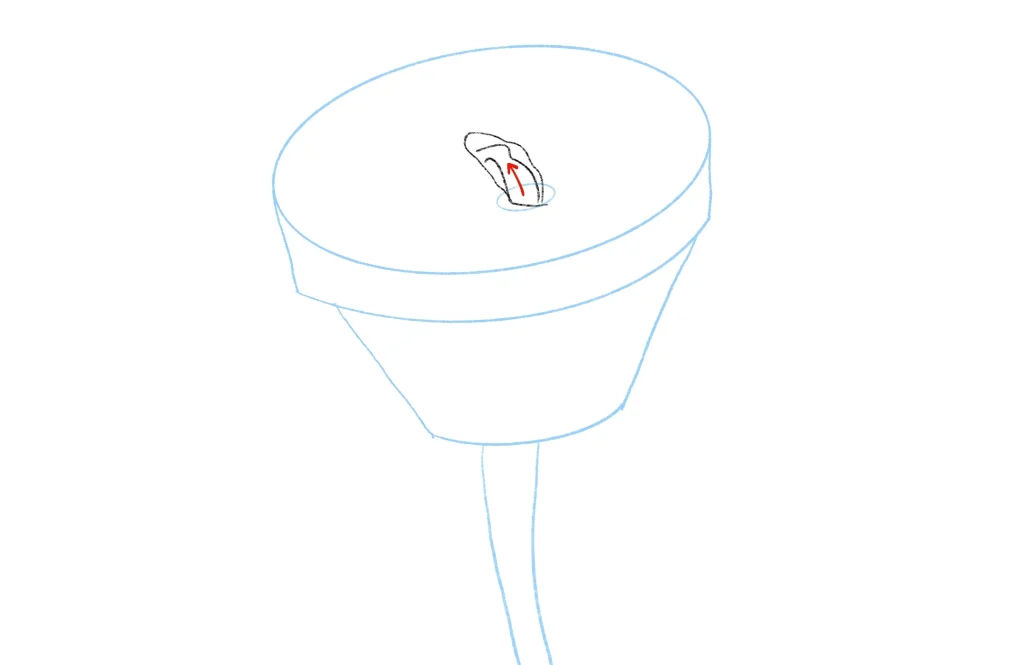
Once you’ve got the basic shape down, it’s time to focus on the rose’s center. This is where our petals begin. In a full-bloom rose, these center petals are small and close but not too tight, giving the flower its open look.
As we move out, the petals start opening – a key difference between a half-bloom and a full-bloom rose.
Notice how more petal area is visible as we move out.
As you sketch, imagine the petals fanning out in different directions, creating that lush, full appearance we love in blooming roses.
Building on our basic structure, let’s delve into the outermost petals that give the full-bloom rose its majestic appearance.
As you move outwards from the center, the petals become larger.
These petals should have a gentle curve, almost as if they’re gracefully curling due to their weight. This subtle detail is what gives the rose its full and mature look.
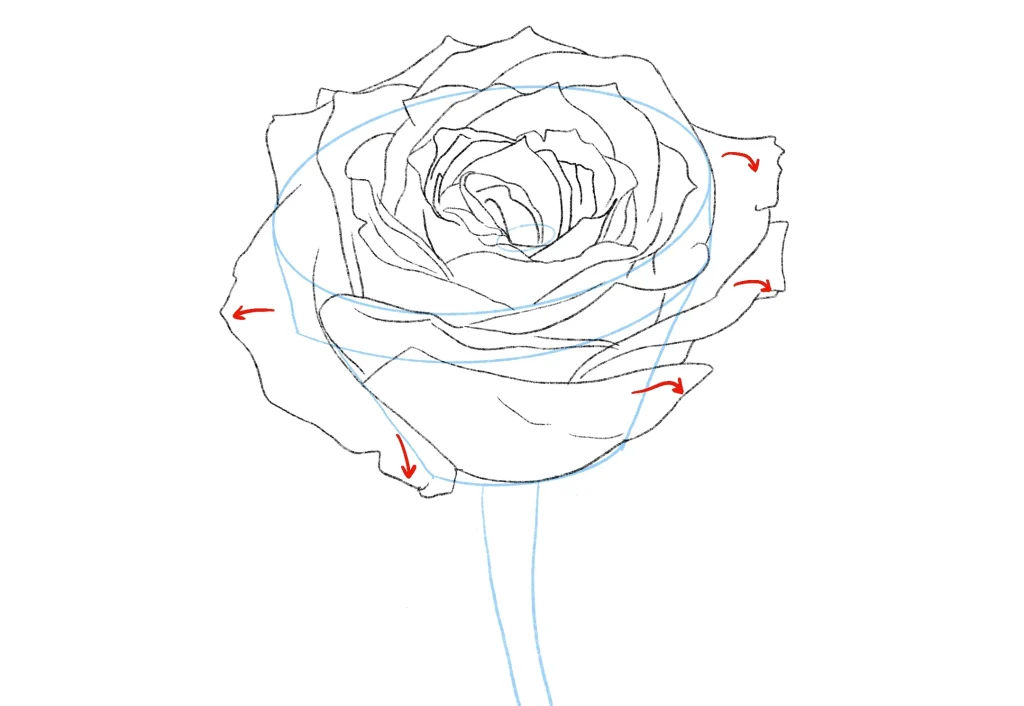
Drawing these petals with a slight droop emphasizes the rose’s full bloom, making it appear lush and vibrant.
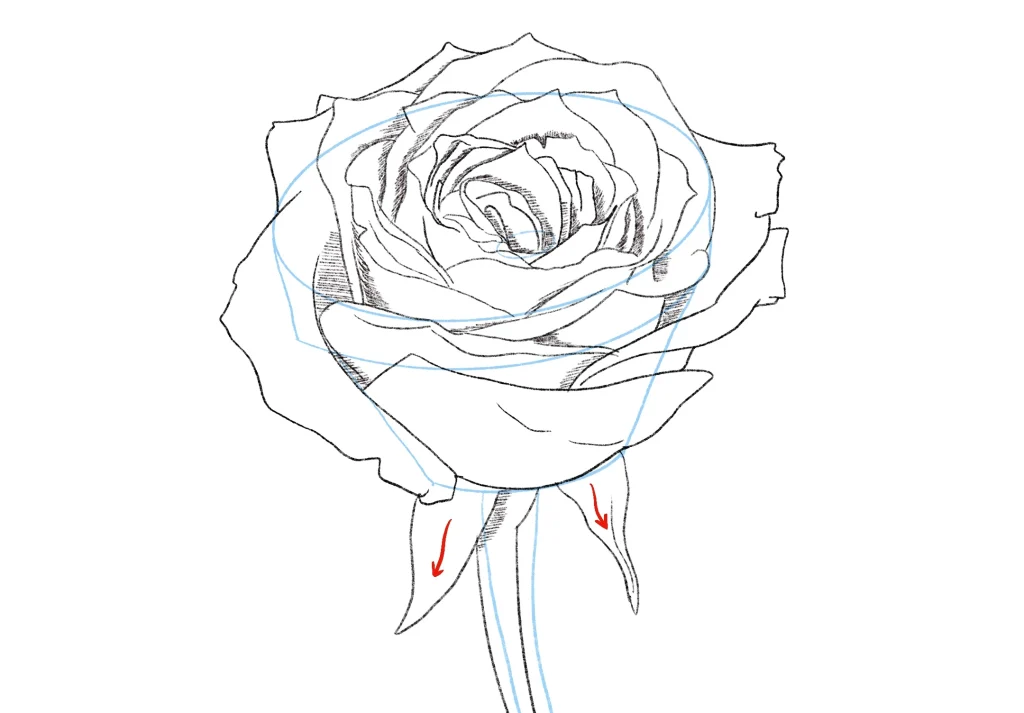
Once your rose’s petals are in place, it’s time to ground the flower with its foundational elements. Begin with the rosehip, the rounded part at the rose’s bottom.
Next, add the sepals. These are the thin green extensions framing the flower’s base. Finally, draw a stem extending from the rosehip. Together, these elements anchor the rose, giving it depth and context.
As with the half-bloom rose, shading will give your full-bloom rose depth and dimension.
Begin by identifying the highlight and shadow regions on your reference image. Then, gently shade the shadowed sections of your drawing.
After sketching the rose, the next step is to breathe life into it with colors, shadows, and highlights. Begin by applying a base color to your rose. This sets the tone and mood of your artwork. Now, to add depth and realism, focus on shadows and highlights.

Think of shadows as the darker parts of your drawing. You can make these by picking a color that’s a bit darker than your main color.
If you’re using a program like Procreate, you can make a new layer, pick black, set it to “Overlay,” and color in the parts you want darker.

Highlights are the bright spots. You can make these by choosing a color lighter than your main one.
In Procreate, you’d make another new layer, pick white, set it to “Overlay,” and color where you want it to shine or look bright.

These techniques resemble our half-bloom rose approach and transform your sketch into a vibrant, three-dimensional piece.
After delving into the intricate details of half-bloom and full-bloom roses in our previous sections, let’s simplify things a bit.
In this segment, we’ll guide you through a more straightforward process, ideal for those just starting out or even for children eager to sketch. We’ll use simple shapes to draw a rose.
Here are eight simple steps to draw a rose.
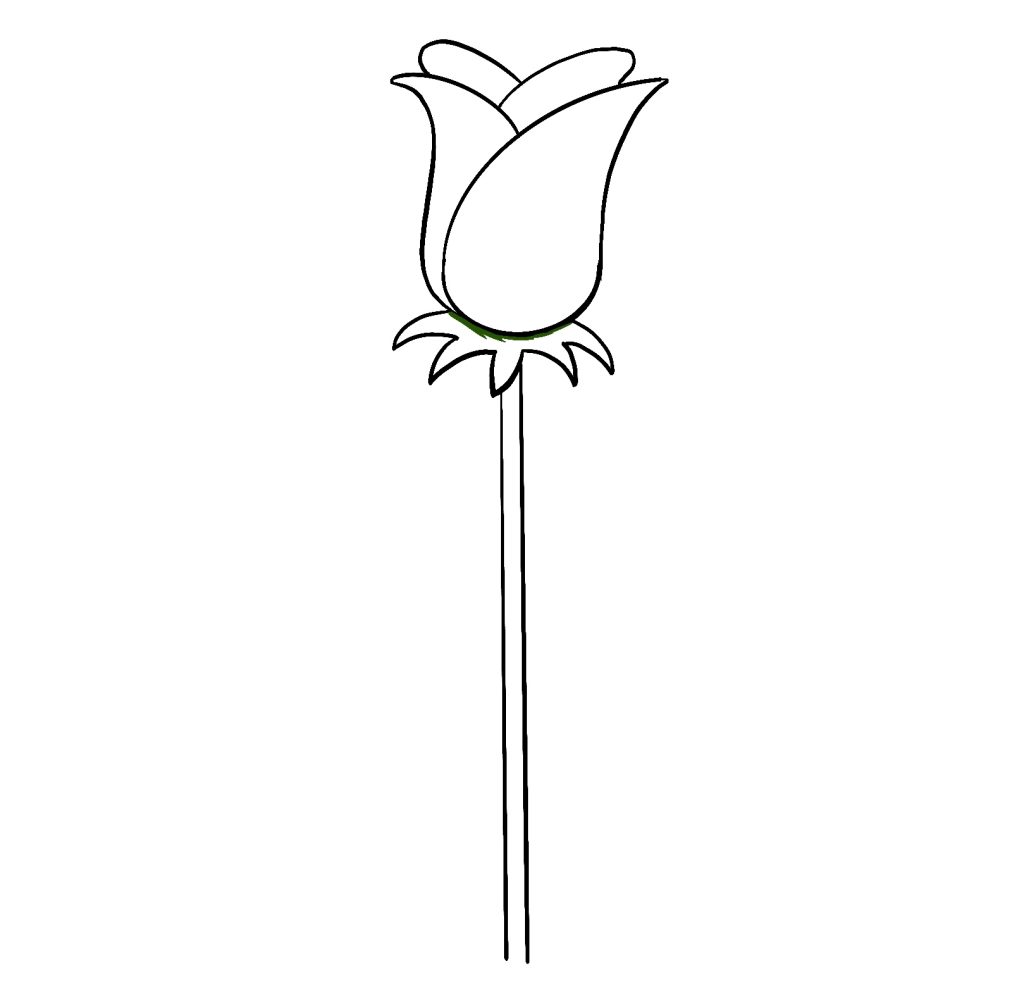
Step 1 – Begin with a raindrop-shaped petal tilted to the right; this is the rose’s right side.

Step 2 – Sketch a similar petal on the left, which appears behind the right petal and is tilted left.

Step 3 – Draw an elliptical shape over the right petal, representing the petals behind the front ones.

Step 4 – Repeat the elliptical shape over the left petal.

Step 5 – Add sepals at the base and extend a stem.
Step 6 – Draw a slightly curved line extending on either side of the stem. These lines are the center of the leaves. Sketch zigzag-edged leaves on both sides of the stem, capturing the rose leaf’s unique texture.
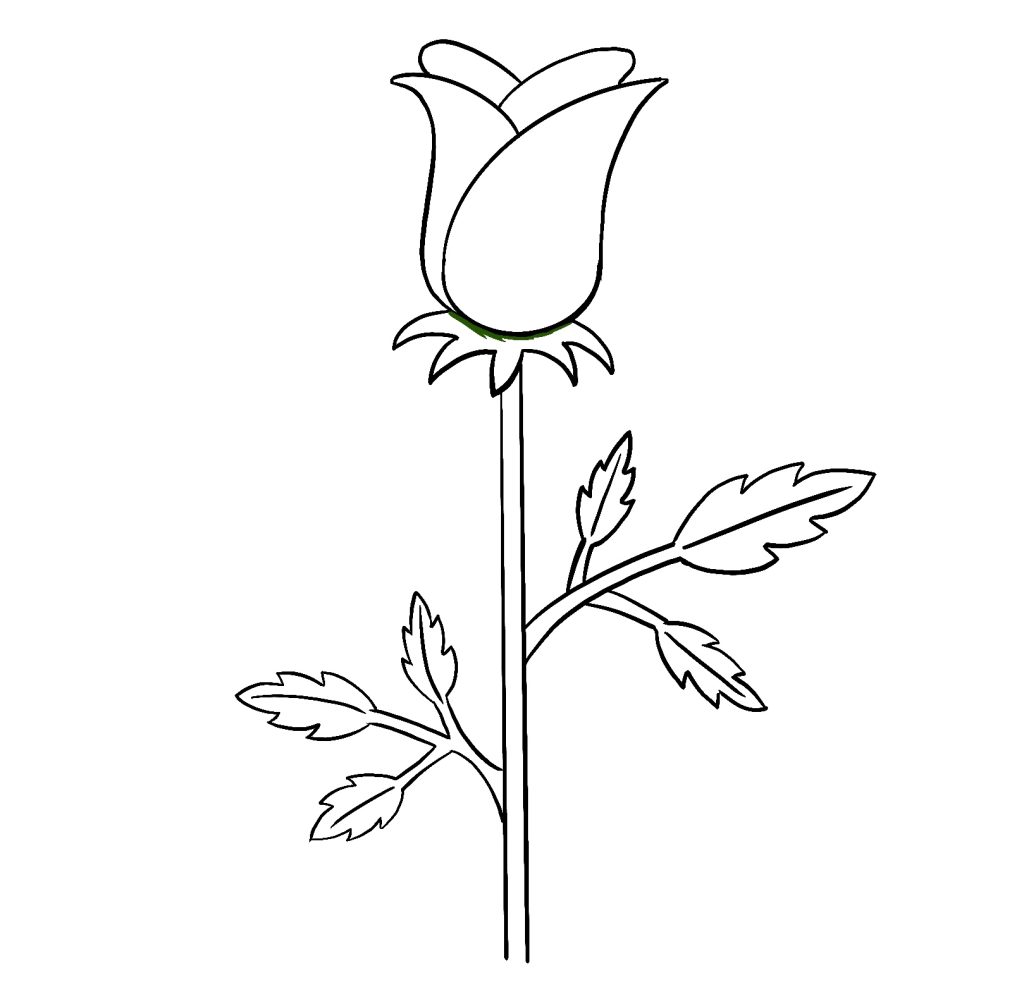
Step 7 – Color the rose using a colored pencil or any type of medium. Use darker shades for outer petals and lighter shades as you move inward.

Step 8 – Color the leaves with a gradient – light green on the top, dark green below – and paint the stem and sepals green.


Navigating through our “How to Draw a Rose” tutorial, you’ve tackled everything from the intricate half-blooms to the simplicity of a basic rose pencil drawing.
These drawing lessons are designed to help you capture the essence of roses and other blooms in various styles.
Our courses “Fundamentals of Drawing” and “Learn to Draw in 21 Days” offer foundational insights for those just starting.
Are you interested in expanding your skills?
Our “Figure Drawing for Beginners” and “Gesture Drawing” courses are the perfect next steps. We also have many other drawing tutorials available to support your artistic journey.
Check out our course list and pick one that interests you the most. Dive in, practice, and watch your skills blossom.
Ryan
I have been surfing online more than 3 hours today, yet I never found any interesting article like yours. It is pretty worth enough for me. In my opinion, if all web owners and bloggers made good content as you did, the web will be much more useful than ever before.
Reply


 Gift Cards