Sega NAOMI Ark – Portable Multiplayer Arcade Setup & Parts List
Arcade systems in their native form can large and bulky, but once you break out individual parts and re-arrange in a creative way, you can create machines that can be easier to move and share. Â A prime example of this is this Sega NAOMI “Ark” from Daniel Gewargis. Â You can read about this creation and some of his other arcade and multiplayer creations in this recent interview.
Below, we will cover the actual parts of the NAOMI Ark in case you’re interested in re-creating it yourself or start a similar project.
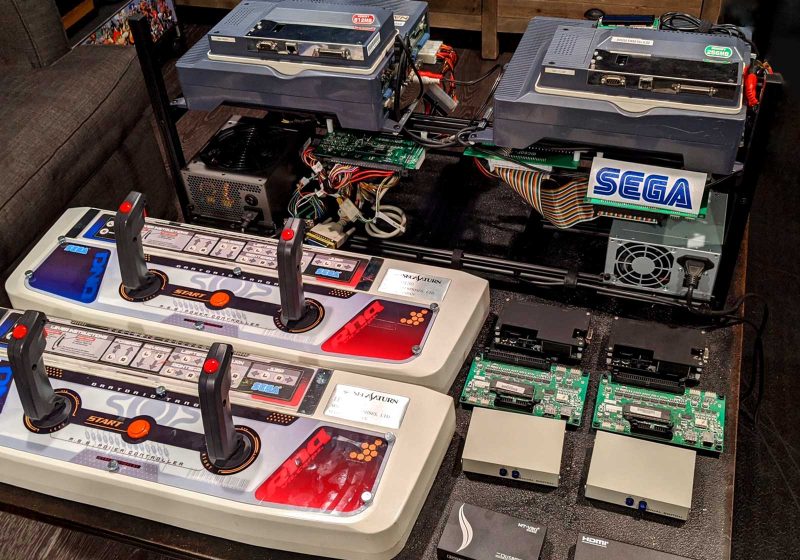
Daniel has fine-tuned a compilation of standard Sega NAOMI hardware pieces along with some off-the-shelf parts and some software solutions, mounted on to a cryptocurrency mining frame to create what he calls the NAOMI Ark. Not only does the NAOMI Ark give him a rather organized “consolized†setup, but it’s also rather portable and is designed to let you swap in different types of controllers. This helps Daniel take the NAOMI Ark to his friends’ homes to share the arcade power and multiplayer fun.  His Ark setup also is design to do multiple player “screens” on a single large flat screen display.
When putting together a NAOMI “home system†or portable setup, you can think of the main Sega NAOMI unit as a bit like a console (that needs some extra parts).
You do need an external power supply and then either have an IO board or OpenJVS to handle items to manage the different types of controller. Then you have the audio/visual output (with the option to split multiple video outputs to a single screen). As a finishing touch, you have the stuff to manage multiplayer. The least straightforward part of the setup is the controls, but we will get to that below.
Below is a run-down of what Daniel used to build his Head-2-Head NAOMI Ark and thoughts on how to replicate it, if you are interested. This setup is to allow a single NAOMI to support 4 players AND 2 NAOMI’s to play head-2-head (Link) games.
Sega NAOMI Arcade Unit – Qty 2
The brains of the system.
Shop eBay for Sega NAOMI Units
Power Supply – Qty 2
Using ATX power supplies that would normally be deployed in a PC but with an adapter that allows me to plug them into the Sega NAOMI hardware.
Shop Amazon for ATX Power Supplies
VGA Cable – Qty 4
You might be able to get away with 3 depending on if your VGA splitter cable can connect directly to the VGA switch box.
Shop Amazon for VGA Cables
VGA Y Cable – Qty 1
Shop Amazon for VGA Y Splitter Cables
VGA Switch Box – Qty 1
Shop Amazon for VGA Switch Box
Audio Amplifier
If you are driving actual speakers in your cab then at least 1 – but probably 2 if you have 4 speakers.
Shop Amazon for Audio Amplifiers
Shop eBay for Audio AmplifiersÂ
Toslink optical cable for link play – Qty 2
Shop Amazon for Toslink Cable
USB “B†(1 A Input/ 2 B output) Switch Box – Qty 1
Shop Amazon for USB B Switch Box
USB A -> Cable – Qty 4
Shop Amazon for USB A -> Cable
JVS Type 1 for Controller Output – Qty 2
You could use Rev B’s as well.
Shop eBay for JVS Type 1Â
As you can imagine, different arcade games can have wildly different control schemes – whereas most Dreamcast games are played with the standard controller. To accommodate all these control sticks (flying/driving/pedals/buttons/shooting/etc) in the arcade, Sega made a series of I/I boards that all these controls get wired to. Some games require specific boards because they have enough ports/inputs to handle all the buttons. You can read a good summary here.
The boards specifically listed above have pretty broad compatibility with the most common games, but there are some specific games that would need more/different boards to work. In these cases, the Open JVS software is used with a Raspberry Pi to emulate the proper IO board. Open JVS essentially lets you use non-arcade equipment to connect to the NAOMI units. For instance, Daniel uses Xbox360 Wireless Steering wheels for Alien Front, but could also use them for Crazy Taxi, etc.
When Daniel wants to play a game that is going to use a specialized controller that doesn’t use the standard JVS board, he unplugs the original JVS board and play the Pi in its place
Using the Xbox wheels is cheaper, more convenient, portable, and saves space. Also, in some cases, you couldn’t find the original parts even if you wanted to.
Other items:
- 60pin or Jamma looms to the control panels depending on if you are using Type 1 or Reb B JVS’
- Qty 2 Carts for Link play or Qty 2 NETDIMMS w/ethernet switch & Piforce.
- Might need either an RCA audio merging cable or a switch box depending on the number of speakers/amps or if you want 2 separate games to be played at the same time.
- Optional: Qty 2 OSSC’s to convert VGA to HDMI
- Optional: HDMI Multi-viewer to create a split screen effect on a single display.

Affiliate programs and affiliations include, but are not limited to, the eBay Partner Network or Amazon Associates.