
Text interfaces are extremely useful when an MS-Window client is trying to connect into a Linux or Raspberry Pi node.
There are some good options for creating Bash text interfaces, two of the most popular are Whiptail and Dialog. Raspberry Pi users will be familiar with Pi configuration tool, raspi-config, which uses Whiptail to create all its menu and application screens.

Whiptail comes pre-installed on Raspbian and on many Linux images. Whiptail is a lighter version of the more complete Dialog package.
This blog will show some examples using Whiptail and Dialog.
Getting Started
For my work I preferred using Dialog, I found that it had many more options and a slightly easier interface than Whiptail. However for projects where I needed to distribute my code to other users or nodes I would keep things simple and use Whiptail.
To install Whiptail and Dialog on a Raspbian/Debian/Ubuntu:
sudo apt install whiptail
sudo apt install dialog
A simple Whiptail test to show the date/time in a message box:
whiptail --title "Time/Date" --msgbox "$(date)" 0 0
This statement will clear the terminal screen and show a default background with message box centered in the window. A height and width of : 0 0 will autosize the message box.

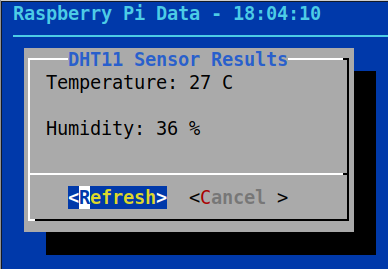
Refreshing YESNO Dialog
A message box only has a single OK button. A yesno dialog has two button.
Whiptail only supports a basic yesno function. The Dialog utility supports changing the button labels and a timeout so the window can be automatically refreshed.
Below is an example that refreshed an yesno dialog every 5 seconds. The show_dlg function generates a random temperature and humidity valid, and then calls the dialog utility. The YES button, relabelled as “Refresh”, will manually force a refresh of the data and redraw the window. The NO button, relabelled as “Cancel” will close the script and clear the screen.
#!/usr/bin/bash
#
# dyesno.sh - A freshing yes/no dialog with simulated sensor data

YES=0
TIMEOUT=255

show_dlg() {
   # simulate some data
   data1="Temperature: $(( ( RANDOM % 10 )  + 20 )) C";
   data2="Humidity: $(( ( RANDOM % 10 )  + 30 )) %";
   message="$data1\n\n$data2";
   dialog --begin 2 2 --backtitle "Raspberry Pi Data - $(date +'%T' )" \
       --yes-label "Refresh" --no-label "Cancel" --timeout 5 \
       --title "DHT11 Sensor Results" --yesno  "$message" 8 30;
}

response=0
# Cycle is the response is YES button or the dialog timed out
while [ "$response" == "$YES" ] || [ "$response" == "$TIMEOUT" ]; do
  show_dlg
  response=$? ;# Get the output from the yesno dialog
done
clear
Radio Dialog to Toggle Pi GPIO Pins
A radio dialog allows a user to select one option from a list.
For this example I’m using 3 GPIO pins (0, 2, and 7) and the user can select one of these pins and toggle the output using the Raspberry Pi gpio utility.
The Dialog utility will output the item selected (0, 2 or 7), and the OK/Cancel button code (0=OK,1=Cancel).
#!/usr/bin/bash
#
# dradio1.sh - toggle a GPIO output pin
#
thepin=$(dialog --begin 2 2 --title "Toggle GPIO Pins" \
     --backtitle "Raspberry PI GPIO" --stdout \
     --radiolist "Select Pin:" 10 40 3 \
      0 "GPIO_0 - physical pin 11" off \
      2 "GPIO_2 - physical pin 13" off \
      7 "GPIO_7 - physical pin 7 " off )
clear
# Toggle if OK entered and a pin is selected
if [ "$?" == "0" ] && (( ${#thepin} > 0 )) ; then
  echo "Toggling (wPi) pin: $thepin"
  gpio toggle $thepin
  echo "Pin $thepin is: $(gpio read $thepin)"
fi

Weather Station Form
A Form dialog can be used text with captions and allow user input to saved. Below is an example of a Weather station with view only and editable data.

#!/usr/bin/bash
#
# dform1.sh - Form to show data, and allow data entry

# Weather Sensor inputs (connect real inputs here)
wspeed="5 kph"
wdir="NW (350)"
wtemp="11 C"

# Show a dialog with viewonly and data entry values, save to a file
dialog --begin 2 2 --ok-label "Save" --backtitle "Pi Weather Station" \
     --title "North Beach" --stdout  \
     --form  "Data at : $(date +'%T' )"  12 65 0 \
	"Wind Speed :"      1 1 "$wspeed"  1 30 0 0 \
	"Wind Direction:"   2 1 "$wdir"    2 30 0 0 \
	"Water Temp:"       3 1 "$wtemp"   3 30 0 0 \
	"Beach Conditions:" 4 1 ""  	   4 30 30 30 \
	"Wildlife:"         5 1 ""  	   5 30 30 30 > beach.txt
clear
The syntax for the form is:
--form text height width formheight [ label y x item y x flen ilen ]

where: y = line position
       x = position in line
    item = view only or editable data
    flen = field length , 0 = view only
    ilen = input length , 0 = view only
For this example the last 2 items (Beach Conditions and Wildlife) have a field and input length defined to 30 characters so data can be entered into these fields. If the OK button is selected the user entered data is saved to the file beach.txt.
Menu Example
Menuing applications are probably the most useful feature in the Whiptail and Dialog utilities.
Below is an System Information application, that has 3 options: node, disk space, and memory stats. Each of the menu items call a display_dialog function that presents the results of a Bash statement in a message box.


#!/bin/bash
#
# dmenu.sh - Bash Dialog Menu showing some system stats
#

# Display menu results in a msgbox
display_result() {
  dialog --title "$1" \
    --backtitle "System Information" \
    --no-collapse \
    --msgbox "$result" 0 0
}

while true; do
  selection=$(dialog --stdout \
    --backtitle "System Information" \
    --title "Key Features" \
    --clear \
    --cancel-label "Exit" \
    --menu "Please select:" 0 0 4 \
    "1" "Display Node Information" \
    "2" "Display Disk Space" \
    "3" "Display Memory Stats" \
     )
  exit_status=$?
  if [ $exit_status == 1 ] ; then
      clear
      exit
  fi
  case $selection in
    1 )
      result=$(echo "Hostname: $HOSTNAME"; uptime)
      display_result "System Information"
      ;;
    2 )
      result=$(df -h)
      display_result "Disk Space"
      ;;
    3 )
      result=$(vmstat --stats)
      display_result "Memory Stats"
      ;;
  esac
done
Changing Whiptail Default Colors
Whiptail uses the newt graphic library. A NEWT_COLORS variable can be created with custom colors. An example would be:
export NEWT_COLORS='
  window=,red
  border=white,red
  textbox=white,red
  button=black,white'
# to reset the color back to default use:
# unset NEWT_COLORS
A full definition of all the options and colors:
root                  root fg, bg
border                border fg, bg
window                window fg, bg
shadow                shadow fg, bg
title                 title fg, bg
button                button fg, bg
actbutton             active button fg, bg
checkbox              checkbox fg, bg
actcheckbox           active checkbox fg, bg
entry                 entry box fg, bg
label                 label fg, bg
listbox               listbox fg, bg
actlistbox            active listbox fg, bg
textbox               textbox fg, bg
acttextbox            active textbox fg, bg
helpline              help line
roottext              root text
emptyscale            scale full
fullscale             scale empty
disentry              disabled entry fg, bg
compactbutton         compact button fg, bg
actsellistbox         active & sel listbox
sellistbox            selected listbox

bg and fg can be:

color0  or black
color1  or red
color2  or green
color3  or brown
color4  or blue
color5  or magenta
color6  or cyan
color7  or lightgray
color8  or gray
color9  or brightred
color10 or brightgreen
color11 or yellow
color12 or brightblue
color13 or brightmagenta
color14 or brightcyan
color15 or white
Changing Default Dialog Colors
The custom Dialog colors are defined in the file: ~/.dialogrc
To create and edit this file:
dialog --create-rc  ~/.dialogrc
nano $HOME/.dialogrc
Within the ~/.dialogrc file, an important option is:
# Shadow dialog boxes? This also turns on color.
use_shadow = OFF
Dialog supports inline color (this isn’t supported in Whiptail) with the –colors option. Inline colors are defined with by “/Zx”:
ANSI colors:

/Z0 = black
/Z1 = red
/Z2 = green
/Z3 = yellow
/Z4 = blue
/Z5 = magenta
/Z6 = cyan
/Z7 = white

Other options:

/Zb = bold, /ZB = reset bold
/Zr = reverse, /ZR = reset reverse
/Zu = underline, /ZU = reset underline
/Zn = restore settings to normal
An example:
$ msg="Temperature: \Zb\Z3 28 \Zn Deg C"
$ dialog --title "Outside" --colors --msgbox  "$msg" 0 0 ; clear

Final Comments
I’m a big fan of Zenity and YAD X-Window dialog tools, and I found that it wasn’t a big transition to use Whiptail and Dialog.
It’s important to note that the Dialog option –stdout is needed if you want to pass the Dialog output to a variable. Passing the output from Whiptail is a little trickier, use: 3>&2 2>&1 1>&3

Thanks – Sometimes, the old technology is refreshing. I like the large msg window and easy visibility using whiptail and dialog. You can also use ncurses from the C language to create these types of windows.
LikeLike