What Is A Histogram In Photoshop: A Concise Guide for Users
As photographers and graphic designers, one of our key objectives is to ensure that our images have the right tonal balance. Understanding histograms in Adobe Photoshop can help us achieve this goal easily. A histogram is a visual representation of the tonal values present in an image, making it a critical tool when editing photos.
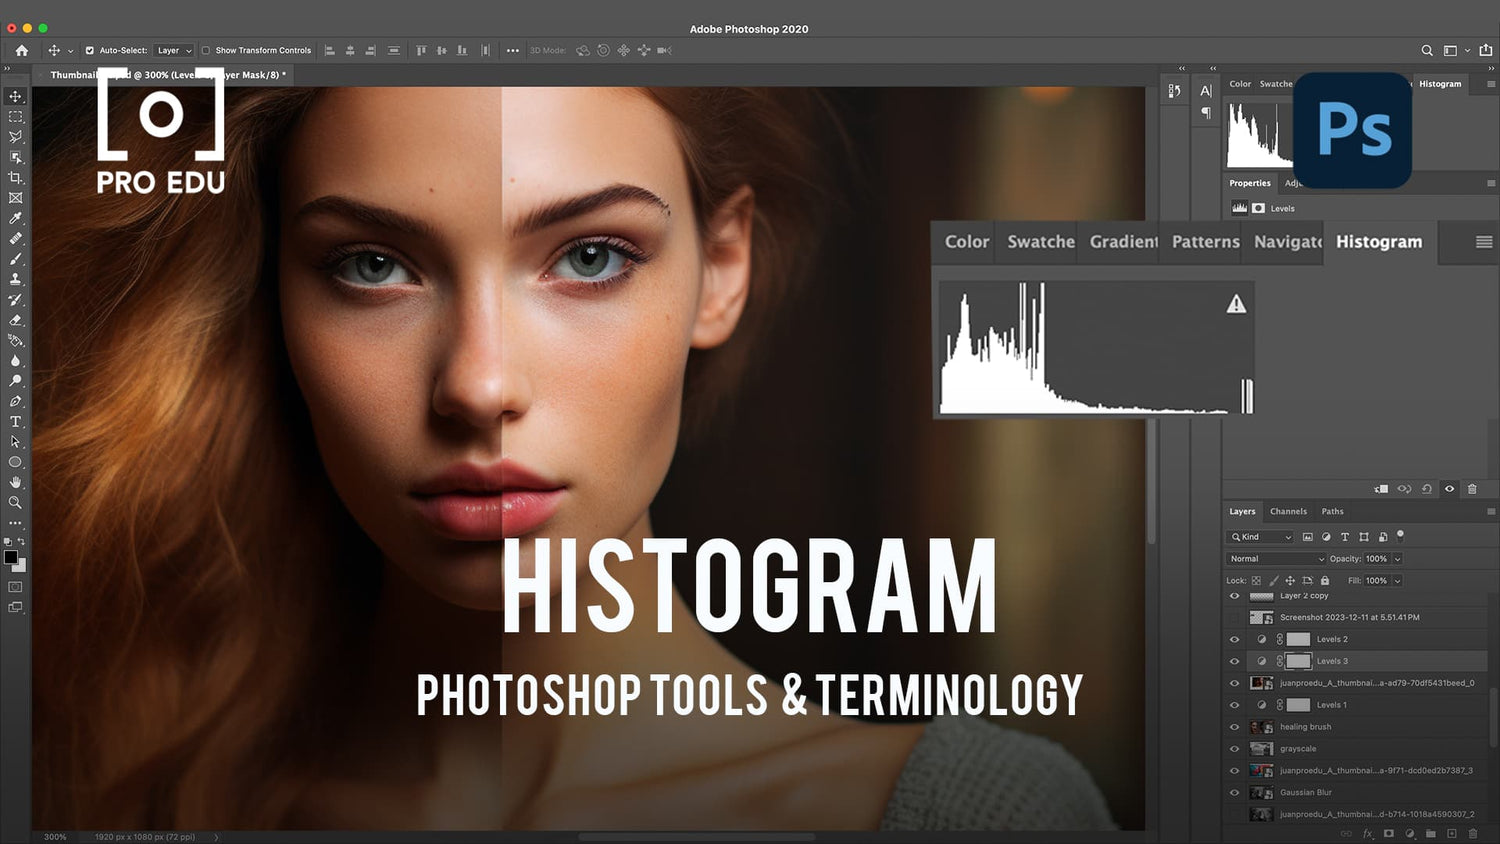
In Photoshop, a histogram displays the distribution of luminance values of pixels within an image, ranging from pure black to pure white. By analyzing the histogram, we can identify areas with too much contrast or insufficient brightness, allowing us to make necessary adjustments to achieve optimal tonal balance. It's important to familiarize ourselves with using histograms when working with digital images, as it can greatly enhance our editing capabilities.
Key Takeaways
- Histograms in Photoshop display the tonal distribution of an image
- Understanding and using histograms helps improve photo editing
- Analyzing histograms allows for the identification and correction of tonal issues
Understanding Histograms in Photoshop
A histogram in Photoshop is a graph that represents the distribution of pixels in an image, based on their color intensity levels. It helps us identify details in the shadows, midtones, and highlights of the image, making it an essential tool when editing photos. You can find a histogram in Photoshop's Levels dialog box or in the Camera Raw histogram for RAW images.
When looking at a histogram, the horizontal axis represents the tonal range, from pure black (0) on the left side to pure white (255) on the right side. The vertical axis shows the number of pixels with each specific color intensity level. If there are many dark pixels in the image, the histogram will have higher bars on the left side. On the other hand, if the image has many bright pixels, you will notice higher bars on the right side.
By analyzing the histogram, we can understand the distribution of pixels and subsequently make necessary adjustments in an image. For example, if a histogram shows most pixels concentrated on the left side (dark tones), clipping may occur, and we might lose details in the shadows. In this case, adjusting the levels and curves can help balance the pixel distribution and reveal the hidden details.
When using a histogram, remember that it is not an indicator of a "good" or "bad" image. Instead, it is a helpful tool for understanding the tonal range and the distribution of pixels in our images. By leveraging this information, we can confidently make adjustments and enhance our photos while retaining important details.
Using the Histogram Tool
In Photoshop, the histogram tool is essential for assessing and modifying the tonal values of an image. By using histograms, we can identify areas with loss of detail and make appropriate adjustments to improve overall quality. Let's explore some essential aspects of histograms in image editing.
A histogram is a graphical representation of the luminance or color distribution in an image. It displays the number of pixels at various brightness levels, ranging from 0 (pure black) to 255 (pure white). Understanding histograms enables us to identify issues with exposure, contrast, and color balance, which may require retouching.
When opening an image in Photoshop, we can access the histogram through the Levels dialog box or the separate histogram panel. In Adobe Camera Raw or Lightroom, the histogram can be viewed in the top-right corner of the workspace. Analyzing the histogram allows us to identify any underexposed or overexposed areas (shadows and highlights) and make necessary adjustments through tools such as Levels and Curves.
To ensure accuracy in using the histogram tool, it's important to work with high-quality image files (e.g., RAW format) and use a properly calibrated monitor. When adjusting the exposure and tonal values, take care not to push the highlights or shadows too far, as it may lead to a loss of detail and dynamic range in the image.
In conclusion, using the histogram tool is a valuable aspect of our image editing workflow. Understanding brightness levels and the effects of adjustments on tonal values allows us to create well-balanced photographs with proper exposure, detail, and contrast.
Identifying and Correcting Tonal Problems
When working with images in Photoshop, one of the key aspects we need to consider is identifying and correcting the tonal problems that may exist in an image. A histogram serves as a valuable tool to provide us with insight into the contrast, exposure, and editing of an image.
To improve an underexposed image, we can observe the histogram to understand how its values are distributed. This helps us make informed adjustments to the levels and bring out the details hidden in the shadows and highlights.
By utilizing the Camera Raw filter, we can effectively increase the shadow detail while preserving the highlight detail, enhancing the overall dynamic range of the image. However, increasing the dynamic range too much can result in a loss of detail, leaving the image looking flat and washed out.
In some cases, we might want to create a high-key image or a low-key image to emphasize drama or tension in a photograph. We can achieve this by adjusting the white point and black point values in the image's histogram, thereby altering the overall tonal balance of the image.
When tackling overall tonal problems, it's important to strike a balance between correcting the image's levels and maintaining its artistic integrity. Making subtle adjustments while monitoring the histogram will help us achieve the desired outcome, resulting in an aesthetically pleasing and well-balanced image.
Additional Histogram Tools in Adobe Lightroom
In Adobe Lightroom, we can utilize various tools to improve our photo editing experience. One of the powerful features is the histogram. The histogram is a graphical representation of an image's tonal values, primarily focusing on shadows, highlights, and mid-tones. With the histogram, we can better understand the exposure and brightness levels of an image, helping us make more informed decisions when editing.
Lightroom's histogram offers additional features that can assist with managing brightness values and colors. For example, there is a gradient bar below the histogram that shows the distribution of colors, allowing us to see which particular color tones dominate the image. By hovering over the gradient bar, we can view the values of each tone and decide if adjustments are needed.
The histogram's layout also allows us to correct shadow and highlight details with ease. If we see a loss of detail due to overexposure or underexposure, we can simply adjust the white point and sliders to maintain proper exposure.
For Mac users, Lightroom offers the option to display separate histograms for each color channel. This feature helps us fine-tune individual colors for better overall results.
In summary, Adobe Lightroom's histogram gives us a comprehensive view of an image's tonal values. By understanding the distribution of shadows, highlights, and mid-tones, we can make better editing decisions and achieve the desired look in our photographs.
Tips and Best Practices
When working with histograms in Photoshop, it's essential to keep a few tips and best practices in mind. First, always pay attention to the tonal range of your images. This range represents the brightness values from pure black to pure white.
Histograms are vital tools for evaluating and correcting the distribution of pixels and colors within images. Understand the relationship between shadows, midtones, and highlights on the histogram. Shadows will be on the left, midtones in the center, and highlights on the right.
Utilize the histogram when shooting and editing photos to ensure a well-balanced image composition. The histogram displays the distribution of tones and colors, enabling photographers to improve their photos. It can also be particularly helpful when shooting high contrast scenes, such as a sky at sunset or a shadowy ground.
Create drama and tension in your images by manipulating the histogram. For example, you might want to emphasize the gradient bar or use the majority of pixels to create a specific mood.
We recommend using other Adobe applications, like Lightroom, which offers an even more powerful and robust histogram tool for photographers. Don't forget to pay attention to the image details, especially in high contrast scenes, ensuring that both shadow and highlight detail are preserved.
Lastly, take advantage of the динаміка practical tools such as curves and levels in Photoshop to make necessary adjustments according to the histogram. Identifying and correcting tonal ranges can provide the desired image detail and color balance in your work.
Frequently Asked Questions
How does the Histogram panel work in Photoshop?
The Histogram panel in Photoshop displays a graph representing the distribution of pixels in an image, based on their luminance or color intensity. It helps us analyze the overall exposure and tonal range of an image. The panel can be accessed by navigating to Window > Histogram. The horizontal axis represents the color intensity, ranging from 0 (pure black) to 255 (pure white), while the vertical axis shows the number of pixels that correspond to each intensity level how pixels in an image are distributed.
How is a histogram used in photo editing?
In photo editing, histograms help assess the tonal range and distribution of an image. By observing where the peaks and valleys appear in the histogram, we can identify underexposed, overexposed, or well-balanced images, and make adjustments accordingly. Common adjustments include modifying the image's exposure, brightness, contrast, and other tonal settings how much of the image is currently pure black, how much is currently pure white, and how much of it falls somewhere in between.
What information does a histogram provide in Photoshop?
A histogram in Photoshop provides information about the luminance and color distribution in an image. It displays the number of pixels in an image according to their brightness levels or color intensity graph representing the luminance of pixels. This information allows us to understand and evaluate the overall exposure, contrast, and dynamic range of an image.
How do histograms help in adjusting image tones?
Histograms help in adjusting image tones by providing a visual representation of the image's tonal range and distribution. By analyzing the histogram, we can identify areas where the image is too dark, too bright, or lacking contrast. This information can be used to adjust exposure, brightness, contrast, and other tonal adjustments to achieve an optimal look evaluate it and, if necessary, correct it.
What is the relationship between levels and histograms?
The Levels adjustment in Photoshop is a histogram-based tool that allows us to adjust the tonal range and overall balance of an image. By manipulating the input and output levels as shown in the histogram, we can control the shadows, midtones, and highlights of an image brightness values of the image. In this way, histograms and levels work together to help us make precise tonal adjustments for optimal image quality.
How can a histogram be utilized in color correction?
Histograms can be helpful in color correction by displaying image data not only for luminance but also for individual color channels (red, green, and blue). By analyzing the distribution of color values in the histogram, we can identify any color imbalances or color casts in an image. This information can then be used to adjust the color balance, saturation, and other color-related properties in the image powerful tools for the digital imagemaker.


