Abstract
Our home, Earth, is a living planet. Earthquakes and volcanic eruptions are proof that the geological forces that shaped our planet and created the land masses are ongoing. An amazing example of geologic activity that is less damaging is a geyser. In this geology science fair project, you will build a model geyser and determine how depth of the source affects how the water is ejected. By the end of this project, you will know a lot more about geysers and understand that a geyser is much more than just a water-spouting hole in the ground!Summary
Michelle Maranowski, PhD, Science Buddies
This science fair project is based upon the Geyser snack on the Exploratorium's website:
- Doherty, P. and Muller, E. (n.d.). Geyser: Cyclic hot water fountain. Retrieved January 26, 2009.

Objective
To model a geyser and determine the effect that depth has on timing of geyser eruption.
Introduction
Visiting the U.S. national parks can be amazing and educational. Nearly every park is a display of the powerful geological forces that made this Earth. Yellowstone National Park in Wyoming is well known for its incredible geysers. A geyser is an opening in Earth's surface that periodically ejects hot water and steam. In fact, the word geyser is rooted in the Icelandic verb gjosa, which means "to gush."
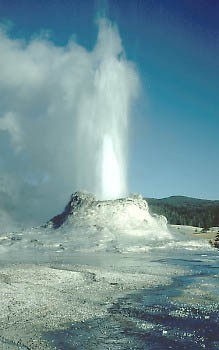
Figure 1. Castle Geyser in Yellowstone National Park. (Brantley, S.R., USGS, 1983.)
The conditions required for geysers exist in only a few places on Earth, so are quite rare. Geysers are located near active volcanic areas, in proximity of magma. Three basic conditions must be met for geysers: there must be (1) a water supply, (2) a heat source, and (3) a reservoir and plumbing system. When you think of plumbing, you probably think of pipes in your house, but the plumbing system in Earth is made up of rock, which must be hard enough to withstand the intense pressure of superheated water. The configuration of the reservoir and plumbing can vary, but if all three conditions are not met, then geysers will not form. However, other geothermal activity could exist instead, like fumaroles and mudpots.
There are two kinds of geysers, fountain geysers and cone geysers. Fountain geysers erupt from pools of water, while cone geysers erupt from cones, or mounds, of sinter. Fountain geysers are typically a series of intense bursts, while cone geysers are steady jets that can last from a few seconds to a few minutes.
The source of water in a geyser can be a nearby river, rainfall, or circulating groundwater. Rainfall works its way underground through fractures in the rock. The water comes in contact with hot rock and then heats up. The water then rises back to the surface and comes into contact with rhyolite rock. Rhyolite rock is former volcanic ash, or lava, that is rich in silica. Silica dissolves from the rhyolite and precipitates as sinter, which, over time, forms the geyser cone and coats the plumbing system. As a result, the plumbing system hardens and becomes pressure-tight.
As the geyser fills with water, the water at the top of the geyser cools down. The cooler water presses down on the hotter water beneath, which causes the water beneath to become superheated. Because the plumbing system is pressure-tight, the pressure of the superheated water is carried all the way to the top and does not leak out into the surrounding soil. As the superheated water nears the surface, its pressure drops and the water flashes and turns quickly into steam, expanding and lifting the water upward in an eruption.
In this geology science fair project, you will build a model geyser and investigate how the depth of the water source affects the eruption of the geyser. Since you will be working with hot water, remember to wear safety goggles and perform the project away from other people. Have fun learning more about the powerful geologic forces that make up the planet Earth!
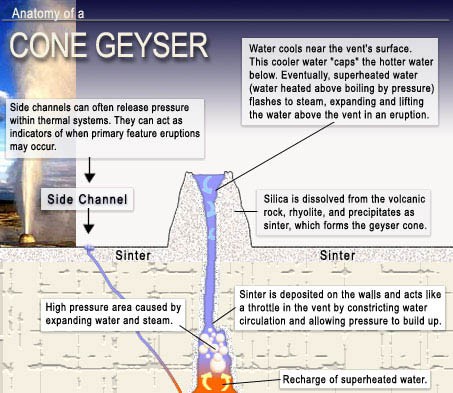 Image Credit: National Park Service / Public domain
An infographic labels and describes the anatomy of a cone geyser. A cone geyser is formed when water containing dissolved silica is pushed towards the surface from inside the Earth's crust. The water containing dissolved silica is called sinter and the sinter is deposited around the area where water is pushed to the surface slowly creating the walls of the cone geyser. Sinter deposits build up in the geyser and trap water under the surface until the pressure from the heated water is enough to breakthrough the blockage. When the water breaks through the sinter deposits it expands as steam and pushes the water above it upward with great force creating a water eruption.
Figure 2. The cross-section of a cone geyser. (National Park Service, 2004.)
Terms and Concepts
- Geyser
- Reservoir
- Superheating
- Geothermal
- Fumarole
- Mudpot
- Fountain geyser
- Cone geyser
- Rhyolite rock
- Silica
- Sinter
Questions
- What are the three factors that are required for a geyser to exist?
- What causes pressure-tight geyser plumbing?
- What is superheated water?
Bibliography
- Streepey, M. (1996, December 12). Geysers and the Earth's Plumbing Systems. Retrieved January 26, 2009.
- Wikipedia Contributors. (2013, March 12). Geyser. Wikipedia The Free Encyclopedia. Retrieved March 13, 2013.
- National Park Service. (n.d.). Geysers and How They Work. Retrieved March 8, 2013.
- Doherty, P. and Muller, E. (n.d.). Geyser: Cyclic hot water fountain. Retrieved January 26, 2009.
Materials and Equipment
Note: If you are carrying out this experiment in a school laboratory, some of the materials and equipment listed below may be more readily accessible.
These items can be purchased from Carolina Biological Supply Company, a Science Buddies Approved Supplier:
- Safety goggles
- Rubber stopper with one central hole. You will need a size 7 stopper.
- Hard glass Pyrex tubing (2 pieces: 1 m long and 0.5 m long). You will need a 5-mm outer diameter. You can have an adult help you use a pipe cutter to cut a 1 m length and a 0.5 m length of tubing.
- Erlenmeyer flask, 500 mL
- Support stand with rings
- Plastic pitcher, 2-qt.
- Drill with a bit that has the same diameter as the glass tubing
- Pipe cutter; available at your local hardware store
- Plumber's putty; available at your local hardware store
- Single burner, portable and with temperature control; available online at Amazon.com
- Liquid measuring cup, 2-cup
- Optional: Paper towels
- Stopwatch
- Lab notebook
- Graph paper
Disclaimer: Science Buddies participates in affiliate programs with Home Science Tools, Amazon.com, Carolina Biological, and Jameco Electronics. Proceeds from the affiliate programs help support Science Buddies, a 501(c)(3) public charity, and keep our resources free for everyone. Our top priority is student learning. If you have any comments (positive or negative) related to purchases you've made for science projects from recommendations on our site, please let us know. Write to us at scibuddy@sciencebuddies.org.
Experimental Procedure
- Find a location with a table and an electrical outlet nearby. Try to find a location that is free of debris.
- Put on your safety goggles. With an adult's help, drill a hole in the bottom center of the plastic container. The hole should be big enough for the glass tubing to be snugly inserted.
- Now insert the 1-m glass tubing into the hole of the rubber stopper. Gently slide the tubing into the hole until it is flush with the bottom of the rubber stopper.
- Fill the Erlenmeyer flask with 200 mL of water. Firmly insert the rubber stopper with the glass tubing into the Erlenmeyer flask. Try to reduce the gap between the flask neck and the stopper. You want to make sure that steam doesn't escape from the flask. You can use a small amount of plumber's putty to seal the rubber stopper against the flask neck.
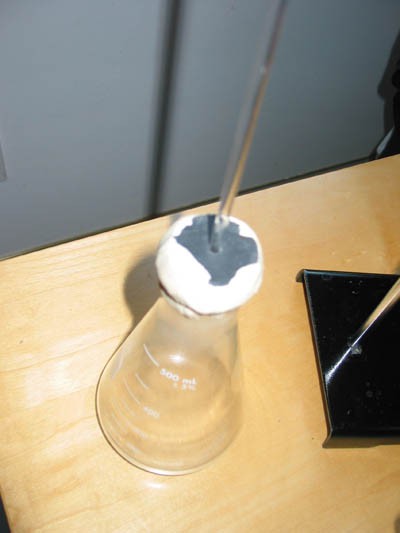 Image Credit: Michelle Maranowski, Science Buddies / Science Buddies
Figure 3. Rubber stopper with glass tubing sealed to the Erlenmeyer flask.
- Place the burner on the floor and plug it in, but don't turn it on yet. Put the ring stand together and position it on the table. See Figure 4, below.
- Place the flask with the rubber stopper on the burner.
- Slide a ring onto the ring stand, over the glass tubing. The ring should be positioned several centimeters below the end of the glass tubing. Don't tighten the ring yet.
- Carefully insert the end of the tubing through the hole in the bottom of the plastic container. Adjust the container so that the glass tubing extends a few centimeters above the bottom of the container, but well below the container's rim.
- Adjust the metal ring so that it is supporting the plastic container. Now tighten the ring to the ring stand. The ring has to support the weight of the plastic container and several cups of water.
- Take a small amount of plumber's putty and seal the glass tubing to the bottom of the plastic container.
- Fill the measuring cup with cool tap water and carefully add the water to the plastic container. Fill the container with enough water that the top of the glass tubing is 2–3 centimeters (cm) below the surface of the water and the surface of the water is well below the rim of the container.
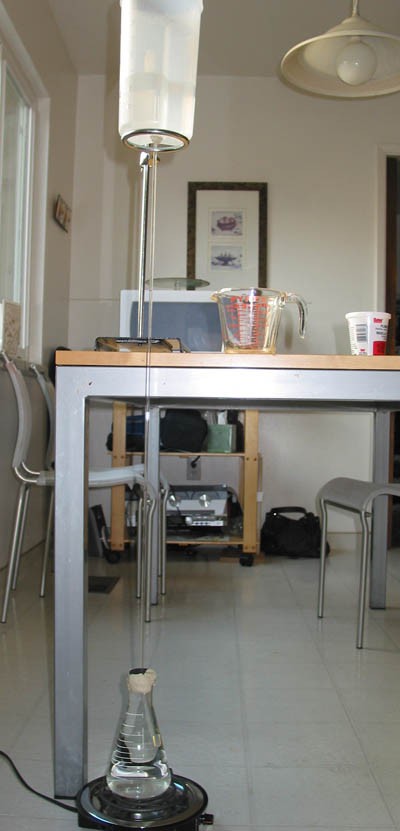 Image Credit: Michelle Maranowski, Science Buddies / Science Buddies
Figure 4. Example of a model geyser.
-
As you are pouring water into the container, some of the water will flow into the Erlenmeyer flask below, through the glass tubing. Keep adding water to the container to maintain the water level at 2–3 centimeters (cm) above the top of the glass tubing, as the water enters the flask below. Try to get as much water into the flask as possible, while keeping the water level in the plastic container at 2–3 cm above the top of the glass tubing. If you're having trouble getting water to flow into the flask, try gently tapping the glass tubing or container. Try to get the flask at least half full. The plastic container should have enough water in it to fill any free space left in the flask and the surface of the water should be 2–3 cm above the end of the glass tubing.
- If some water spills from the container onto the burner, unplug the burner and use paper towels to wipe up the water from the burner and surrounding area. Be careful to not snap the glass tubing. Be gentle when you wipe up any water. Let the burner dry completely. Plug the burner back in when you are sure that there is no water in the burner.
-
Create a data table, like the one below, in your lab notebook.
Length of Glass Tubing = Total Number of Eruptions = Burner Setting =
Cycle Eruption Start Time Eruption End Time Duration of Eruption Time Between Eruptions Average: Average:
- Turn the burner on. Do not leave the burner unattended. Note the setting of the burner in your lab notebook.
- As the water in the flask heats up, you will notice that it does not turn to steam like boiling water in a pot. This is because the water in the tubing is pressing down on the water in the flask and prevents it from turning into steam. The water in the flask is superheated.
- Eventually, a rising water bubble will reduce the pressure in the tubing, the superheated water will turn into steam, and the geyser will erupt. As soon as the geyser erupts, start your stopwatch. Record the start time in your lab notebook. Note the time on the stopwatch when the eruption ends in your data table, but do not stop the stopwatch.
- The eruption stops when the steam and water cool down. The geyser resets itself by sucking cool water from the container back into the flask and the cycle starts again.
- Note down in your data table the time on the stopwatch when the next eruption occurs. Again, note down in your data table when the eruption ends.
- Repeat step 16 until the container of water gets too hot and the difference in temperature between the container of water and the water in the flask is not great enough to refill the system and erupt. Note down how many cycles you were able to get from this geyser model.
- Turn the burner off and unplug it. Let the water in the container and flask cool down to room temperature. Repeat steps 13–19 two additional times, always remembering to record your data in your data table, and to let the water in the model cool down to room temperature between trials. If the water level in the container is not 2–3 cm above the top of the glass tube, then refill the container with water to the proper level.
- After the model has cooled down completely, carefully remove the plastic container from the glass tubing. Immediately block the hole in the container to minimize the amount of water that spills out, and pour the water into the sink (or recycle it and use it to water your plants or for your next set of trials!). Peel off the plumber's putty from the Erlenmeyer flask. Replace the 1-m glass tubing with the 0.5-m tubing. Repeat steps 3–20. If possible, carefully move the model geyser from the floor to the table to accommodate the shorter tubing for these trials.
- Using the data tables, calculate the duration of the eruption and the time between eruptions. To calculate the duration of the eruptions, subtract the start time from the end time. To calculate the time between eruptions, subtract the end of one cycle from the beginning of the next cycle. Calculate the average duration of an eruption and the average time between eruptions. Perform these calculations for each trial and for each length of tubing.
- Now analyze your data. Plot your data. If you would like to learn more about plotting or would like to do your plots online try the following website: https://nces.ed.gov/nceskids/CreateAGraph/default.aspx. Plot the duration data on a scatter plot. Label the x-axis Tubing length and the y-axis Average duration. For this graph, plot the average for each trial. For each tubing length, there should be three data points. On a second scatter plot, label the x-axis Tubing length. and the y-axis Average time between eruptions. Do you notice any patterns in the data? Is there a difference in the eruption times between the 1-m glass tubing and the 0.5-m glass tubing? Is there a difference between the time between eruptions for the 1-m glass tubing and the 0.5-m glass tubing? If so, what is the cause (Hint: read the Exploratorium's science snack on geysers to find a clue)? How many eruptions occurred for the 1-m glass tubing? How many for the 0.5-m tubing?
Ask an Expert
Variations
- Repeat the science fair project with a smaller Erlenmeyer flask.
- Repeat the science fair project with several different heat settings.
- Change the diameter of the tubing and the diameter of the hole in the rubber stopper.
Careers
If you like this project, you might enjoy exploring these related careers: